Training Tips
Your go-to resource for more effective workouts!
Check out my expert advice, practical strategies, and in-depth training tips to help you maximize your gains.

Slow Down Your Reps 🏋️♀️
A common mistake I see gymgoers make is speeding through reps at a quick pace, spending only 1 second on the eccentric and 1 second on the concentric phase. While there are certain phases of your training where moving quickly with explosive power is good (i.e., a power block), most of the time you should move at a slow, controlled pace. When it comes to resistance training, how you move matters just as much as how much you lift. If you’ve ever caught yourself rushing through a set or powering through reps just to get them done, you’re definitely leaving gains on the table. Slowing down your reps is the key to maximizing muscle growth, building strength, and minimizing your risk of injury. Let’s break down why you should be focusing on slow, controlled reps in your training — and how it will benefit your fitness goals.
A common mistake I see gymgoers make is speeding through reps at a quick pace, spending only 1 second on the eccentric and 1 second on the concentric phase. While there are certain phases of your training where moving quickly with explosive power is good (i.e., a power block), most of the time you should move at a slow, controlled pace.
When it comes to resistance training, how you move matters just as much as how much you lift. If you’ve ever caught yourself rushing through a set or powering through reps just to get them done, you’re definitely leaving gains on the table. Slowing down your reps is the key to maximizing muscle growth, building strength, and minimizing your risk of injury.
Let’s break down why you should be focusing on slow, controlled reps in your training — and how it will benefit your fitness goals.
✅ Better Muscle Activation and Mind-Muscle Connection
Moving too quickly through your reps allows momentum to take over, shifting the focus away from the intended muscle group. On the other hand, slowing down allows you to engage the target muscle more effectively.
Moving slowly forces you to control the weight through the full range of motion, which improves the mind-muscle connection (the ability to consciously engage and contract the muscle).
Better activation leads to more balanced muscle development and reduces the risk of compensating with other muscles.
Example: During a lat pulldown, if you pull too quickly, your biceps or shoulders might take over. Slowing down ensures your lats are doing the work.
✅ Increased Time Under Tension (TUT) = More Muscle Growth
While in a hypertrophy (muscle-building) block, it’s important to keep in mind that your muscles need more time under tension (TUT).
Muscle growth (hypertrophy) happens when your muscle fibers experience stress and tension during resistance training. The longer your muscles are under tension, the more muscle fibers you recruit and fatigue — which is exactly what stimulates growth.
When you slow down your reps, you increase time under tension (TUT). This forces your muscles to work harder for longer.
The longer your muscles are under tension, the greater muscle fiber breakdown you’ll get. This is necessary for rebuilding and growth during recovery.
Example: Instead of blasting through a bicep curl in 1 second, try lifting the weight in 2–3 seconds, pausing at the top, and then lowering it over 3–4 seconds. That’s how you maximize TUT 💪
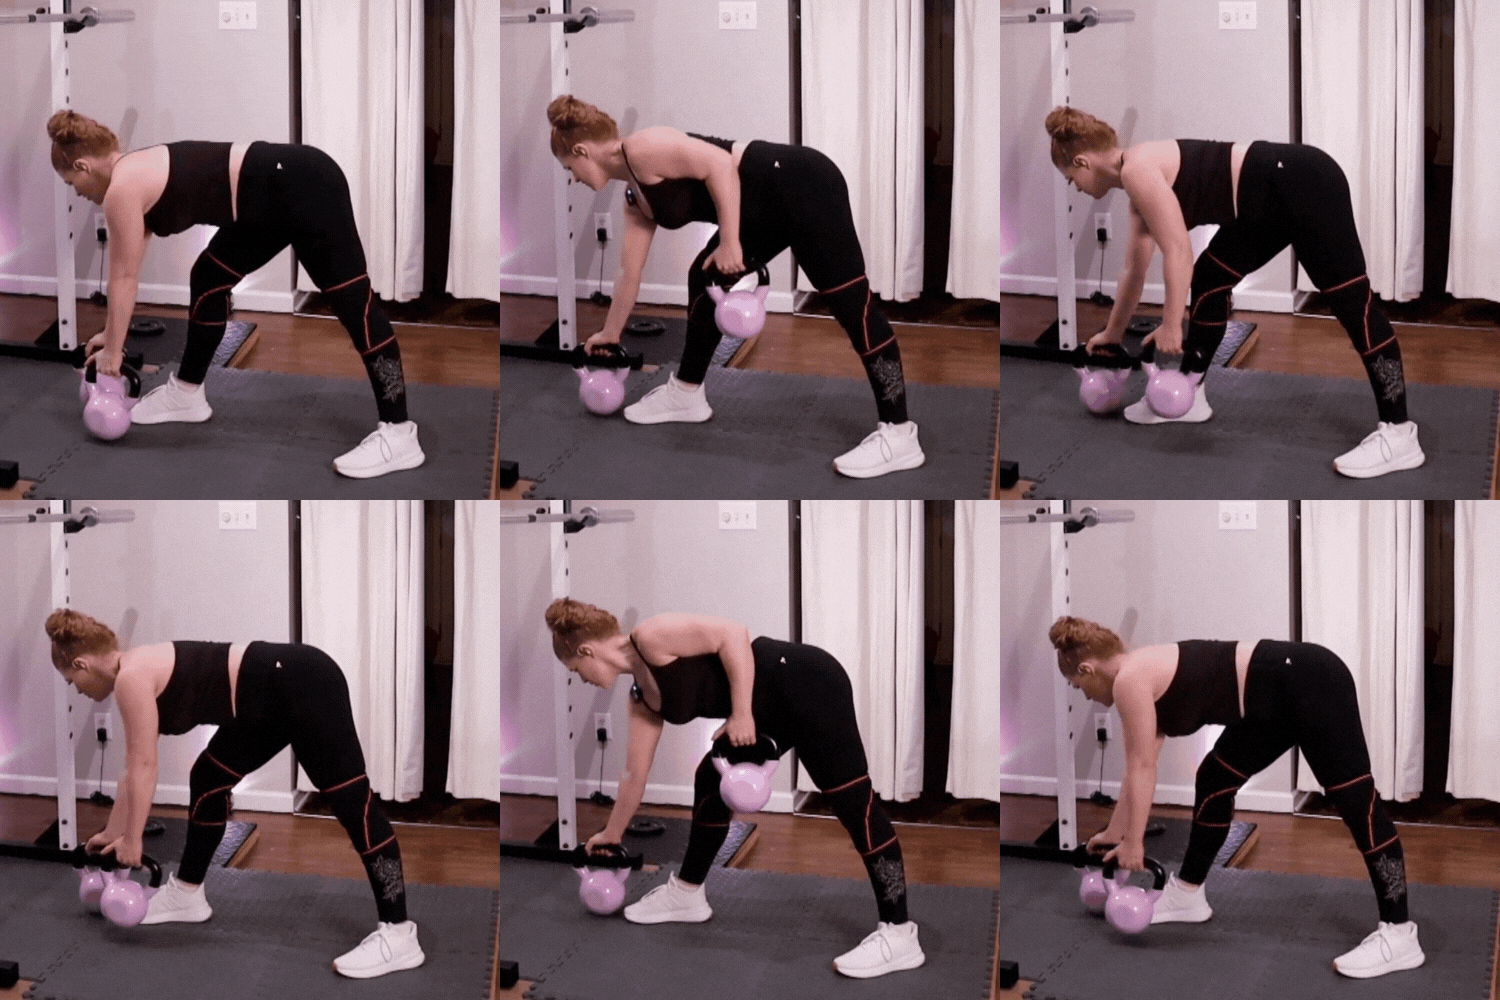
2 sec up, 2 sec down
4 sec down, 2 sec pause, 1 sec up
✅ Increased Muscle Damage and Growth During the Eccentric Phase
Muscles experience the most growth during the eccentric (lengthening) phase of an exercise — for example, lowering the bar in a bench press or lowering your body during a squat. So most of the time, you should practice moving slowly through the eccentric phase of an exercise (at least 2 seconds).
Spending more time during the eccentric phase increases muscle damage, which triggers your body’s repair and growth process.
Slower eccentrics also improve strength by reinforcing control and technique.
Example: During your squats, aim to lower yourself over 3–4 seconds before driving back up. That increased eccentric stress will pay off in strength and size gains.
✅ Improved Control = Lower Injury Risk
Fast, uncontrolled movements can increase your risk of injury by compromising form and putting excess strain on your joints and connective tissue. If you’ve experienced a lot of nagging aches and pains, definitely check out the speed of your lifts. Are you going too fast? If so, that may be part of the problem.
Slowing down ensures that you’re using proper form and controlling the load through the entire range of motion.
It also helps you identify any muscular imbalances or weaknesses since you’re not relying on momentum to carry you through the movement.
Example: A slow, controlled deadlift helps protect your lower back by reinforcing proper bracing and spinal alignment.
🚀 When to Use Fast, Explosive Reps
Fast, explosive movements do have their place in training — especially during power training blocks (when the goal is to build strength and speed). Olympic lifts, plyometrics, and power-focused exercises like kettlebell swings are meant to be performed with speed and intensity.
However, if your goal is muscle-building (hypertrophy) or strength-building, your default should be to practice your reps at a slow and controlled pace. Explosive training recruits fast-twitch muscle fibers and develops power—but it doesn’t provide the sustained tension and muscle damage necessary for maximum growth.
🔥 How to Slow Down Your Reps
If you’ve been training fast, it can take some time to adjust to a slower tempo — but the payoff is worth it. Here’s how to make the shift:
👉 Use a tempo count: Try a 3–1–3 tempo: 3 seconds to extend (eccentric), 1-second pause, 3 seconds to contract (concentric).
👉 Focus on the eccentric: Make the lowering phase slower than the lifting phase to maximize muscle stress. For this, try a 4-2-1 tempo: 4 seconds to extend (eccentric), 2 second pause, and 1 second to lift (concentric).
👉 Stay mindful of your form: Engage the target muscle throughout the entire movement — if you feel other muscles taking over, slow down and adjust your form.
👉 Reduce the weight if needed: You might need to lighten the load at first to stay controlled — that’s okay! Muscle-building comes from tension, not ego-lifting.
💪 Slow and Steady Wins the Muscle-Building Race
If you’ve been feeling stuck in your progress or not seeing the muscle definition you expect, try slowing down your reps. Controlled, intentional movement increases time under tension, improves muscle activation, and leads to more strength and size over time. Save the explosive reps for power days — and for everything else, slow it down and feel the burn!
Let me know your thoughts in the comments below!

How to Train Around Injuries
Injuries can happen to anyone, no matter whether you’re a beginner to fitness or a seasoned athlete. While there are many things that we can do to reduce our risk of injury in the gym, there’s always a certain amount of risk that you may get injured. But don’t worry–you’re not going to lose all of your gains. And in many cases you actually can continue to train despite having an injury. Let’s take a look at the common types of injuries that exercisers sometimes experience. Then we’ll talk about ways to deal with these injuries and train around them.
Read time: 7-8 minutes
Injuries can happen to anyone, no matter whether you’re a beginner to fitness or a seasoned athlete. While there are many things that we can do to reduce our risk of injury in the gym, there’s always a certain amount of risk that you may get injured.
But don’t worry–you’re not going to lose all of your gains. And in many cases you actually can continue to train despite having an injury. Let’s take a look at the common types of injuries that exercisers sometimes experience. Then we’ll talk about ways to deal with these injuries and train around them.
Common Types of Injury
Injuries can occur in the gym due to various reasons, including improper technique, overexertion, lack of warm-up or stretching, equipment malfunction, or accidents. It’s important to be aware of the common injuries and their causes so that you can practice injury prevention.
Here are some common types of injuries that can happen in the gym:
Strains and sprains: These are among the most common gym injuries and typically affect muscles, tendons, and ligaments. They can occur when you overstretch, overexert, or use incorrect form during exercises.
Muscle tears: A muscle tear, also known as a muscle strain, can happen when a muscle is stretched beyond its limits or subjected to sudden excessive force. This can occur during weightlifting, sudden movements, or explosive exercises.
Joint injuries: Gym workouts that involve repetitive movements, heavy weights, or poor form can lead to joint injuries. Common examples include sprained ankles, dislocated shoulders, or knee injuries such as ligament tears (e.g., ACL or MCL tears).
Back injuries: Lifting heavy weights with improper form or performing exercises that strain the back can result in back injuries. These can include muscle strains, herniated discs, or vertebral fractures.
Shoulder injuries: Weightlifting exercises that involve overhead movements, such as shoulder presses or snatches, can put strain on the shoulders. This can lead to shoulder impingement, rotator cuff tears, or dislocations.
Tendinitis: Repetitive movements and overuse can cause inflammation of the tendons, leading to tendinitis. Common areas affected in the gym include the elbows (tennis elbow), wrists, or Achilles tendon (Achilles tendinitis).
Fractures and broken bones: Accidents or equipment malfunctions in the gym can result in fractures or broken bones. These injuries can occur from falling off equipment, dropping weights, or collisions.
Contusions and bruises: Bruises or contusions can happen in the gym when there is direct impact or trauma to the body, such as bumping into equipment or dropping weights on yourself.
Heat-related injuries: Intense workouts without proper hydration and ventilation can lead to heat-related injuries like heat exhaustion or heatstroke. These conditions are more likely in hot and humid environments.
It's important to note that while these injuries are relatively common, many of them can be prevented or minimized by using proper form, warming up adequately, using appropriate equipment, and seeking guidance from a qualified trainer or instructor.
Injury Protocol
Whether it happens in or outside the gym, it’s important to follow certain guidelines when dealing with an injury during training:
1 Never push through sharp pains while training
One of the most critical rules when it comes to injuries is to listen to your body. While the saying "no pain, no gain" has been popularized, it is essential to recognize the difference between muscle discomfort and sharp pain. Sharp pain is a clear indication that something is wrong, and pushing through it can exacerbate the injury. Instead, prioritize your long-term well-being and avoid any movements or exercises that cause sharp pain.
If you’re exercising and experience sharp, sudden pain stop immediately and assess your form, lower the level of resistance, modify the exercise you’re doing, or skip the exercise altogether. If the pain persists even after you stop the exercise, you’ll definitely want to see a medical professional to assess the injury and avoid long-term damage.
2 Get it checked out by a doctor/physical therapist
Strains, sprains, and muscle tears may be common injuries in the gym, however my advice is always to consult a qualified healthcare practitioner if you experience any of these things. A doctor or physical therapist who specializes in sports medicine will assess the injury, provide an accurate diagnosis, and offer specific recommendations tailored to your condition.
Physical therapists also can give you specific exercises to help facilitate healing while avoiding movements and exercises that could make your injury worse. Follow their guidance on the appropriate treatment plan, including exercises to practice and movements to avoid during your recovery–and make sure to share their recommendations with your personal trainer or coach!
3 R.I.C.E. vs. M.E.A.T.
For many years, the standard advice for treating injuries in exercisers and athletes was the acronym R.I.C.E. (Rest, Ice, Compression, Elevation). However in recent years, studies have suggested that complete rest and applying ice might prolong healing for many types of injuries (especially muscle strains & tears).
Instead, most practitioners today recommend following the M.E.A.T. protocol, which stands for:
Movement: Controlled, pain-free movement stimulates blood flow, maintains mobility, and prevents stiffness
Exercise: Gradual strengthening and rehabilitation exercises rebuild tissue resilience.
Analgesics: Pain management strategies that avoid NSAIDs, which can slow healing.
Treatment: Hands-on therapies like massage, physical therapy, or chiropractic care to enhance recovery.
Unlike R.I.C.E., which focuses on immobilization and reducing inflammation, M.E.A.T. encourages active recovery to promote tissue repair, reduce healing time, and prevent long-term weakness.
Why M.E.A.T. Works Better Than R.I.C.E.
1. Blood Flow Promotes Healing
Ice restricts blood flow and can delay the body’s natural healing response. While it may temporarily numb pain, it can also slow the inflammatory process that’s crucial for recovery. Movement, on the other hand, increases circulation, delivering oxygen and nutrients to the injured tissues.
2. Strengthens Tissues Instead of Weakening Them
Resting too much after an injury can lead to stiffness, muscle atrophy, and decreased function. By incorporating movement and progressive exercise early in the recovery process, you help maintain strength, flexibility, and neuromuscular control.
3. Long-Term Recovery Focus
R.I.C.E. is mostly about short-term symptom management, whereas M.E.A.T. is designed to support long-term healing and tissue remodeling. Instead of just reducing swelling, M.E.A.T. promotes functional recovery, ensuring that the injured area can handle real-world demands once healed.
How to Apply the M.E.A.T. Protocol
Early-Stage Recovery (Days 1-3)
Introduce gentle, pain-free movement (e.g., ankle circles for a sprained ankle).
Avoid complete immobilization unless necessary.
Use pain management techniques like heat, massage, or natural analgesics instead of NSAIDs.
Mid-Stage Recovery (Days 4-14)
Begin low-intensity rehabilitation exercises (e.g., resistance band work, bodyweight movements).
Continue soft tissue treatments (massage, physiotherapy, or chiropractic adjustments).
Gradually increase movement patterns while monitoring pain levels.
Late-Stage Recovery (Week 2 and Beyond)
Progress to more challenging strength training and sport-specific drills.
Address mobility restrictions and muscle imbalances.
Ensure full function and resilience before returning to full activity.
When to Use M.E.A.T. Instead of R.I.C.E.
M.E.A.T. is ideal for most soft tissue injuries, including muscle strains, ligament sprains, and tendon injuries. However, for acute injuries involving significant swelling or fractures, brief use of R.I.C.E. in the first 24-48 hours may be beneficial before transitioning to M.E.A.T.
Always consult a healthcare professional to determine which approach is best for your specific injury.
How to Train Around an Injury
An injury doesn't mean you have to abandon your fitness routine entirely. In many cases, you can continue training by working around the injured area. Modify your exercises or explore alternative movements that don't exacerbate the injury.
As your injury heals, you can gradually add back in gentle movement and exercise to the affected area. For example, if you have an ankle sprain you can do workouts focusing on upper body and core training for the first two weeks or so. Once you’re able to walk without much pain, then you can add back in gentle light-weight-bearing exercise like using the cardio bike. As the joint gets stronger again, you can begin to add back in weight-bearing exercises like squats, leg presses, and deadlifts. Remember to listen to your body and avoid pushing through pain as your injury heals.
You may need to do special rehab exercises for the affected area for a couple of weeks or months to get back to your previous strength level and range of motion in the affected area. Make sure to stay consistent in your rehab exercise routine–the more you do these exercises, the faster you can recover!
You're not going to lose all of your progress.
It's natural to worry about losing the progress you've made when dealing with an injury. However, it's essential to understand that setbacks are a part of any fitness journey. Taking time off to recover and heal is crucial for long-term success.
Remember, fitness is a lifelong pursuit, and one setback does not define your journey. Embrace this opportunity to focus on other aspects of your fitness, such as flexibility, mobility, or core strength. By prioritizing your health and focusing on rehabilitation, you will bounce back stronger than ever before.
Additionally, scaling back your intensity or adjusting your training plan can prevent further damage and allow your body to heal effectively.
If you have any questions while working through your program, feel free to reach out. If you are one of my 1-on-1 personal training clients, you can message me directly in the Trainerize Fitness App. Otherwise, you can also get in touch with me in the Coaching Corner Discord server or chat when I’m live on my Twitch channel throughout the week.

How to Breathe While Lifting
As much emphasis as you place on what muscles you feel working during an exercise, put an equal focus on being aware of your breath. Effective breathing not only helps maintain stability and control but also maximizes performance and reduces the risk of injury. Let’s look at the 3 effective breathing techniques to use while lifting.
One thing that can help you to get more out of your resistance training workouts is to pay attention to your breathing.
A lot of people make the mistake of holding their breath while doing an exercise because they’re so focused on the movement. This can lead to dizziness or even passing out–which we definitely don’t want, especially while you’re holding equipment!
As much emphasis as you place on what muscles you feel working during an exercise, put an equal focus on being aware of your breath. Effective breathing not only helps maintain stability and control but also maximizes performance and reduces the risk of injury.
First, let’s talk about how to practice belly breathing while training.
Belly Breathing (Diaphragmatic Breaths)
It’s important to practice breathing into your belly (diaphragmatic breaths) whenever you’re working out. Belly breathing involves using your diaphragm muscle and the deep abdominal muscles to draw deeper breaths and stabilize the core.
Before doing a resistance training exercise, take a few moments to practice breathing into your belly so that you can carry that technique into each set.
To practice belly breathing:
Sit or stand with a tall posture and your shoulders relaxed.
Place one hand on your belly and another hand on your chest.
Take a deep breath in through your nostrils, and as you inhale, try to move your bottom hand by pushing your belly out while avoiding moving the chest.
Exhale slowly through your mouth, and feel your belly recede back inwards.
Repeat for several repetitions, establishing a rhythm of deep inhales and slow exhales. While doing your resistance training exercises, try to practice breathing into your belly to stabilize your core and better control the movement.
Common Breathing Patterns
Now that you know how to breathe into your belly, let’s take a look at the different breathing patterns that you may use during your resistance training workouts.
Natural Breathing
For exercises that do not require significant exertion or when performing high-repetition sets, a natural breathing pattern may be more suitable. This involves breathing rhythmically without consciously controlling the breath during the movement. Natural breathing is particularly effective for priming and mobility exercises like dynamic stretches, band pull aparts, or monster walks where the movement is less intense and the focus is on maintaining a steady pace.
Rhythmic Breathing
For exercises that are more strenuous or that use moderate resistance, timing your breathing with your movement can improve your overall performance. While there are various methods, one common approach is to inhale during the less challenging phase and exhale during the more challenging phase of the exercise.
Typically, this ends up being an inhale on the extension (eccentric phase) and an exhale on the contraction (concentric phase) of the exercise.
For instance, in a leg press, inhale as you lower the weight and exhale as you push it away. During a bicep curl, inhale as you lower the weight down, exhale as you lift the weight up. In a squat, inhale as you lower your hips down, and exhale on the way up. This synchronization can improve coordination, maximize power output, and promote overall efficiency during resistance training.
The Valsalva Maneuver (i.e. “Bracing”)
For heavy lifts using a large amount of weight, many exercisers use what is called the Valsalva maneuver to brace their core and maximize abdominal stability. This breathing technique involves taking a deep breath into your belly and holding it there while isometrically contracting the muscles in the core (abdominals, obliques, pelvic floor muscles, etc). By creating intra-abdominal pressure, the Valsalva maneuver enhances core stability and spinal support, which is crucial for staying safe while lifting heavier loads.
There are two main approaches to using the Valsalva maneuver while performing heavy lifts.
Many people prefer to exhale, inhale, and rebrace between every repetition of their heavy exercises, especially when lifting very heavy loads for a short number of reps (singles, doubles, or triples). Holding the breath during the Valsalva maneuver can temporarily increase blood pressure and puts strain on the cardiovascular system. Taking a breath between each rep relieves some of the strain on the cardiovascular system.
Lifters who are doing sets of high volume (many repetitions) of a heavy lift like squats, deadlifts, or bench press may choose to perform several repetitions while holding a single breath. They start the set by taking one big breath and then brace before performing several repetitions. When they feel they need to breathe again, they’ll pause mid-set to exhale, inhale, re-brace, and then continue their set. They may pause and breathe several times during a single set, doing as many as 2-5 reps in one breath at a time.
One benefit to this breathing pattern is that it allows the athlete to maintain intra-abdominal pressure through the course of several reps–whereas breathing between each rep can lead to a temporary dip in intra-abdominal pressure, which risks destabilizing the spine.
The drawback is that it keeps the blood pressure elevated for a longer period of time and can put strain on the cardiovascular system.
It's important to note that the choice between utilizing the Valsalva maneuver between every repetition or performing several repetitions in one breath cycle depends on various factors, including the exercise being performed, the load and intensity, and individual preferences and goals.
Ultimately, both approaches have their merits and can be effective when employed correctly. The key is to prioritize safety, stability, and performance by selecting the breathing technique that aligns with the demands of the exercise and your individual training goals.
Keep in mind that this breathing pattern may not be right for everyone, as it increases abdominal pressure, puts strain on the cardiovascular system, and also puts pressure on the eyes. Avoid using this technique if you have heart disease, are pregnant, if you have retinopathy (damage to the retina in the eye), or have an implanted eye lens.
Be Mindful of Your Breath
Remember, breathing is not just an automatic process. When you practice breathing mindfully into your belly in a controlled pattern, it can be a powerful tool to optimize your workouts and maximize your gains.
Experiment with different approaches, such as the Valsalva maneuver, exhaling during the concentric phase, inhaling during the eccentric phase, natural breathing, or synchronized breathing patterns. Let me know which ones work best for you!

How Hard Should You Train to Build Muscle? (RIR, RPE, & 1RM)
One of the most common questions in strength training is: "How much weight should I use, and how many reps should I do?" Doing resistance training effectively is a delicate balance of adding enough challenge to your muscles, but not so much that you sacrifice proper form (or put yourself at risk of injury). In today’s message, we’ll look in detail at how you can monitor your intensity while doing your resistance training exercises to maximize your gains while staying safe, using methods like RiR, RPE, and percentage 1RM.
One of the most common questions in strength training is: "How much weight should I use, and how many reps should I do?"
Doing resistance training effectively is a delicate balance of adding enough challenge to your muscles, but not so much that you sacrifice proper form (or put yourself at risk of injury).
In today’s message, we’ll look in detail at how you can monitor your intensity while doing your resistance training exercises to maximize your gains while staying safe.
Sets & Reps Recommendations
For muscle-building, experts generally recommend performing a weekly total of between 10 and 20 sets for each muscle group. You can do a variety of exercises for each muscle group, as long as the total number of sets comes out to between 10 and 20 each week.
You can split your sets up in several ways, according to your training schedule:
If you’re a beginner and only training between 1 and 3 times per week, you might prefer to split up your sets between your workouts. For example, to work the quads on Day 1, you might do 3 sets of squats, on Day 2 you might do 4 sets of lunges, and on Day 3 you might do 3 sets of leg press. This will prevent you from overly tiring the muscle group past what your body can properly recover from.
If you’re intermediate or advanced and training 3 or more times per week, you might benefit more from doing most of your sets for a muscle group in one or two workouts. For this reason, many intermediate/advanced exercisers split their workouts into muscle-group focus days (Day 1: Legs, Day 2: Back, Day 3: Arms, etc)
Some people prefer to work on different muscle groups according to movement patterns like pushing, pressing, pulling, squatting, hip hinging, and rotation. This is generally best for athletes or exercisers who are interested in moving better. For example, a popular movement-focused split is called Push-Pull-Legs (Day 1: Push, Day 2: Pull, Day 3: Legs).
Regardless of your schedule, for muscle-building sets it’s generally recommended to do 2-3 sets per exercise, working within a high rep range of between 8 and 25 reps per set. Rest should be between 30 seconds and 2 minutes between sets.
Weight Recommendations
Use an amount of weight that gets your target muscles “burning” within the recommended number of reps per set in your program.
For example: If your recommended reps are 10-15 reps, use a weight that has your muscles getting tired and approaching muscle failure on reps 10, 11, 12, 13, 14, or 15 of each set.
If you have tested your 1 rep max (1RM) in an exercise, you can also base your training weight on a percentage of your 1RM. For muscle-building, experts generally recommend using between 60% and 75% of your 1RM.
When to Stop Your Set
It’s important to listen to your body while performing your sets. This will allow you to determine when you should end your set to maximize gains and minimize your risk of injury.
As I mentioned above, the goal in muscle-building sets is to fatigue the target muscle groups and let them “burn” as they approach failure. In general, it’s best to stop just short of muscle failure to avoid injury and overtraining.
But how can you tell if you’re getting close enough to muscle failure?
Reps in Reserve (RiR)
Most of the time for muscle-building, it’s best to leave between 1 and 3 reps in reserve in each training set. This means stopping when you can only do 1, 2, or 3 more reps before your muscles give out. This is usually denoted in training programs as 1RiR, 2RiR, or 3RiR.
Sometimes it’s hard to gauge how close you are to muscle failure. One way to work around that is to perform what’s called an AMRAP set (AMRAP stands for “as many reps as possible”). To do this, perform as many reps as you can until your muscles completely give out, or once you find you can no longer keep good form. Write down how many reps you performed in your AMRAP in your fitness journal or tracking app.
After your AMRAP set, compare the number of reps you performed with the number of reps recommended per set in your program. If you had to stop within your recommended rep range, you are likely using just the right weight for that exercise. In future sets, stop the set at 1, 2, or 3 reps before your AMRAP total.
If, however, you were able to do 5 or more reps above the recommended number of reps in your program, that’s a sign that you should use more weight for that exercise in the future. If, on the other hand, you could barely get the minimum number of recommended reps, then you should use less weight.
Doing AMRAP sets can help you get a sense of what it feels like to approach muscle failure. But paying attention to how fast or slow your reps are can also give you a clue of when to stop your set. You should be able to perform most of the reps of your set at a pace of 2 seconds “up” and two seconds “down” (unless your program recommends a different speed). Once your reps begin to slow down, end your set before your technique breaks down.
Rate of Perceived Exertion (RPE)
Another way to monitor the intensity of your training is to use the Rate of Perceived Exertion (RPE) scale. At the end of every set of an exercise, ask yourself “How hard am I working on a scale of 1 to 10:
RPE 1-4: Light resistance that can be used for mobility, recovery, and form emphasis.
RPE 5: Warmup Resistance Level (5 Reps in Reserve)
RPE 6: 4 Reps in reserve. Resistance level that one can move quickly for speed work (+/- 8 reps pending on speed/training goal).
RPE 7: 3 Reps In Reserve. Able to move quickly, form stays solid, and you could definitely get 3 more reps.⠀
RPE 8: 2 reps in Reserve. Resistance level is challenging but isn’t so heavy that you couldn’t do at least 2 more reps.
RPE 9: 1 rep in reserve. Tough but could squeeze out one more rep if you needed to.⠀
RPE 10: 0 reps in reserve. Max effort, couldn’t do another rep if your life depended on it.
In general, you should work at an RPE between 7 and 8 (sometimes 9) to make muscle gains.
If an exercise is too easy, you can make adjustments (like adding more weight, more reps, or do a more difficult variation of the exercise). If it’s really difficult for you to do the recommended number of reps in each set, then you’ll want to reduce the resistance or weight for that exercise.
When you’re first learning a new exercise, I recommend practicing the movement for 1 or 2 sets at an RPE level 4 or 5. This means that you’re putting in effort but not tiring yourself out in any way.
Once you get familiar with the movement, then you can gradually challenge yourself by adding more resistance (using more weight or a heavier band). Keep it light initially, starting with a low weight/resistance level for 1 or 2 sets. Adjust the weight or resistance until you’re working at an RPE level 6 or 7. At that point, you should start to feel tired in the last few repetitions and you may feel the target muscles beginning to burn.
As you get more comfortable with the technique of the exercise, you can begin to challenge yourself at an RPE level 8 or 9. This means using a weight and doing a number of repetitions that fatigues the muscles and really has them burning by the last repetition, until you feel like you could only do 1 or 2 more reps before your muscles give out.
As you add on more weight to challenge yourself, remember to always prioritize doing your exercises with good technique while keeping your body in alignment. Never sacrifice good form to add more weight or squeeze out another rep–especially as a beginner. Neglecting your technique to do more can lead to injury or muscle strain.
Practice Progressive Overload
Keep in mind that as you get stronger, you will need to do more repetitions and use more weight to fatigue your muscles and keep them challenged. Increase the number of reps that you do in each set over several weeks until you are able to do the maximum number of reps recommended in your program. At that point, you can either add another set of the exercise, or you can increase the weight gradually by about 10-20% at a time (or to a weight that feels more challenging within the recommended rep range for each set).
A good rule of thumb to follow is the rule of two: if you’re able to perform the same amount of weight with the same number of reps two workouts in a row, then progress the exercise by either adding another set or increasing the weight.
Final Thoughts
Choosing the right weight and rep scheme doesn’t have to be complicated. Whether you prefer the intuitive approach of RIR, the subjective feedback of RPE, or the structured guidance of percentage-based training, all three methods can help you optimize your workouts. The key is consistency—track your progress, listen to your body, and adjust as needed.
Which method do you prefer? Let me know in the comments!

How to Relieve Tight Muscles
Tightness in the muscles can be a real pain in the neck (literally).
Whether you work out or have stress, bad posture, or poor movement patterns, you probably have experienced tightness in your muscles at some point.
Tight muscles can be uncomfortable, limit your mobility, and even hinder your progress in the gym. Finding relief is key to keeping your body feeling and functioning at its best.
Here are my trainer tips on how to get relief from tight muscles and keep them from holding you back.
Tightness in the muscles can be a real pain in the neck (literally).
Whether you work out or have stress, bad posture, or poor movement patterns, you probably have experienced tightness in your muscles at some point.
Tight muscles can be uncomfortable, limit your mobility, and even hinder your progress in the gym. Finding relief is key to keeping your body feeling and functioning at its best.
Here are my trainer tips on how to get relief from tight muscles and keep them from holding you back.
1. Prioritize Proper Warm-Ups
Jumping straight into a workout without a proper warm-up can cause muscle tightness and increase your risk of injury. Always take 5-10 minutes to warm your body up with some moderate-intensity cardio, dynamic stretches, and priming exercises. This helps increase blood flow while preparing your muscles and joints for activity.
2. Stretch Regularly (But the Right Way)
Stretching can help alleviate muscle tightness, but timing matters. Before workouts, focus on dynamic stretching (controlled, movement-based stretches) to warm up your muscles. After your workouts, incorporate static stretching (holding a position for 20-30 seconds) to enhance flexibility and reduce post-workout stiffness.
I generally don’t recommend spending too much time on static stretching at the beginning of a workout since it can bring your heart rate and core temperature back down to a resting state. If you do need to perform static stretches on particularly tight muscles during your warmup, try to keep it brief and spend no longer than 2-3 minutes on static stretching.
3. Use Foam Rolling & Self-Myofascial Release
If you find that your muscles are tight even after warming up, stretching, and doing priming exercises, you may find it helpful to perform self-myofascial release techniques using a foam roller. Foam rolling and other myofascial release techniques (like using a medicine ball, lacrosse ball, or theragun) can help loosen tight muscles by breaking up adhesions in the muscle tissue and improving circulation.
Spend 30-60 seconds on each tight area, applying slow, controlled pressure. Pay extra attention to commonly tight spots like the quads, hamstrings, calves, and upper back.
How to foam roll on your legs:
How to foam roll your upper body:
4. Stay Hydrated & Nourished
Dehydration and electrolyte imbalances can contribute to muscle cramps and tightness. Make sure you’re drinking enough water throughout the day and replenishing electrolytes, especially after intense exercise. Magnesium-rich foods like spinach, nuts, and bananas can also help muscles relax.
5. Move More Throughout the Day
Sitting for long periods can cause muscle stiffness, particularly in the hips, hamstrings, and lower back. Take breaks to stand up, walk, or do a few mobility drills every hour. Small movements can prevent muscles from tightening up due to prolonged inactivity.
I have a reminder set to my watch to get up and move if I’m sedentary for 2 hours. When the alert goes off, I get up and do an active task like tidy up my workspace, walk my dog, or do some chores. If you’re at work, you can take a lap around the office, go fill up your water bottle, or stand up and stretch.
6. Prioritize Recovery with Rest & Sleep
Your muscles repair and recover while you sleep. If you’re constantly feeling tight and sore, ensure you’re getting 7-9 hours of quality sleep per night. Incorporating rest days into your training schedule also gives your muscles time to recover and prevents chronic tightness.
7. Try Heat or Cold Therapy
Heat increases blood flow and helps muscles relax, making it great for general tightness. Try using a heating pad or warm bath with Epsom salts. On the other hand, if muscle tightness is caused by inflammation or injury, ice can help reduce swelling and discomfort. Keep a warm or cold compress on the affected area for 20-30 minutes.
8. Get a Massage or Try Assisted Stretching
A professional massage or assisted stretching session can target deep muscle tension and improve overall flexibility. If tight muscles are a recurring issue, incorporating these services into your routine might be worth it. Look up massage therapy, physical therapy, or stretching studios in your area.
9. Address the Root Cause
Sometimes, muscle tightness is a symptom of an underlying issue like poor posture, overtraining, or muscular imbalances. If you’re experiencing persistent tightness, consider working with a trainer (like me!) to assess your movement patterns and address any weaknesses.
Final Thoughts
Muscle tightness doesn’t have to slow you down. By incorporating these techniques into your routine, you can improve mobility, prevent discomfort, and keep progressing in your fitness journey. If you’re struggling with chronic tightness and need personalized guidance, reach out—I’d love to help!

Troubleshoot Your Bench Press
If you want a strong upper body, bench press is one of the best exercises to train. This compound exercise targets multiple muscle groups, including the pecs, delts, triceps as well as stabilizing muscles throughout your core and legs. In this post, I share my tips for fixing common errors with the bench press to perfect your technique, maximize your gains, and reduce your risk of injury.
If you want to have a strong upper body, bench press is one of the best exercises to train. This compound exercise targets multiple muscle groups, including the pecs, delts, triceps as well as stabilizing muscles throughout your core and legs.
The bench press movement mimics various pushing actions that we do in everyday life. Having a strong bench can improve your ability to perform tasks like pushing objects, lifting heavy loads, and improving sports performance in activities like football, basketball, and wrestling.
Another reason that I love practicing and teaching the bench press is that it’s a damn fun lift–especially when you get up into heavier loads. Everyone I’ve taught bench press says the same thing: it feels empowering to move big weight.
Before you start loading up the bar with heavy weight, however, it’s important to take the time to master the technique of the bench press with lower weight and high-rep sets.
Let’s take a look at how to do the bench press with good technique. I’ll share with you some of the important cues that I give my clients to help them get all the pieces moving together.
First, let’s talk about which muscles are engaged and responsible for movement during the bench press exercise. By understanding the actions and functions of each muscle group, you can focus on engaging them properly during the bench press. This awareness enhances your mind-muscle connection, which will help you to lift more safely and effectively.
The prime movers of the bench press (i.e., the muscles that extend and contract) are the pecs, deltoids, and tricep:
Pectoralis major (pecs): The pectoralis major is the primary muscle targeted during the bench press. It consists of the clavicular (upper) and sternal (lower) heads. When activated, the pectoralis major is responsible for horizontal adduction, which brings the upper arm toward the midline of the body. It also assists in shoulder flexion, extension, and medial rotation.
Anterior deltoids (delts): The anterior deltoids, located at the front of the shoulders, assist the pectoralis major in shoulder flexion during the bench press. They help raise the arms up towards the starting position and provide stability during the movement.
Triceps brachii: The triceps brachii, a three-headed muscle at the back of the upper arms, are heavily engaged during the bench press. They extend the elbow joint, allowing for complete extension of the arms during the pressing phase of the exercise. The triceps are responsible for the lockout portion of the movement.
Many other muscles have to also engage isometrically (meaning they stay fired up without moving) to stabilize your body while you perform the bench press. For example, your lats, external shoulder rotators, and traps all have to stay engaged to stabilize your shoulders on the bench. Your glutes, erector spinae, hamstrings, and quads also have to fire up to keep your lower body stable. Essentially everything from the shoulders down needs to be engaged to help you stabilize while performing the bench press.
How to Do the Bench Press
Before doing bench press, make sure that to set up the equipment properly:
If you’re using a detached bench, place the bench perpendicular to the rack so that your head will be right under the bar on the rack.
If you’re using j-hooks, set them to the height of just below where your hands would reach with your arms extended up while laying flat on the bench.
Place the bar on the j-hooks (or on the rack at the height just below where your hands reach while lying on the bench).
Set up your safeties to the height that would catch the bar if you fail the lift and need to bail. If you don’t have safeties, make sure to have someone there to spot you.
Now that your equipment is set up, it’s time to get into position for doing the exercise:
Lay down on the bench face-up with your feet on the floor (either heels or balls of your feet).
Reach up and grab the bar where your hands are equal distance from the center of the bar (use the rings on the bar as a guide)
Engage the muscles all along the back of your body:
fire up your back and push your shoulders into the bench
squeeze your glutes (butt) and push your feet into the floor
engage your abdominals
push your chest up towards the ceiling
Take a deep breath and brace your core, then unrack the weight, bringing it to right above your shoulders with your arms straight.
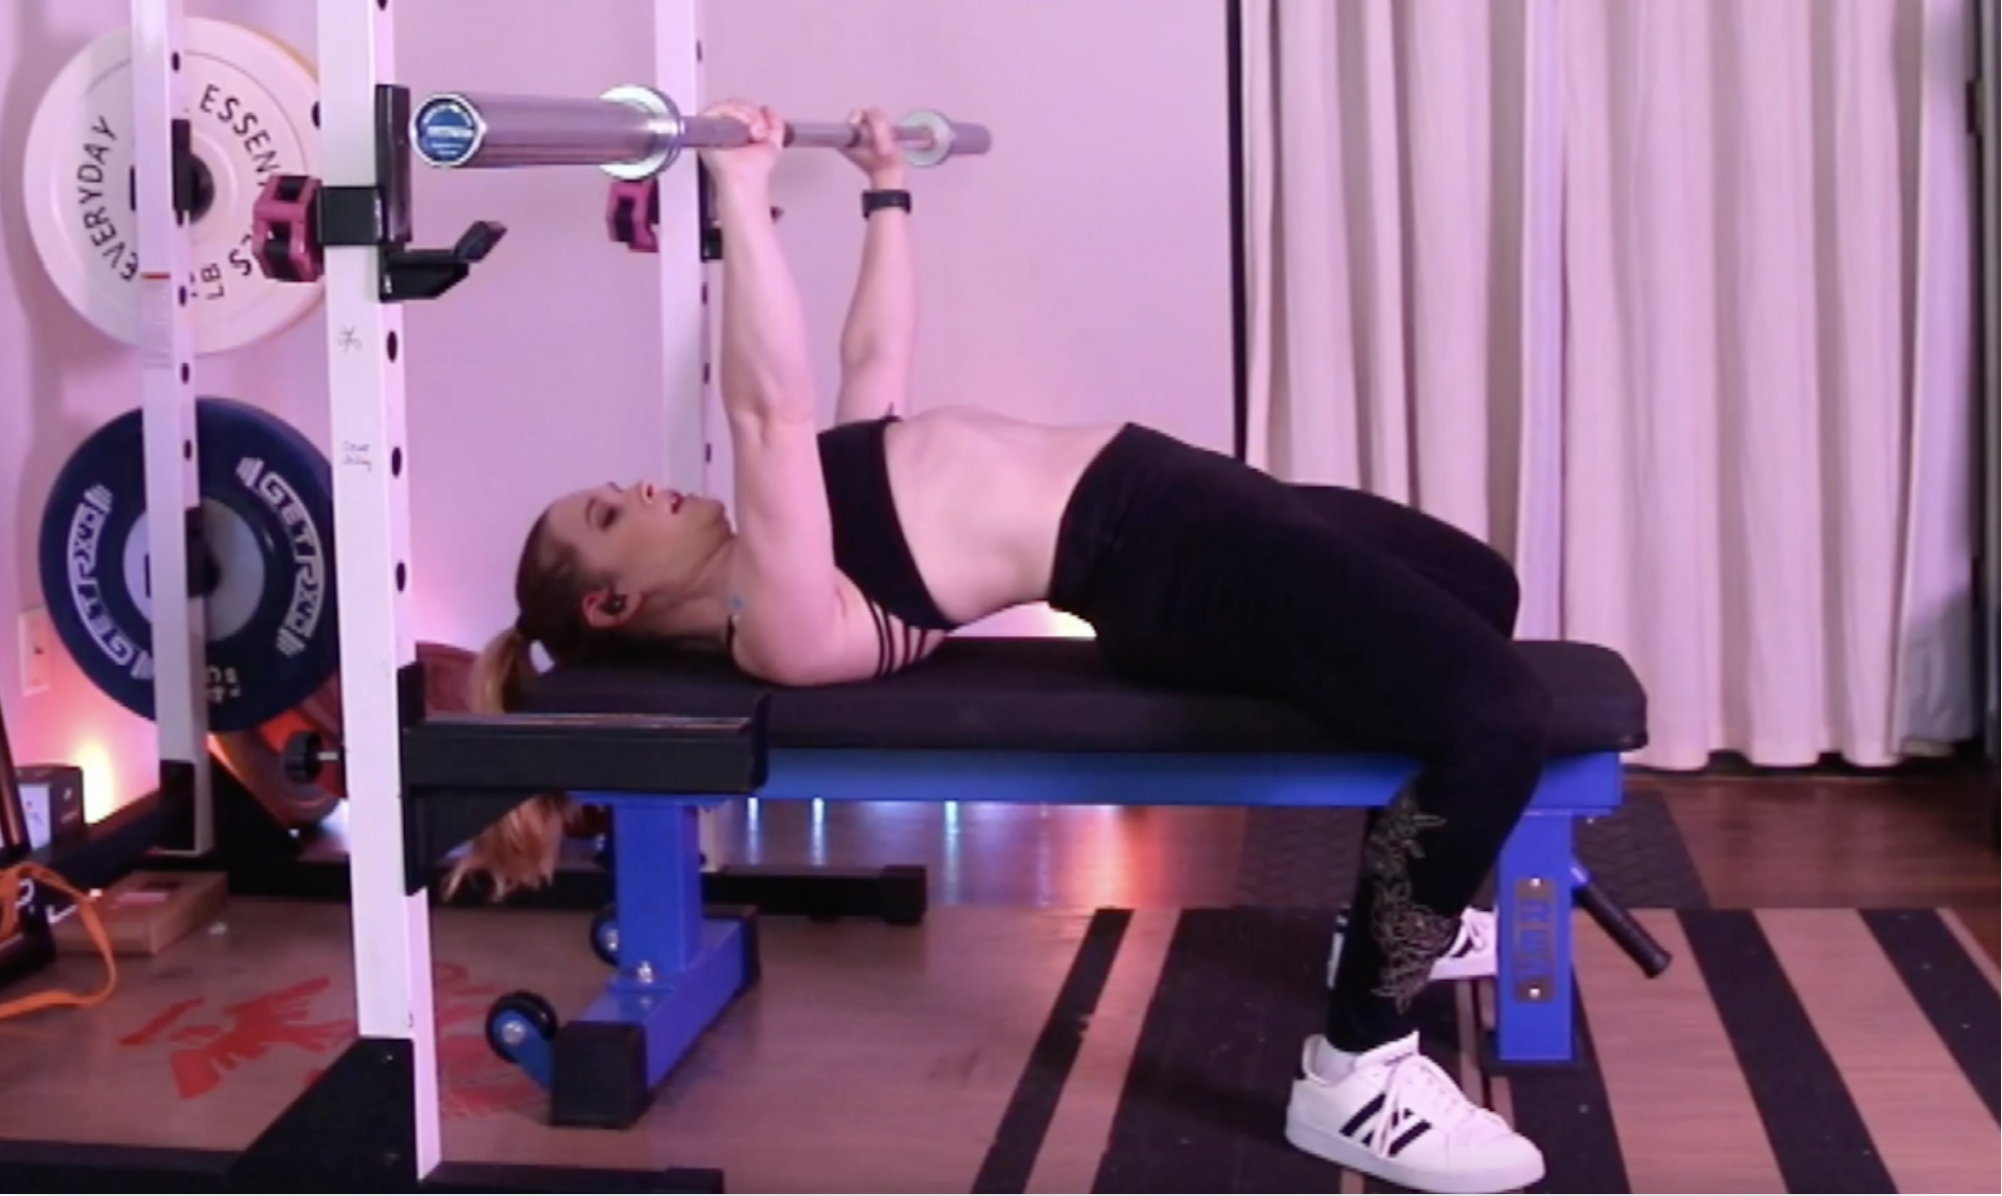
Take another optional shallow breath and keep your core braced with all the muscles in your back fired up. Then bend your elbows to lower the weight towards your chest while you keep pushing your chest up towards the ceiling. Stop when the bar is touching your chest.
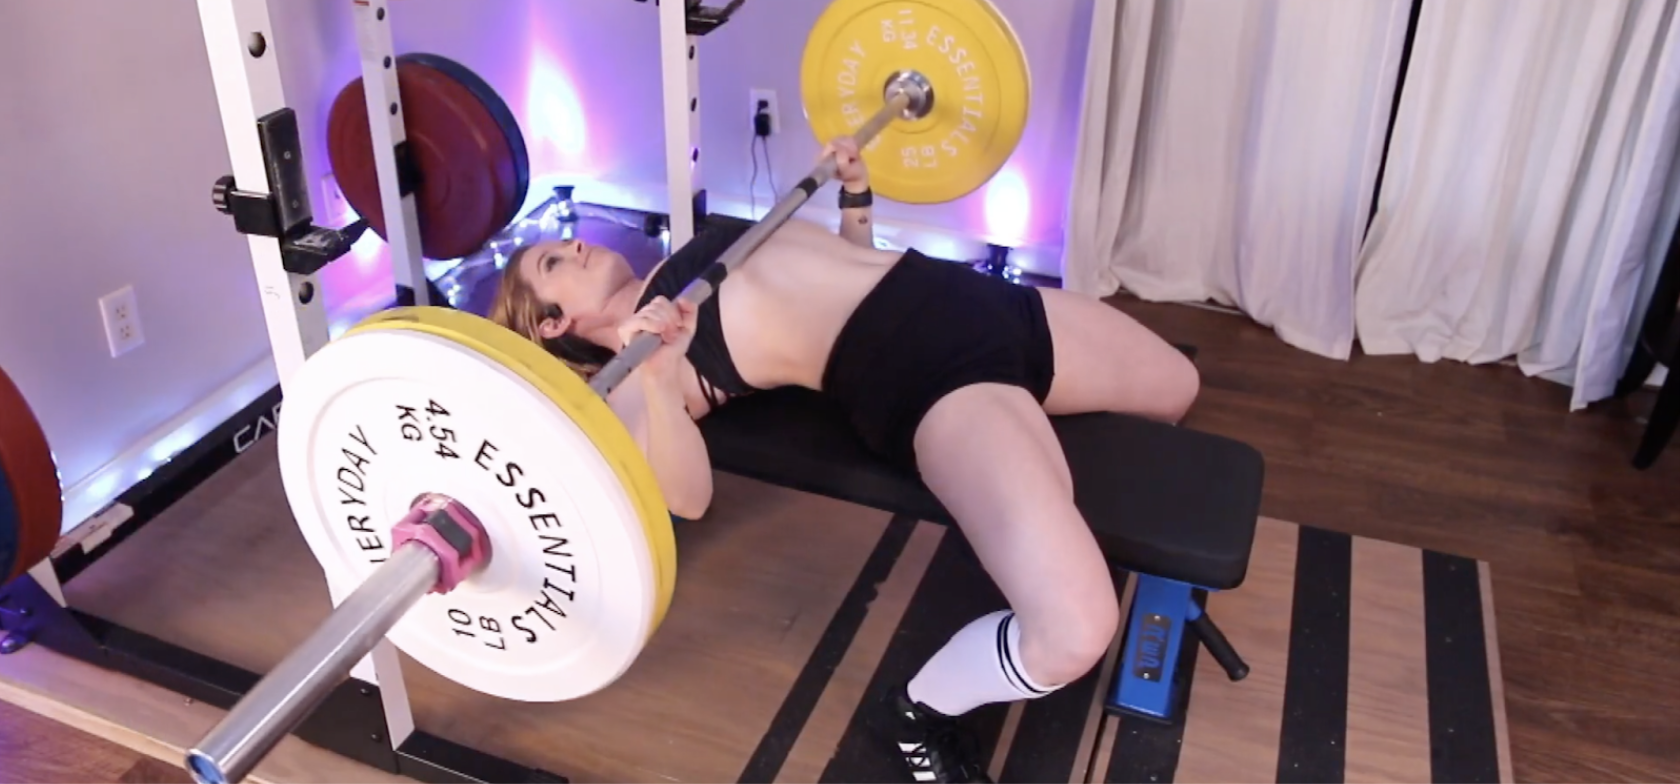
Drive through your legs, squeeze your glutes & back of your shoulders to push the weight back up to the starting position. Take a shallow breath and rebrace before doing another rep. Continue for the recommended number of reps in your training program.
Coaching Cues:
Pull the Bar to You: It’s important to engage your lats and the back of your shoulders to stabilize during this exercise. One thing that can help fire those muscles up is to think about pulling the bar to your chest on the descent. I suggest doing lat rows at a light weight before training bench press to prime this movement.
Leg Drive: Keep your legs pressing into the ground like you’re doing a bridge (I recommend doing bridges as priming exercises before bench for this reason).
Bend the Bar: To engage your external shoulder rotator muscles, think about bending the bar into a u-shape towards your feet.
Brace: If it is safe for you to do the valsalva maneuver, I recommend using it to brace and keep your body stable and rigid during this exercise. This involves holding your breath to create intra-abdominal pressure while the weight is in motion, and taking a breath between each rep or every couple of reps. This eliminates movement in the torso that naturally happens when we inhale and exhale–which can destabilize your base. The valsalva maneauver is not recommended for people with blood pressure problems, health conditions that make the eyes sensitive to pressure, or who are pregnant. For more info on this, check out the lesson on How to Breathe While Training.
For more tips on how to perform the bench press, check out the video below where I covered bench press during one of my Technique Tuesday live streams on Twitch:
Common Problems with Bench Press
Many people struggle with the bench press, usually because of issues with their technique, strength, and/or mobility. Here are the most common problems people experience and how to address them:
1. Weak Lockout (Triceps Weakness)
If you struggle with finishing the bench press at the top of the movement (i.e., the “lockout”), this may be due to having weak triceps. The triceps are responsible for straightening your elbows. A great way to fix this common problem is to incorporate more triceps-strengthening exercises in your workout routine by doing things like Close-Grip Bench Presses, Dips, and Triceps Extensions.
2. Off-Balance Bar Path
Another common problem with benching is that the bar may move unevenly or in the wrong direction. Ideally, the bar should move in a slight arc in both directions rather than going straight down and up.
To see whether you need to fix your bar path, take video of your bench press from the side profile view, and watch the line of the bar path as you move. The path you want to see should look like this:

At the beginning of the movement, the bar should be right above your shoulders. At the bottom, it should be somewhere between your sternum and “bra line” depending on your grip style (wide grip vs. close grip). On the way up, it’s important to “scoop” the bar up over your shoulders as soon as you can to leverage the strength pecs to perform the lift.
To practice this, reduce the weight and work on controlling your bar path with slow reps before adding more weight.
3. Shoulder Pain
Probably the most common problem that people experience with the bench press is shoulder pain. This is often the result of improper positioning, either by excessively flaring out the elbows or poor scapular positioning.
To fix this, practice keeping your elbows at about a 45-degree angle by engaging your lats and externally rotating your shoulders throughout the movement. Also, practice pushing your shoulders actively into the bench and push your chest up towards the ceiling—maintaining this positioning throughout the exercise.
To improve your scapular mobility, practice spinal extension exercises like Cat Cows, Cobra Stretch, Swimmers, Supermans, and Bird Dogs.
You may also need to work on improving your shoulder mobility by practicing exercises for internal rotation, external rotation, and general strength in the shoulders. Great exercises for this include Quadruped T-Spine Rotation, Band External Rotation, Band Internal Rotation, Back Flys, Rear Delt Flys, Up & Overs, and Resistance Band Pull-Aparts.
4. Weak Chest (Sticking Point at the Bottom)
If you struggle at the bottom of the movement getting the bar off your chest, this is likely due to having weak pecs (chest muscles). It may also be due to poor positioning, with the elbows flared excessively and/or insufficient scapular retraction (i.e., pulling the shoulder blades back and down toward the spine.
To fix this common problem, first make sure that you are in the proper position while performing the bench press:
Keep your shoulders pinned down toward the bench and your chest pushed up toward the ceiling through the entire range of motion
Engage your lats and externally rotate your shoulders to keep the shoulders in good position to engage the pecs.
In addition to focusing on positioning, you should also focus on strengthening your chest with exercises like Paused Bench Presses, Dumbbell Chest Presses, and Deficit Push-Ups.
5. Wrist Pain
Wrist pain while lifting can be due to a number of causes, chief among which is poor wrist positioning. Many people mistakenly bend their wrists back too much to the point where the bar isn’t resting above their wrist.
To fix this problem, practice using a neutral wrist position. I tell my clients to “punch the ceiling” to point their knuckles up. From the side, you should see the bar resting right above the wrist joint.
After fixing your positioning, you may still experience wrist pain. This may be due to poor grip strength, carpal tunnel, or tendonitis. To address this, work on your grip strength with other weight-bearing exercises like Farmer Carries and Romanian Deadlifts.
To reduce pain while training, consider wearing wrist wraps for weightlifting.*
6. Lack of Leg Drive
Many people don’t realize that the legs play an important role in a strong bench press. During the exercise, you should plant your feet firmly on the ground and push through the floor. This helps to stabilize your body during the lift and also helps you to generate more force.
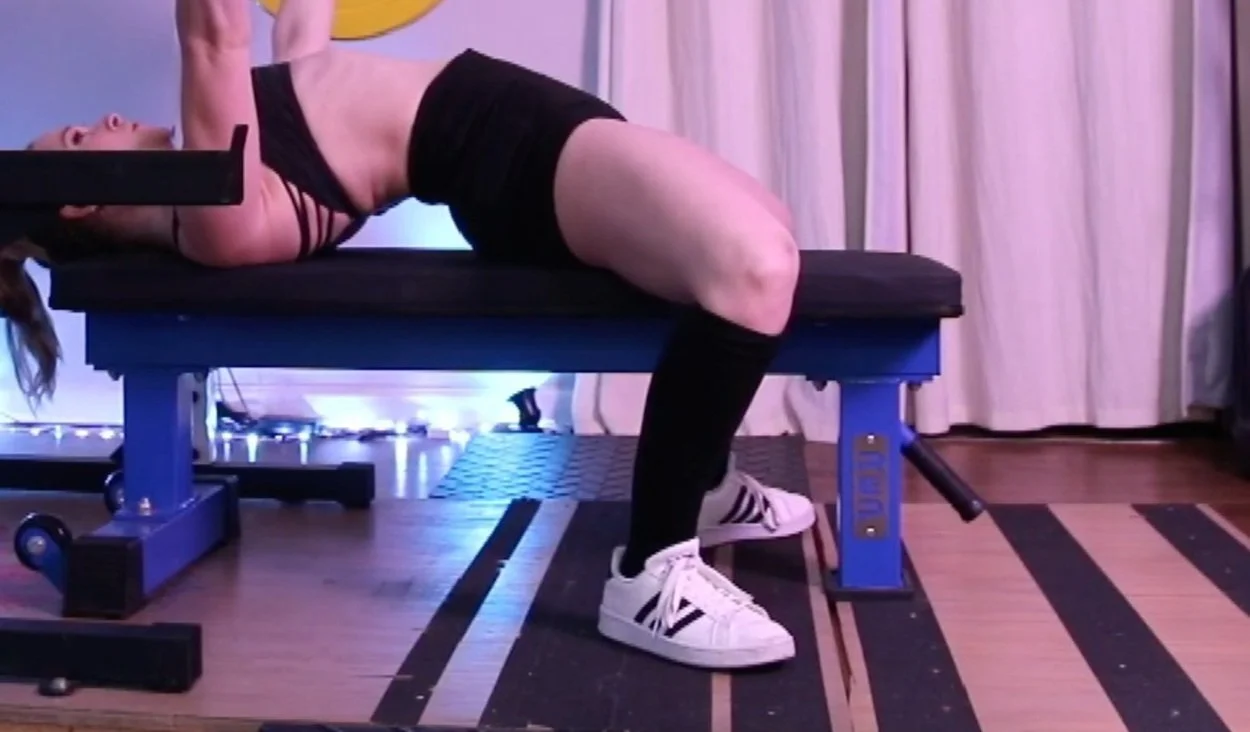
If you’re not using leg drive, you may feel like your legs are passive or loose. If your legs feel relaxed, you're missing out on extra power and stability. You may also feel your feet move or even lift off the floor. If your feet shift around or come off the floor, you’re not creating a stable base for power transfer.
Make sure you’re using your legs properly while doing bench press. Place your feet right under your knees. When you lift the bar off the rack, press your toes into the floor and engage your quadriceps like you’re about to do a leg extension.
7. Unstable Grip or Bar Wobbling
If the bar feels wobbly or unstable, check to make sure that your grip is even before you unrack the weight. Use your pinkies against the rings of the bar to ensure that your hands are evenly placed.
If the bar still feels unstable after checking your grip, you may have weak grip strength. Use chalk to help your hands grip the bar more solidly. Also, strengthen your grip by performing load-carrying exercises like Farmer Carries and Romanian Deadlifts.
8. Arching Too Much or Too Little
Whenever I lift on stream, I often get asked “why do you arch your back like that?” The back arch is another important component of a stable bench base, and if done correctly, it can help you generate more power.
Should you deliberately try to arch your back while lifting? Not necessarily. The arch is a natural product of proper positioning, which includes engaging the back muscles, firmly pressing your shoulders into the bench while driving the legs into the floor, and pushing your chest up towards the ceiling during the lift. For different people, the degree of arch that this creates will vary. Some people’s arch will look more dramatic than others.
Be careful not to excessively arch the back beyond what is helpful for stability. Too much of a back bend can strain the lower back, leading to pulled muscles or injuries to the spine.
Not having enough engagement in the back, glutes, and legs, however, can lead to loss of stability in the lift—which will also look like a lack of arch.
To find the happy medium of a useful arch, focus on driving your shoulders down into the bench, your chest up towards the ceiling, and your feet down into the floor. Avoid allowing your hips to come off the bench.
9. Not Controlling Eccentric (Lowering) Phase
Often, people mistakenly think they have to move fast through each rep, and will drop the bar too quickly to their chest on the eccentric (lowering) phase. Lifting like this leads to poor control and can increase your risk of injury. You can see this in the beginning of the video linked below:
Instead, practice lowering the bar in a controlled manner (2-3 seconds) before pressing the bar back up. This will allow you to maintain proper positioning while the weight is in motion.
10. Breathing and Bracing Issues
Whenever you do a compound or heavy lift, it’s super important to control your breath and keep your core engaged (meaning your abdominals, obliques, and back muscles are fired up). This helps to keep your torso stable to prevent any movement and reduce the risk of injury.
If your torso feels loose and “wobbly,” this may be due to a lack of bracing. To fix this, take a deep breath before lowering the bar and engage your core muscles just like you would while holding a plank. Focus on keeping your torso rigid throughout the movement. Once the weight is back at the top, exhale and inhale again before doing your next rep.
Keep Practicing!
Initially, the bench press may appear challenging or slightly intimidating. But with consistent practice and attention to technique, this exercise can bring a lot of benefits to your overall development in resistance training.
Don’t forget that you can always reach out if you have any questions about whether or not you are practicing the form correctly. Send me a message in Trainerize if you’re a 1-on-1 client, or take a selfie video and post it in the Coaching Corner Discord #🏋-technique-reviews channel.
*This and other equipment links are affiliate links (I will be compensated in part after you make a purchase).

Troubleshoot Your Romanian Deadlift (RDL)
What is the most intimidating weight-training exercise for you?
If you’re like many of my clients and followers, you probably answered: deadlifts!
You probably do this movement multiple times every day, regardless of whether you’re aware of it or not.
The deadlift is the movement of picking something up from the ground in a standing position.
Deadlifts are one of the more tricky exercises to master and perform safely. Most adults that I see have poor mobility and movement patterns, which puts them at risk of straining their backs whenever they pick something up from the ground (both in and outside the gym).
There are a lot of moving pieces involved in safely lifting weight from the ground—you have to keep your spine in alignment, monitor the degree of hip hinge to knee bend, engage the lats, and stay balanced, among other things.
Another thing that makes deadlifts difficult to master is the many variations. Some variations rely more on hinging the hips than bending the knees (e.g., Romanian Deadlifts and Conventional Deadlifts). Others incorporate more knee bending and a more upright posture (e.g., Sumo and Frog Stance).
Most people have a preferred variation according to their individual strengths, body shape (i.e., length of torso, arms, and leg bones), and individual preferences. However, it’s a good idea to master the correct technique of all deadlift variations for a well-rounded physique and mobility.
Let’s take a look at how to do one of the most common forms of the deadlift—the Romanian Deadlift. We’ll also troubleshoot some common errors with the technique so that you can practice the movement with perfect form.
What is the most intimidating weight-training exercise for you?
If you’re like many of my clients and followers, you probably answered: deadlifts!
You probably do this movement multiple times every day, regardless of whether you’re aware of it or not.
What is the Deadlift?
The deadlift is the movement of picking something up from the ground in a standing position.
Deadlifts are one of the more tricky exercises to master and perform safely. Most adults that I see have poor mobility and movement patterns, which puts them at risk of straining their backs whenever they pick something up from the ground (both in and outside the gym).
There are a lot of moving pieces involved in safely lifting weight from the ground—you have to keep your spine in alignment, monitor the degree of hip hinge to knee bend, engage the lats, and stay balanced, among other things.
Another thing that makes deadlifts difficult to master is the many variations. Some variations rely more on hinging the hips than bending the knees (e.g., Romanian deadlifts and conventional deadlifts). Others incorporate more knee bending and a more upright posture (e.g., sumo and frog stance).
Most people have a preferred variation according to their individual strengths, body shape (i.e., length of torso, arms, and leg bones), and individual preferences. However, it’s a good idea to master the correct technique of all deadlift variations for a well-rounded physique and mobility.
Let’s take a look at how to do one of the most common forms of the deadlift—the Romanian deadlift (RDL). We’ll also troubleshoot some common errors with the technique so that you can practice the movement with perfect form.
Romanian Deadlift (RDL)
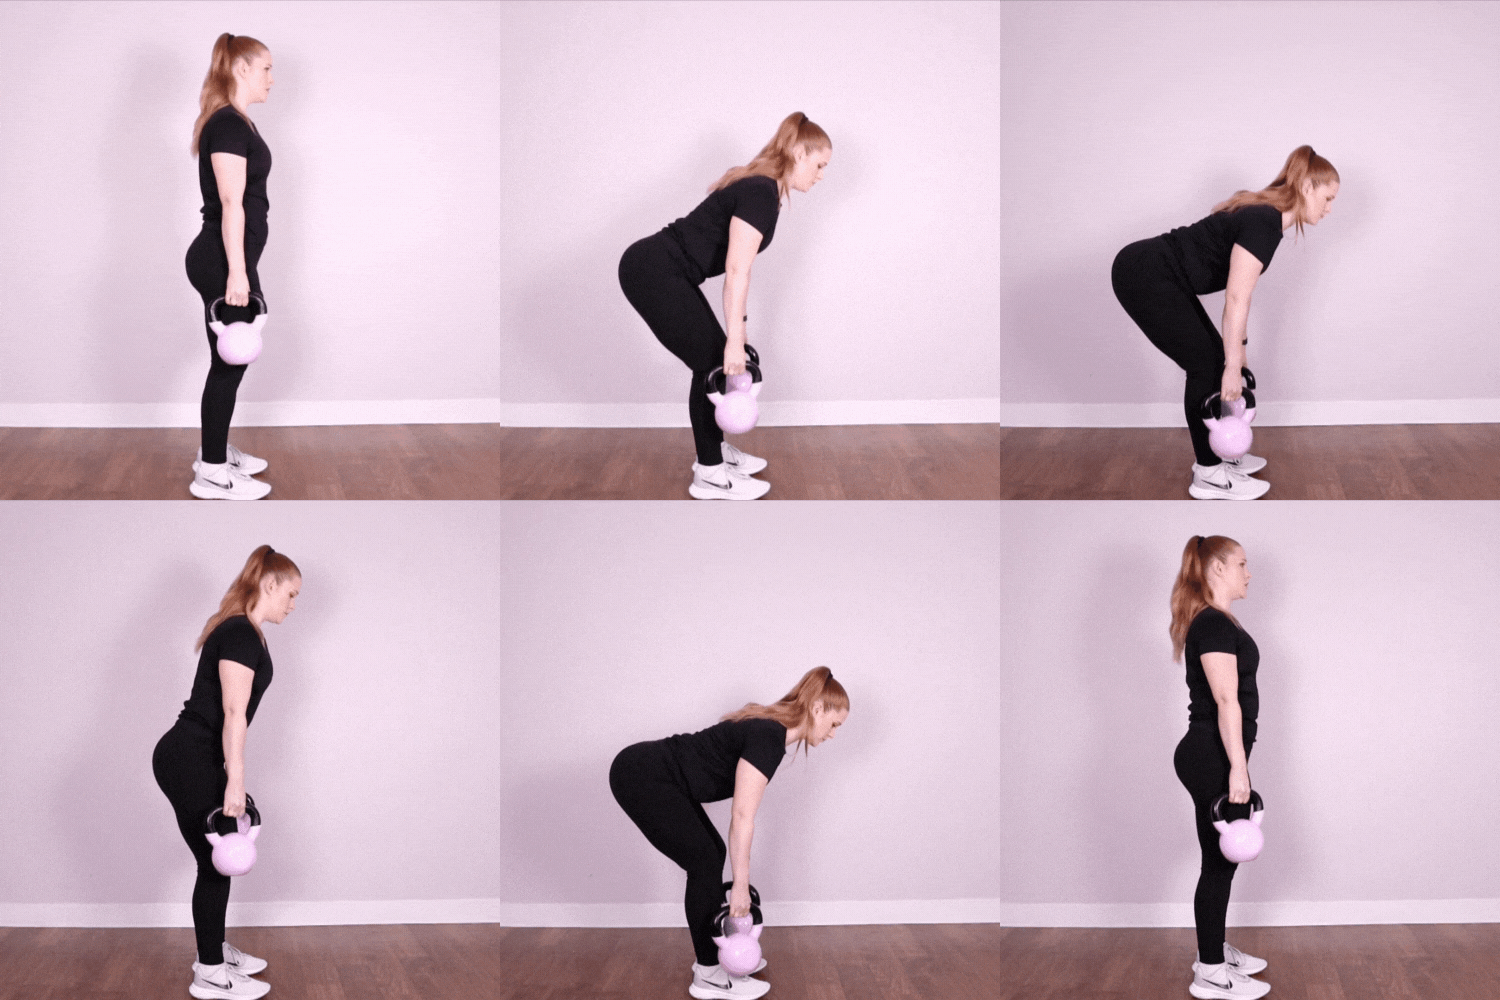
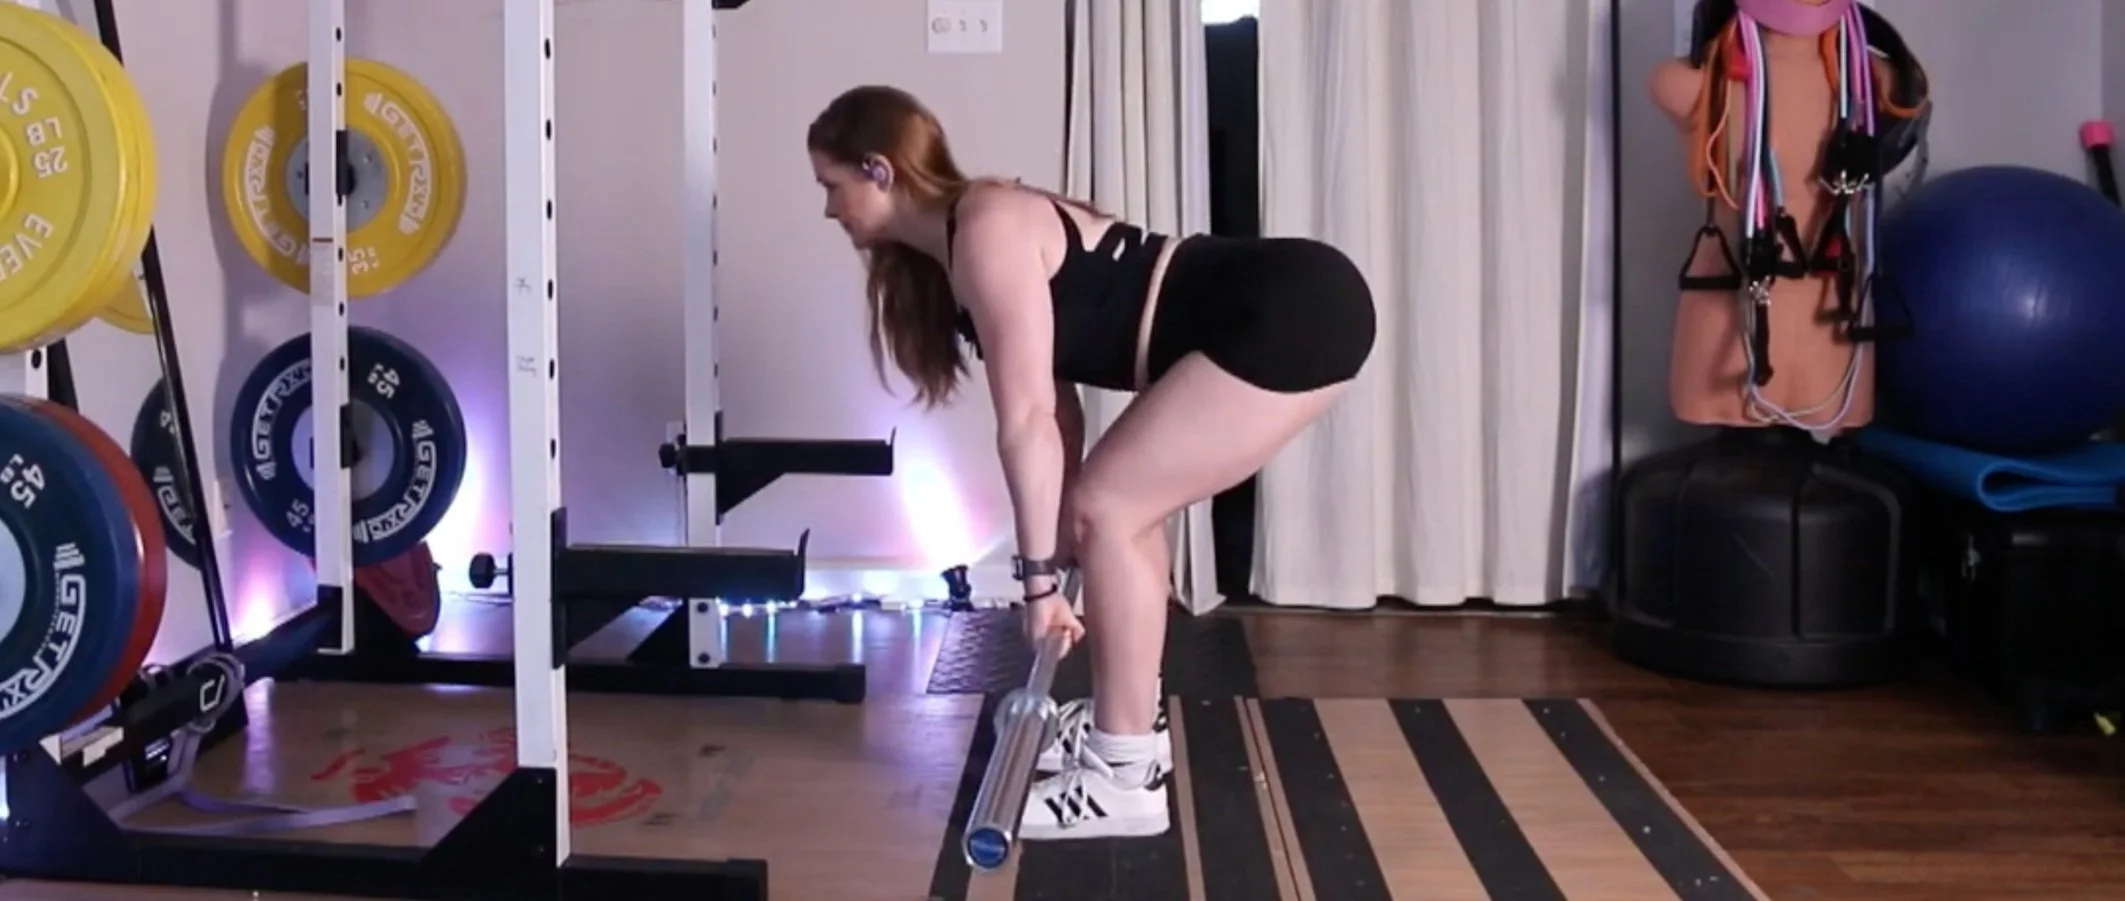
The basic variation of the deadlift that I like to begin with is the Romanian deadlift (RDL). This variation starts from a standing position holding a band, hand weights like dumbbells or kettlebells, or a barbell.
RDLs are an incredibly useful exercise for a number of reasons, which is why I try to get my students performing it as soon as possible in their programs:
The RDL is a great exercise for practicing the hip hinge movement, which is foundational to nearly all “big lift” exercises (i.e. squats and conventional deadlifts).
Holding the weight throughout the entire set is a great way to boost your grip strength. This will allow you to train with heavier weight in this and other exercises over time.
Practicing the exercise with good technique while keeping your back in alignment is a great way to challenge your core strength and stability. Your abdominals, obliques, transverse abdominis, and pelvic floor muscles have to stay engaged to keep your torso rigid while the weight is in motion—similar to what happens when you’re holding a plank.
People who struggle with weak, tight hamstrings find this exercise helpful for improving the strength and mobility of their legs.
If you have a weak back and poor posture, this exercise will strengthen the muscles in your back while training your shoulders to stay back. This can help you to sit and stand taller even when you’re not training, and can even reduce instances of chronic back pain.
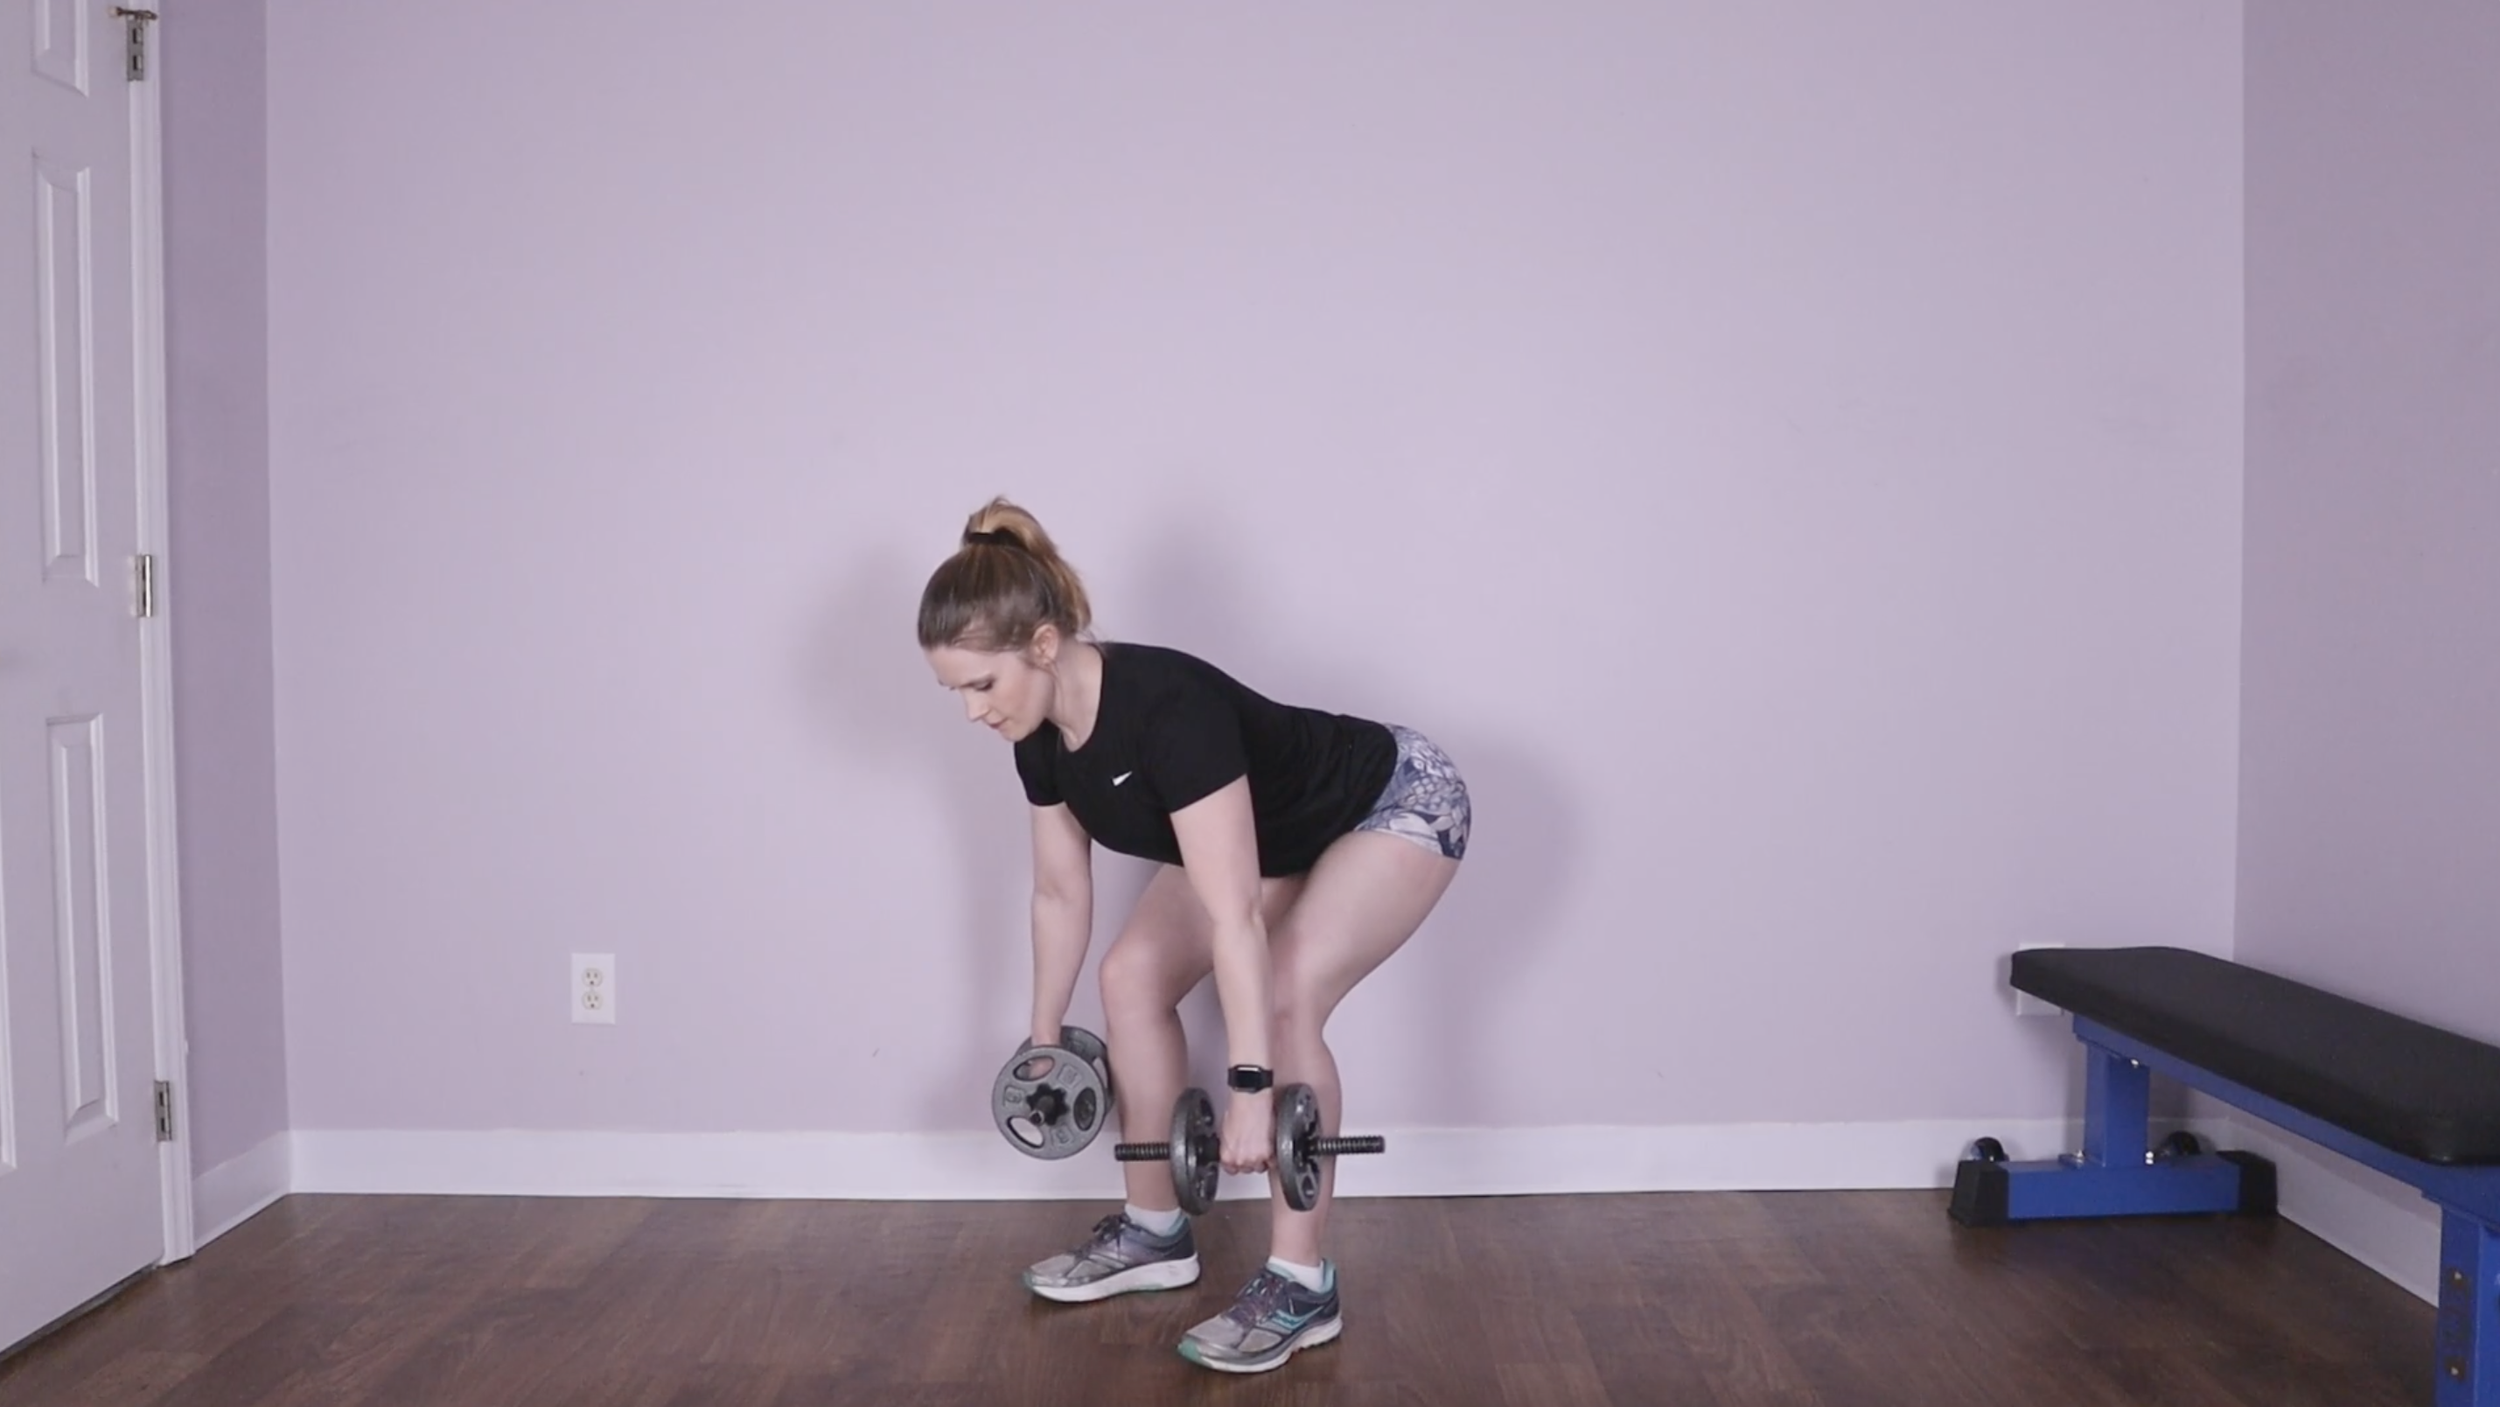
To Perform Romanian Deadlifts/RDLs:
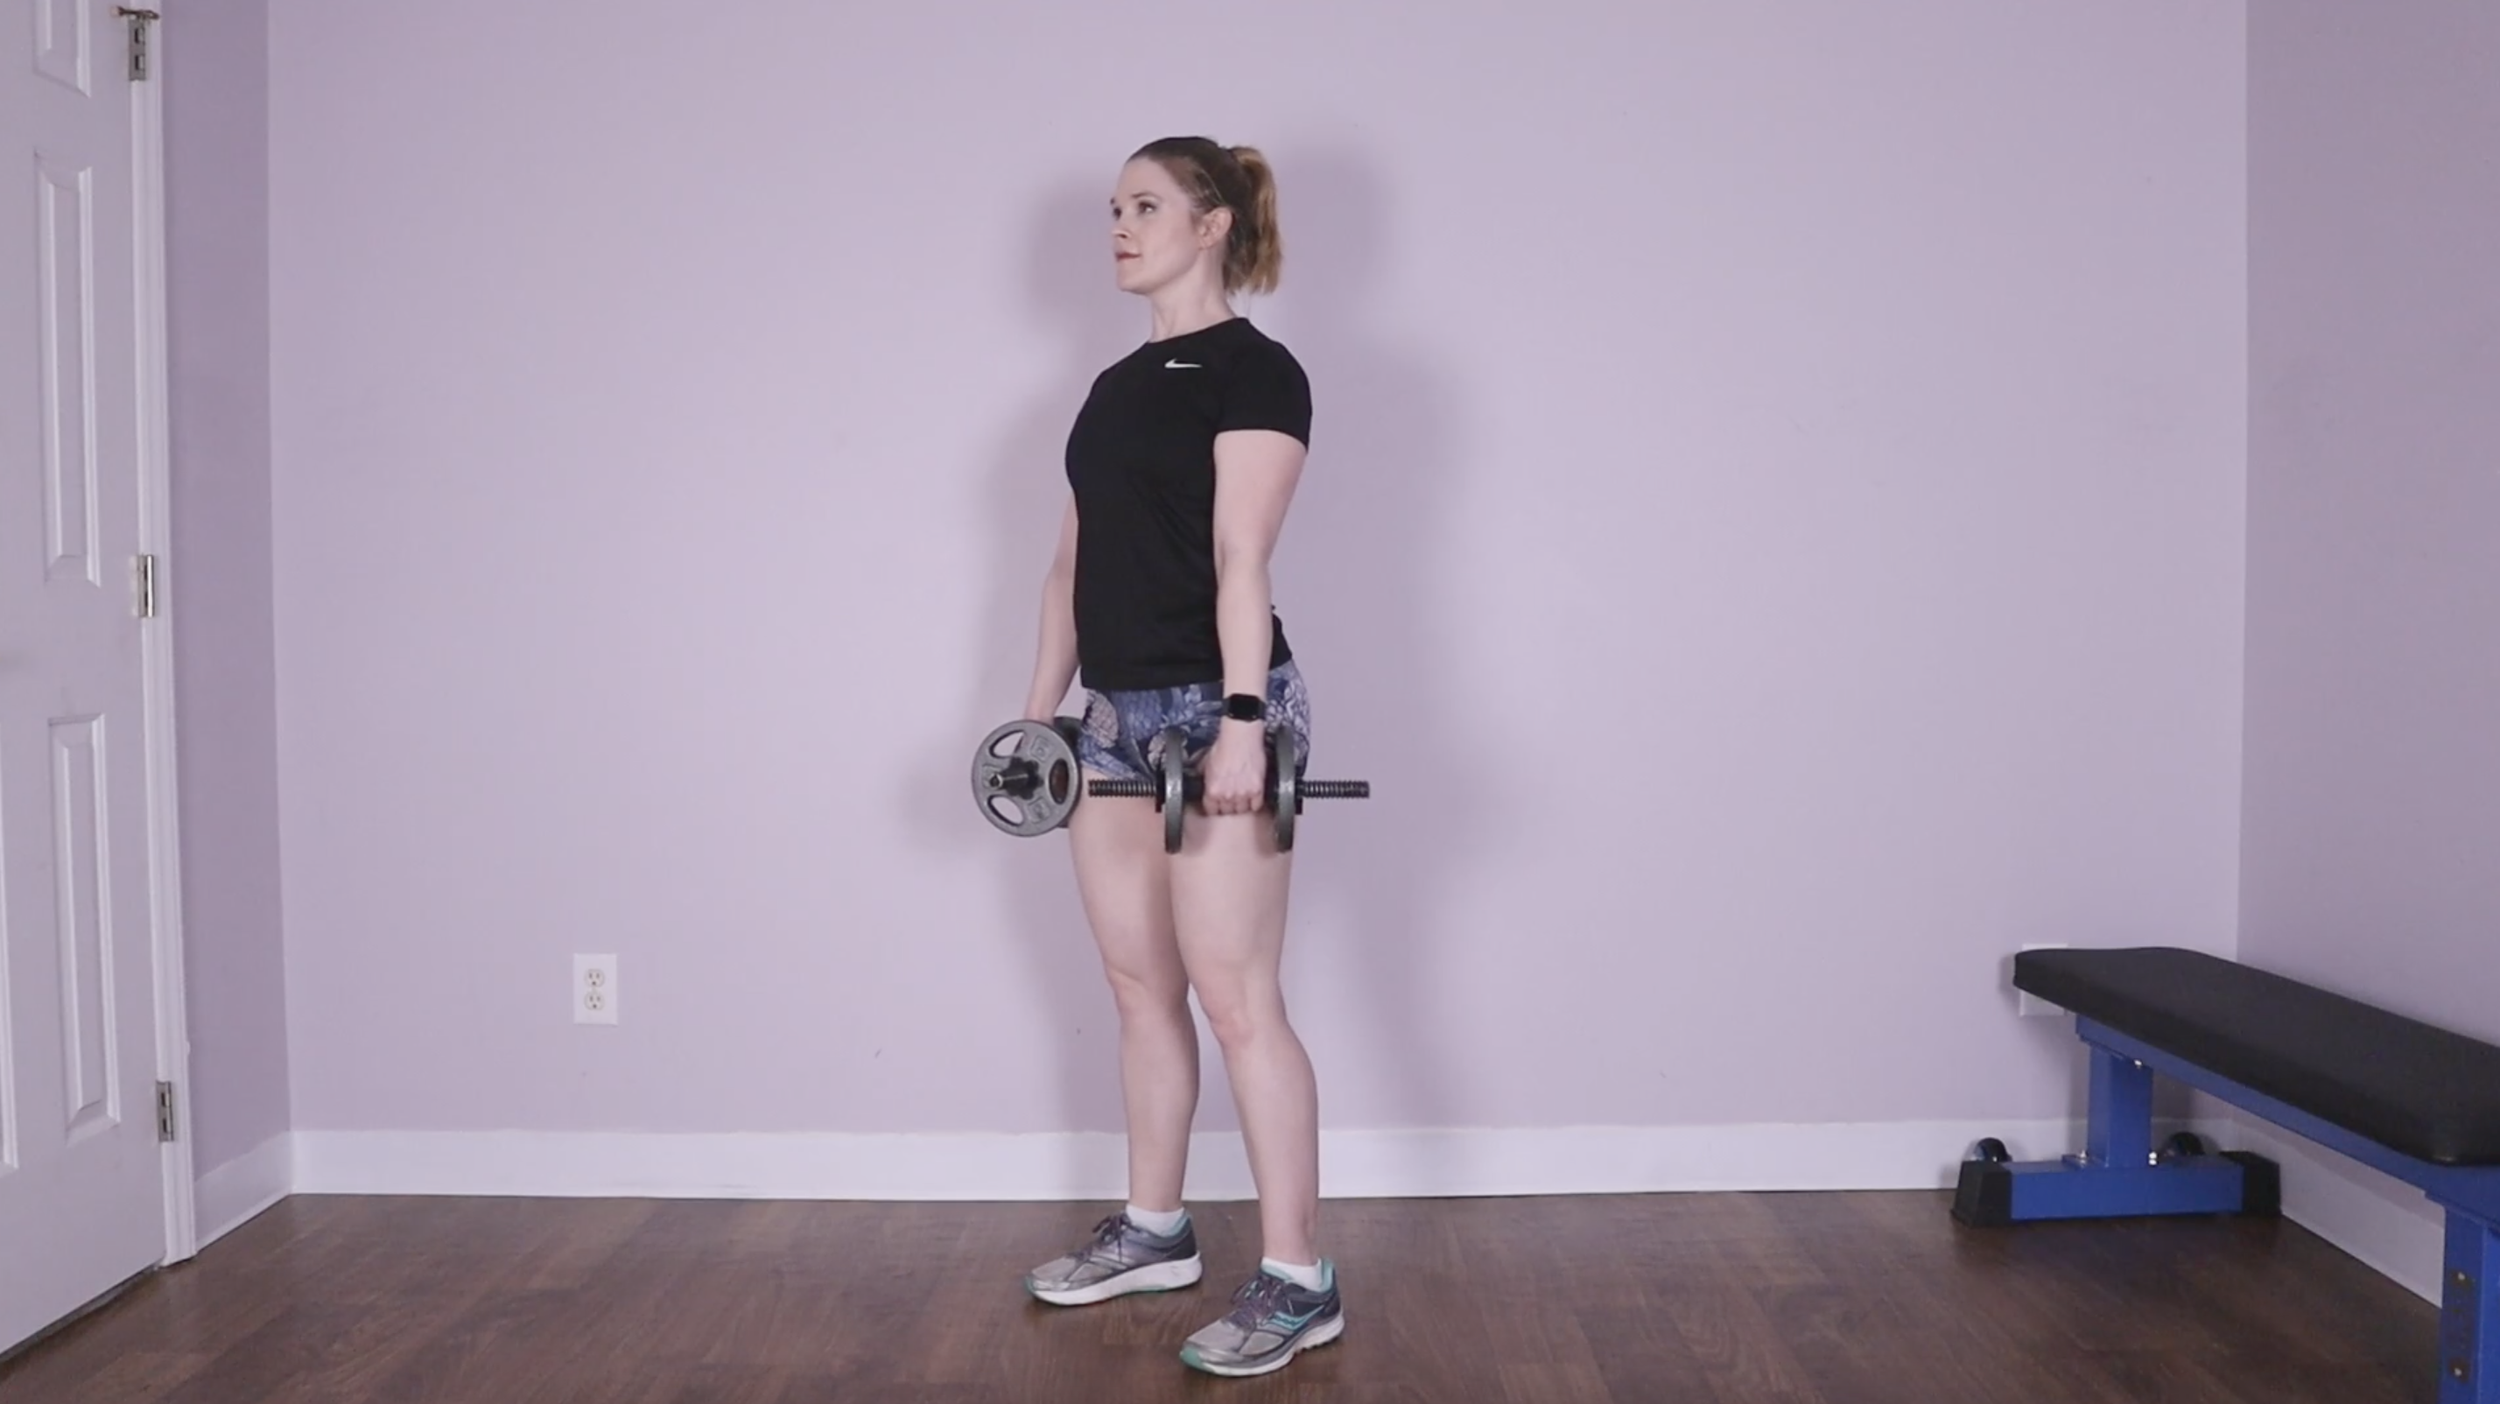
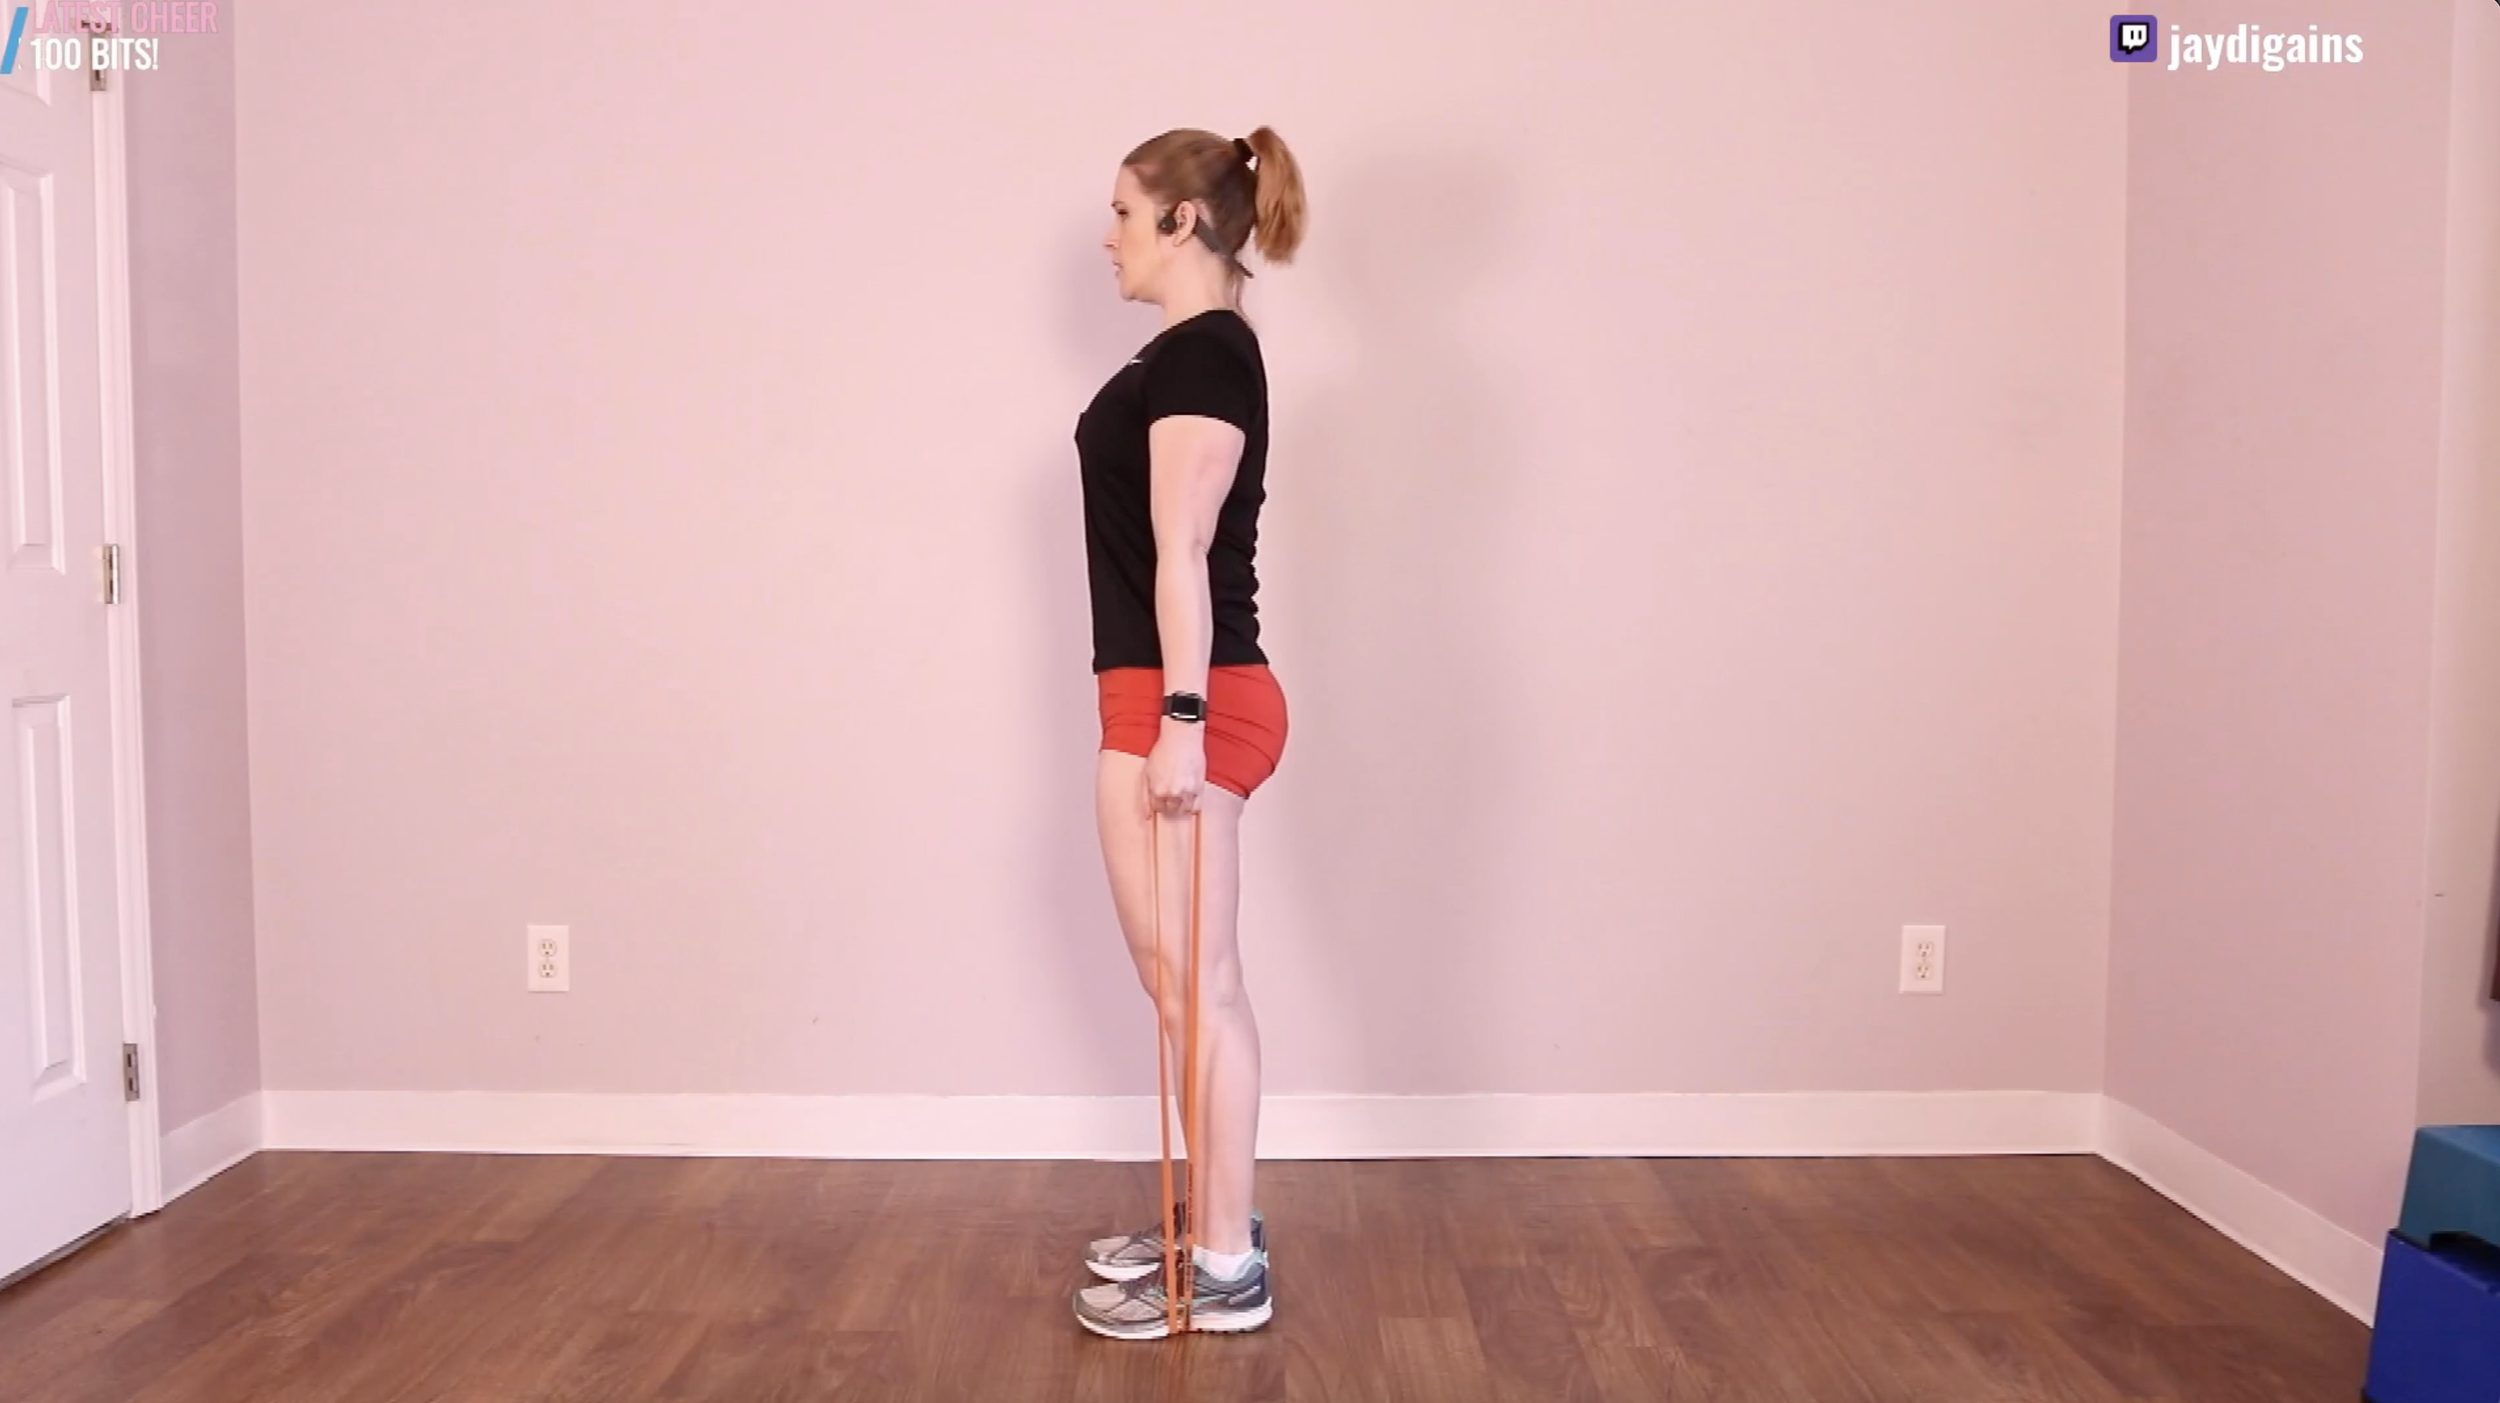
Start by standing with your feet shoulder-width apart, toes pointing slightly outward, and the weight in your hands with your arms straight and hands just outside your hips.
Maintain a slight bend in your knees and a neutral spine position throughout the movement.
Brace your core, squeeze your armpits to engage your back, and push your hips back while keeping your back straight and your chest up.
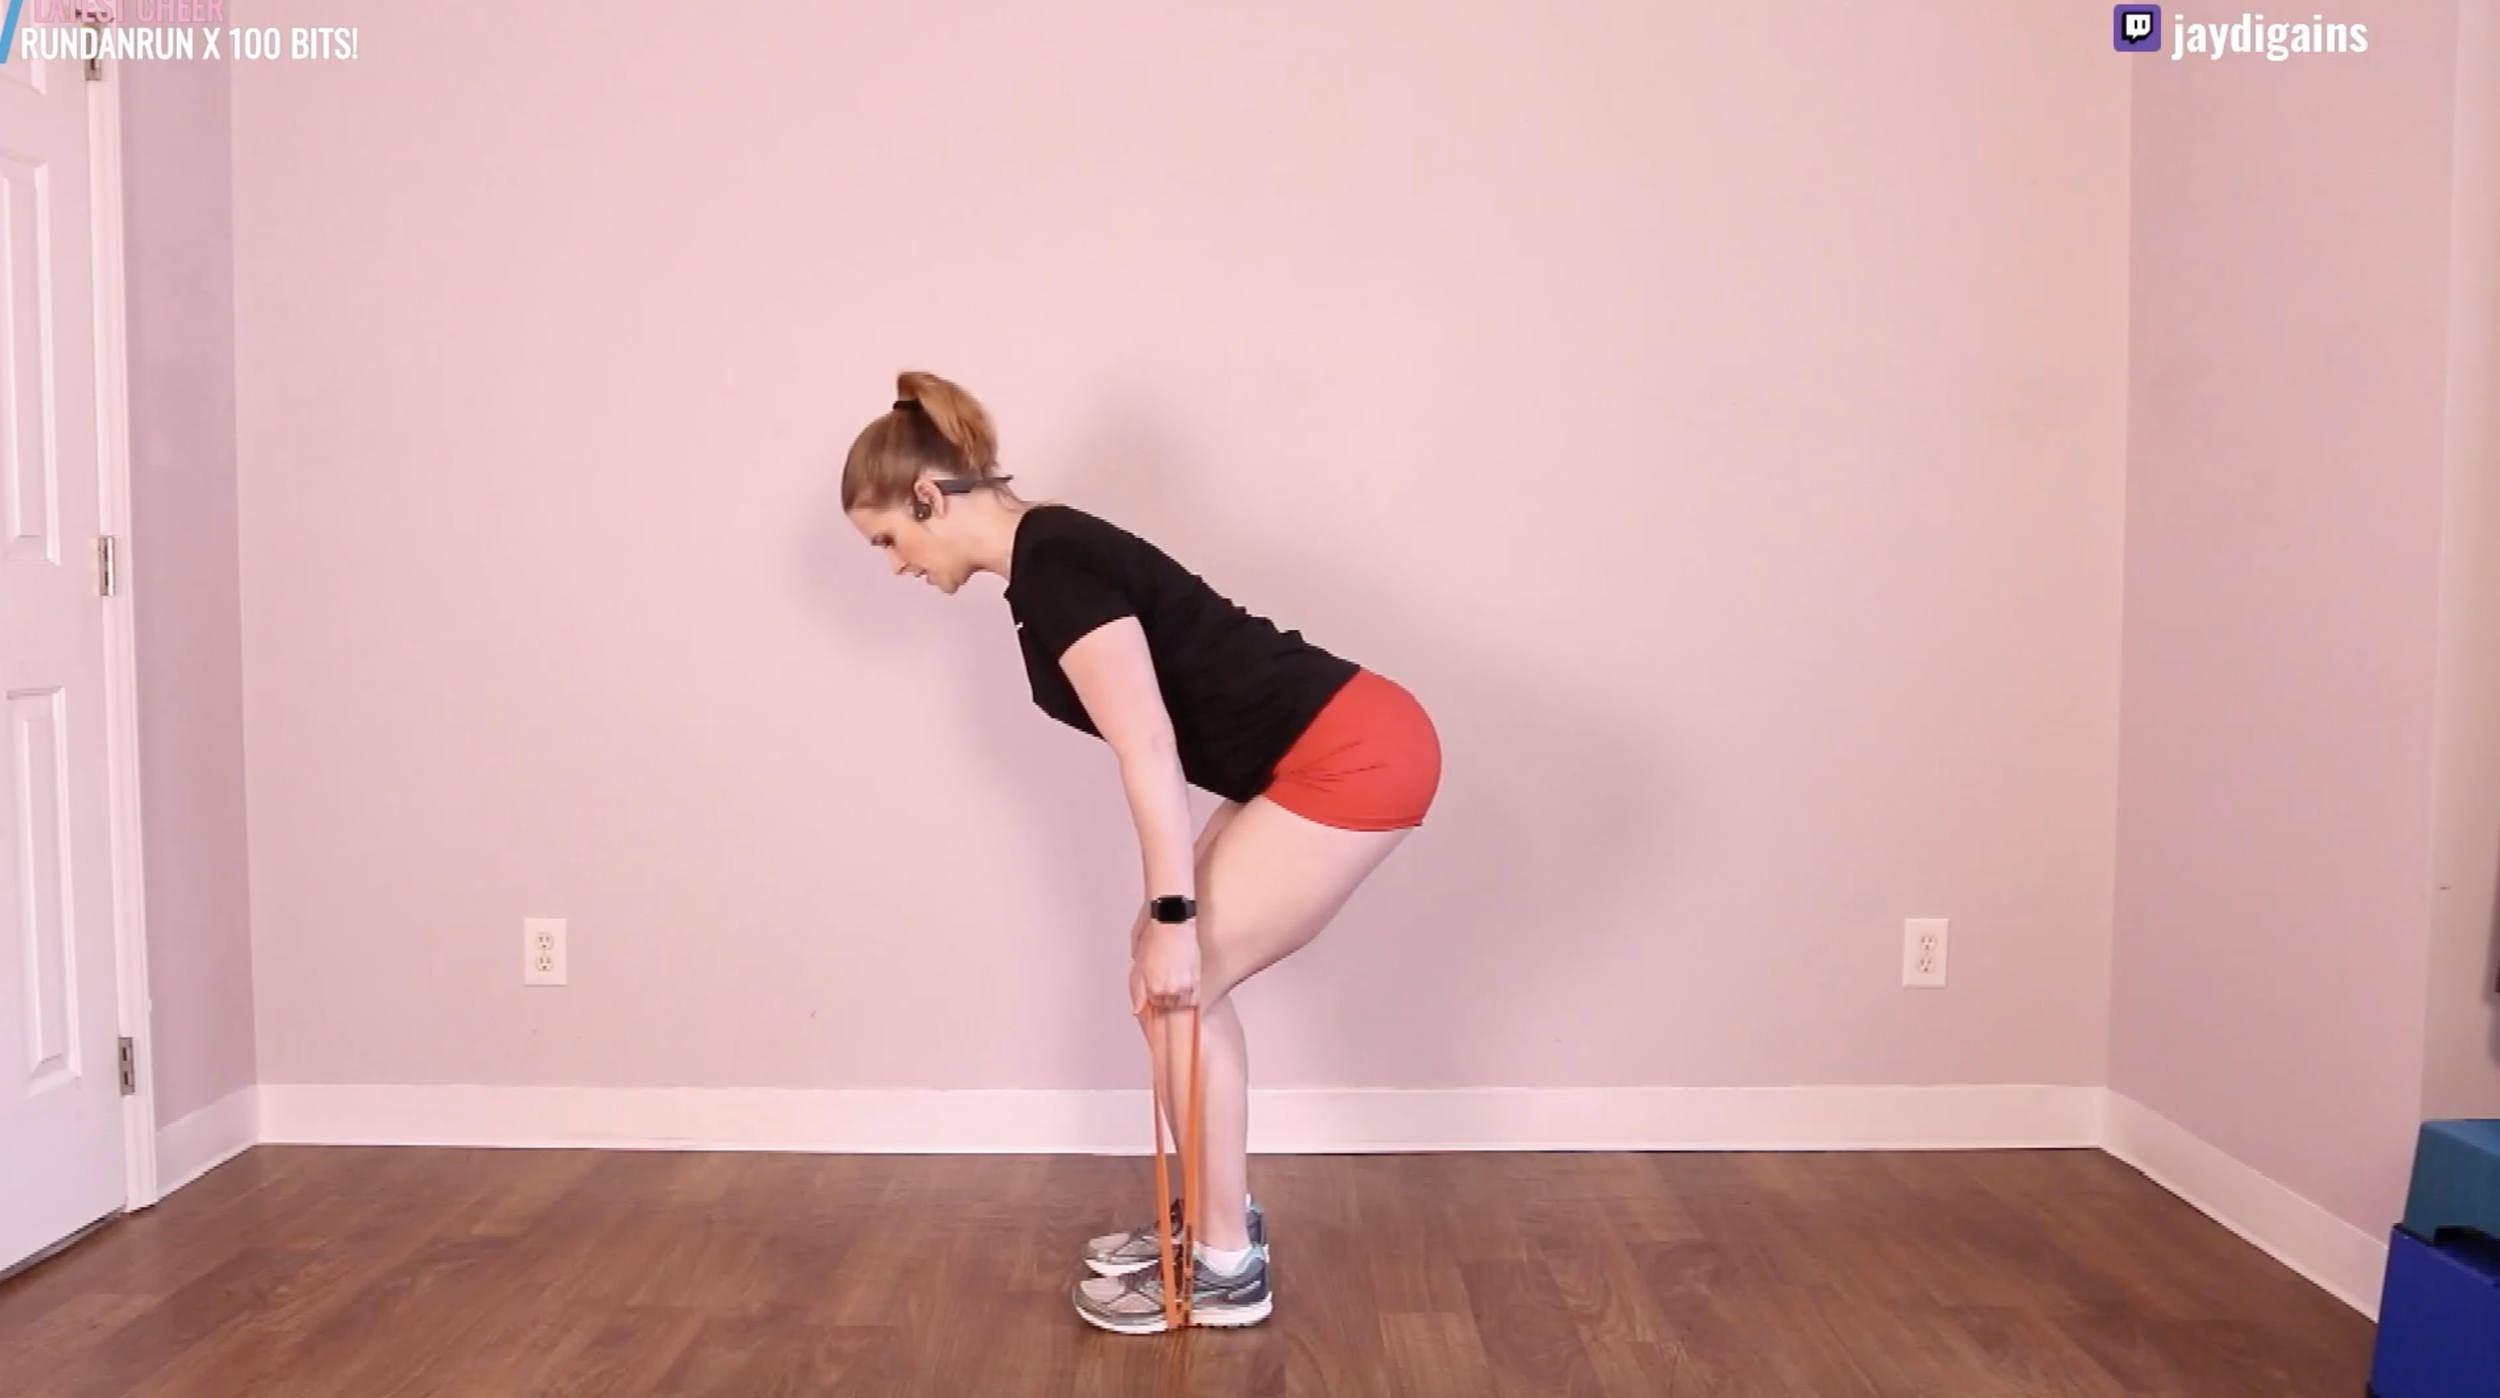
Push your hips back until either you feel a stretch in your hamstrings or the weight is resting just below the level of your knees.
Push your hips forward by squeezing your glutes and return to the starting position, standing tall.
Repeat for the desired number of repetitions, ensuring proper form and control throughout the exercise.
I find that practicing this exercise with a mini band, tube resistance band, or superband is helpful for learning hand placement and priming before adding free weights.
A more advanced variation of this exercise is using the barbell with plates for heavier resistance:
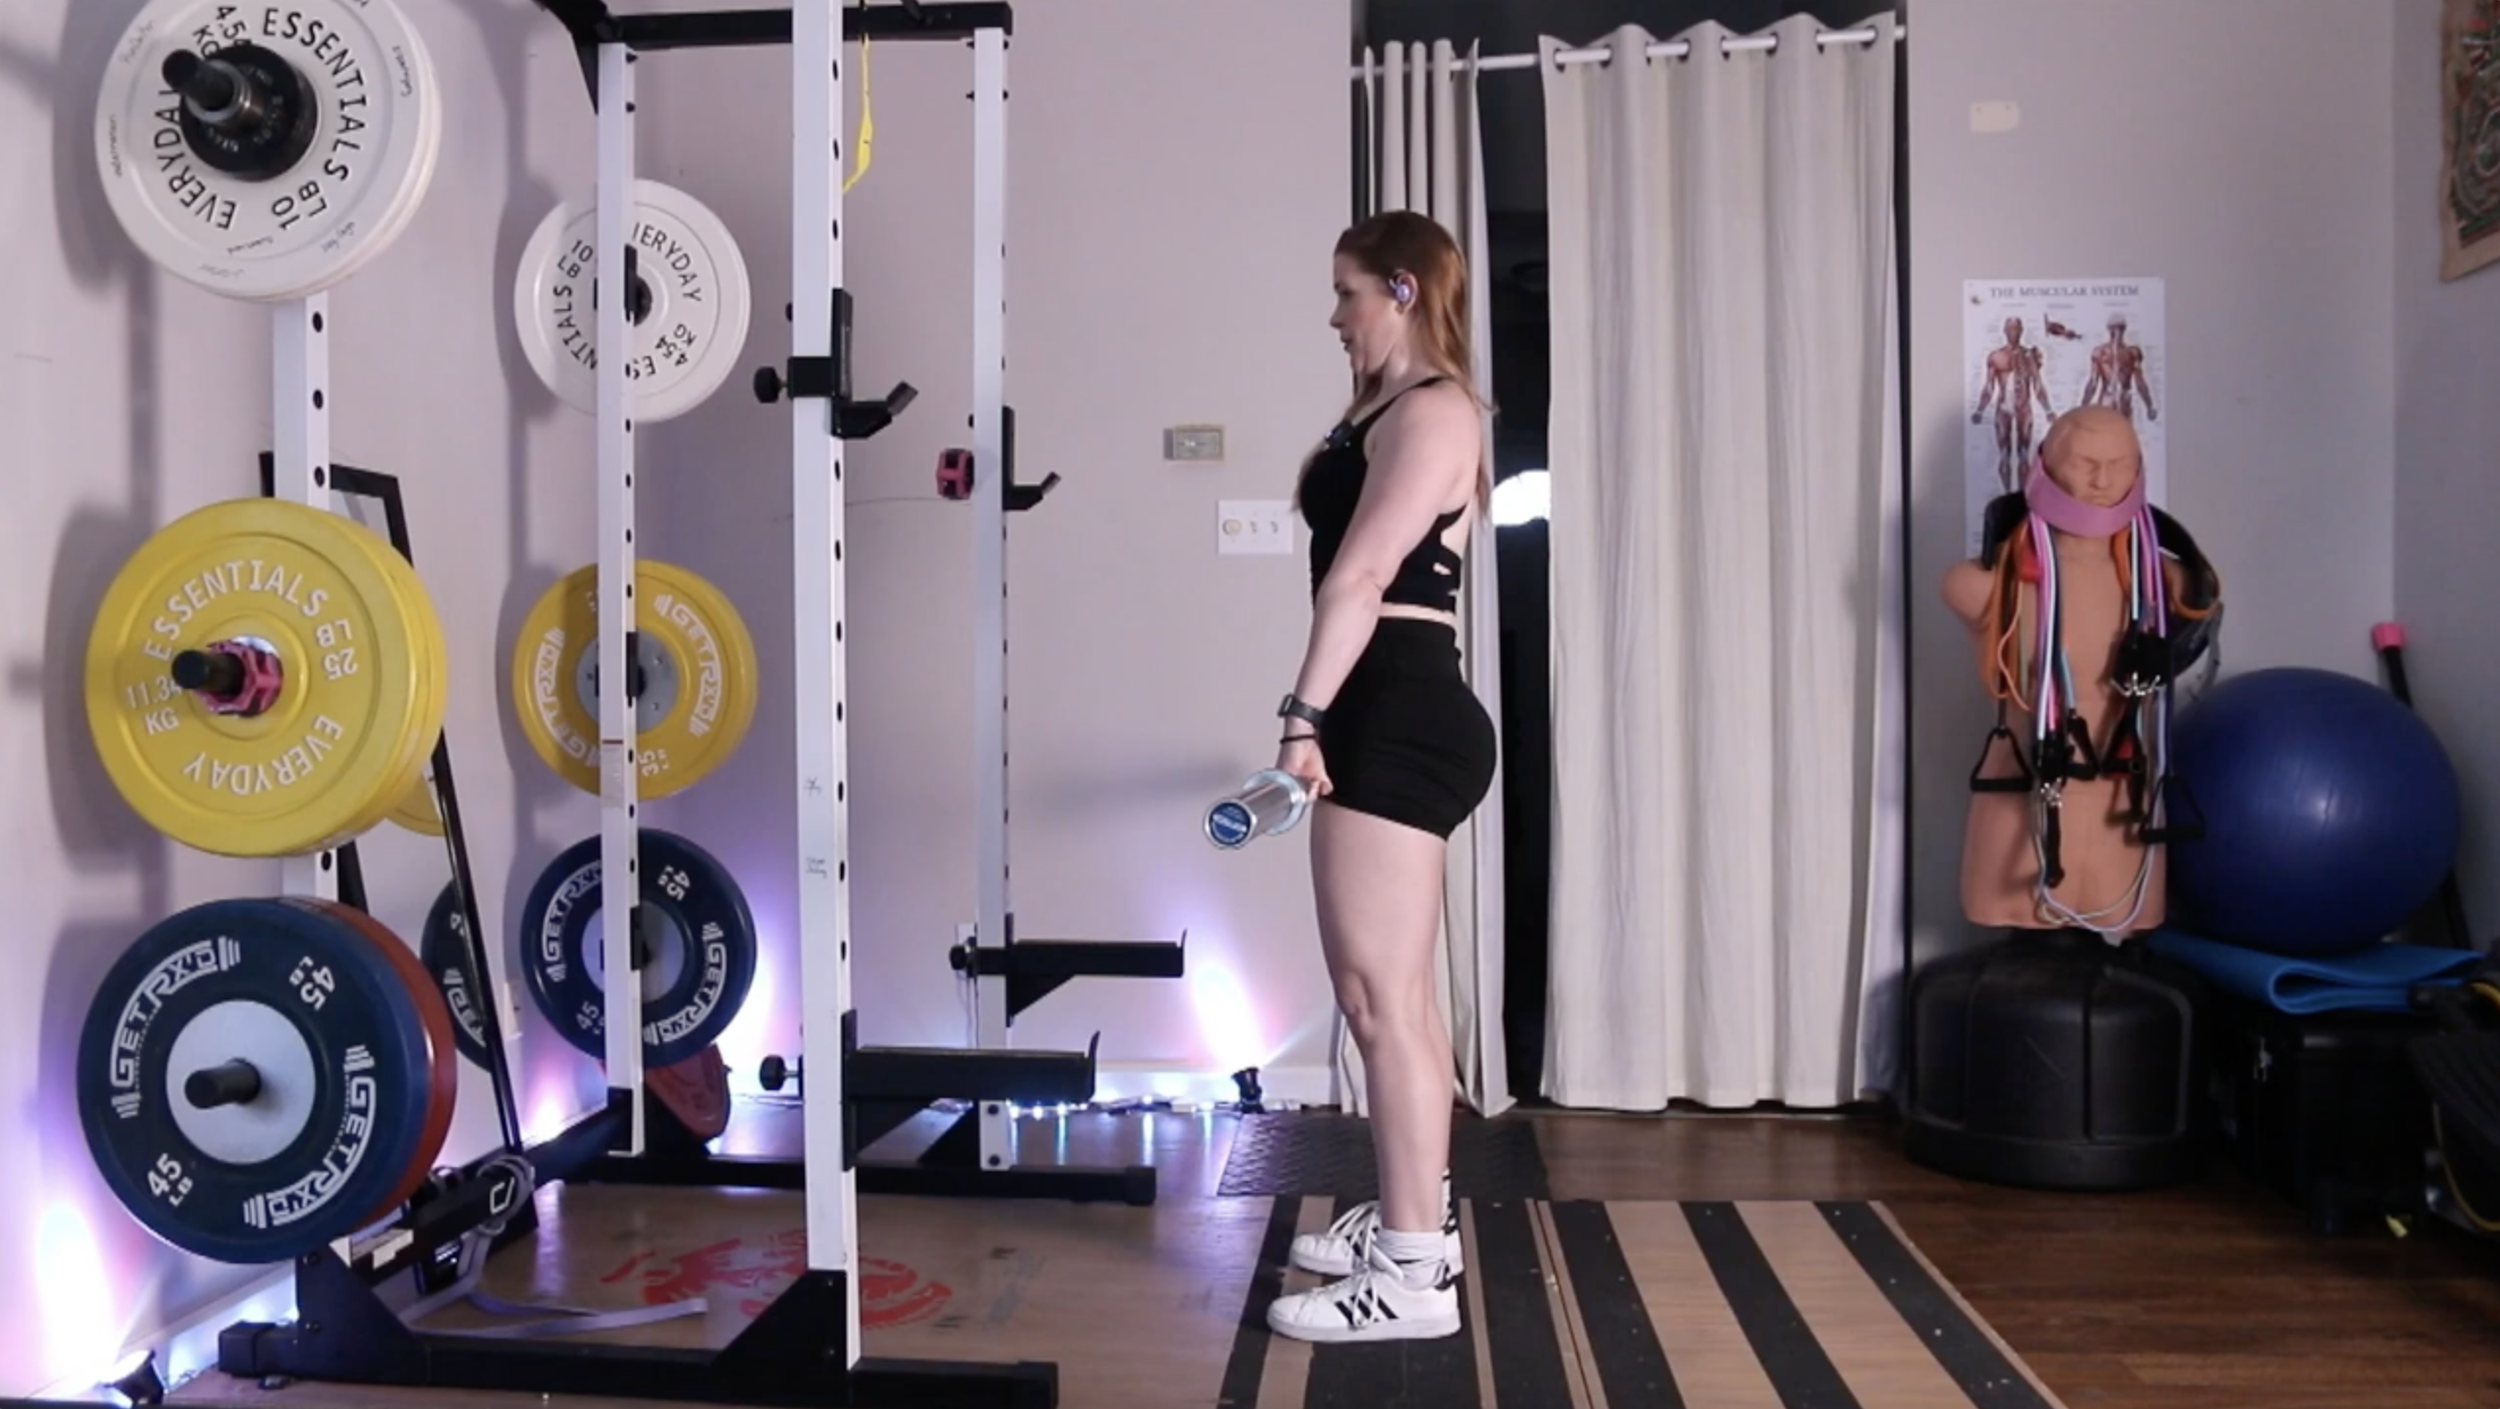
You can also do this exercise with a trap bar:
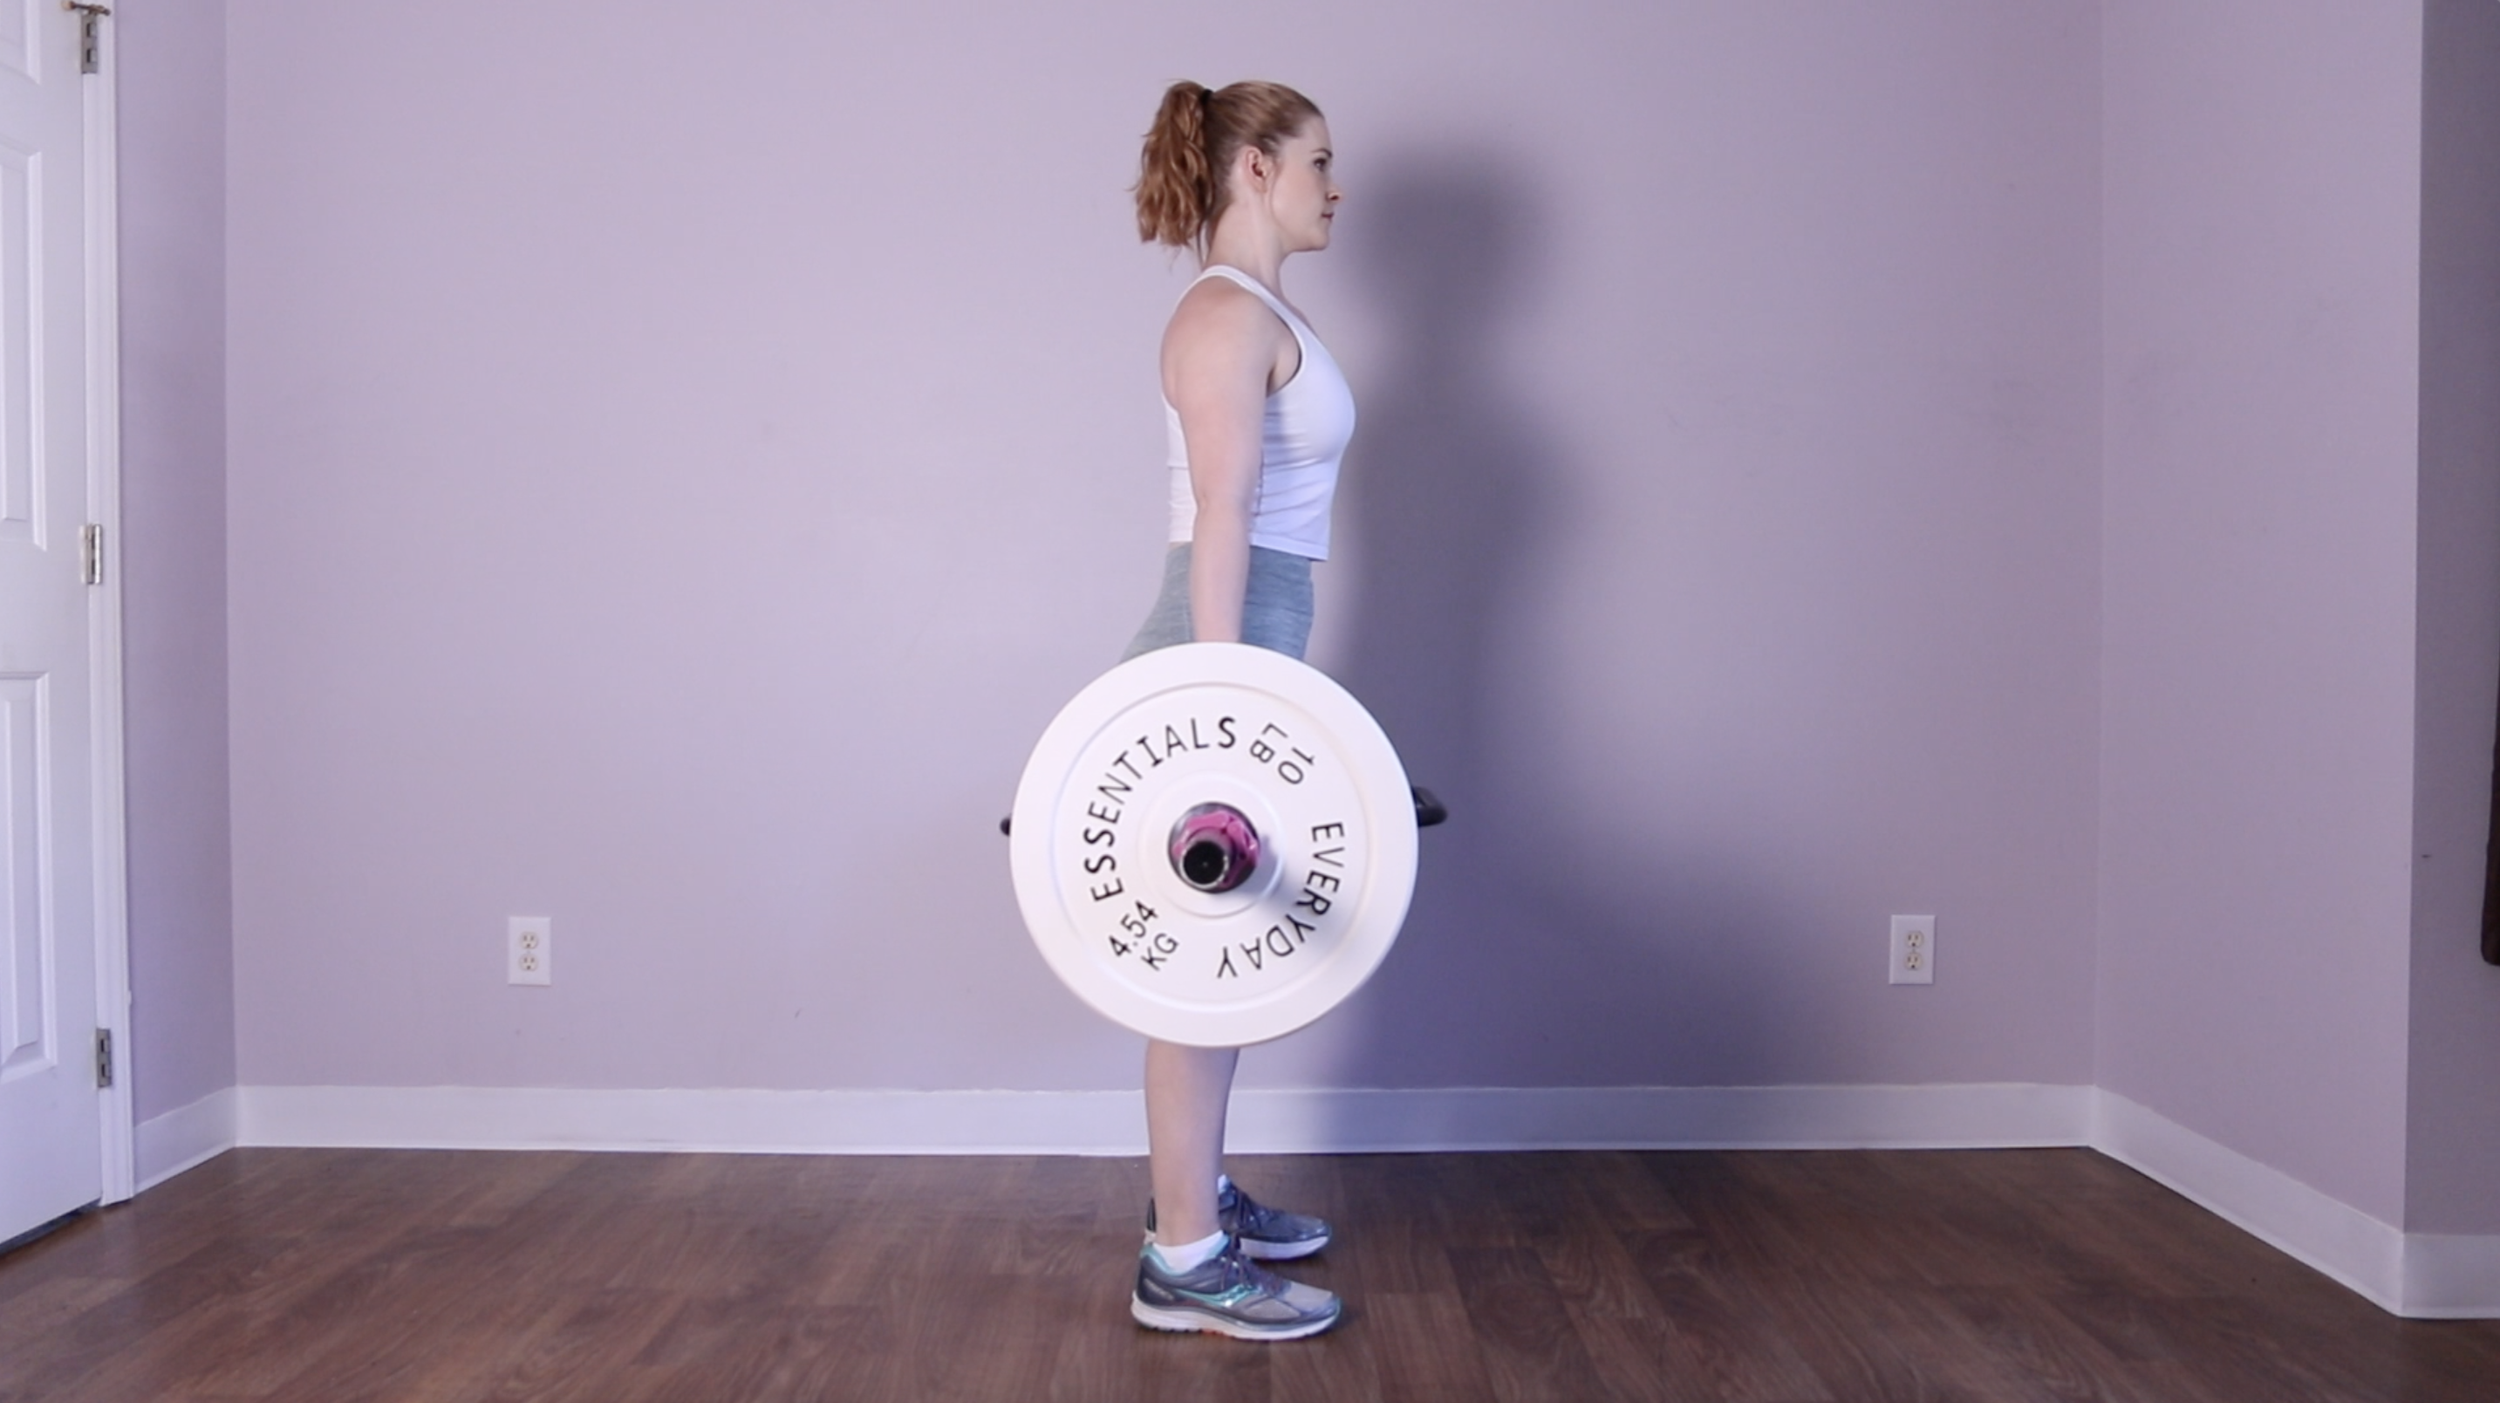
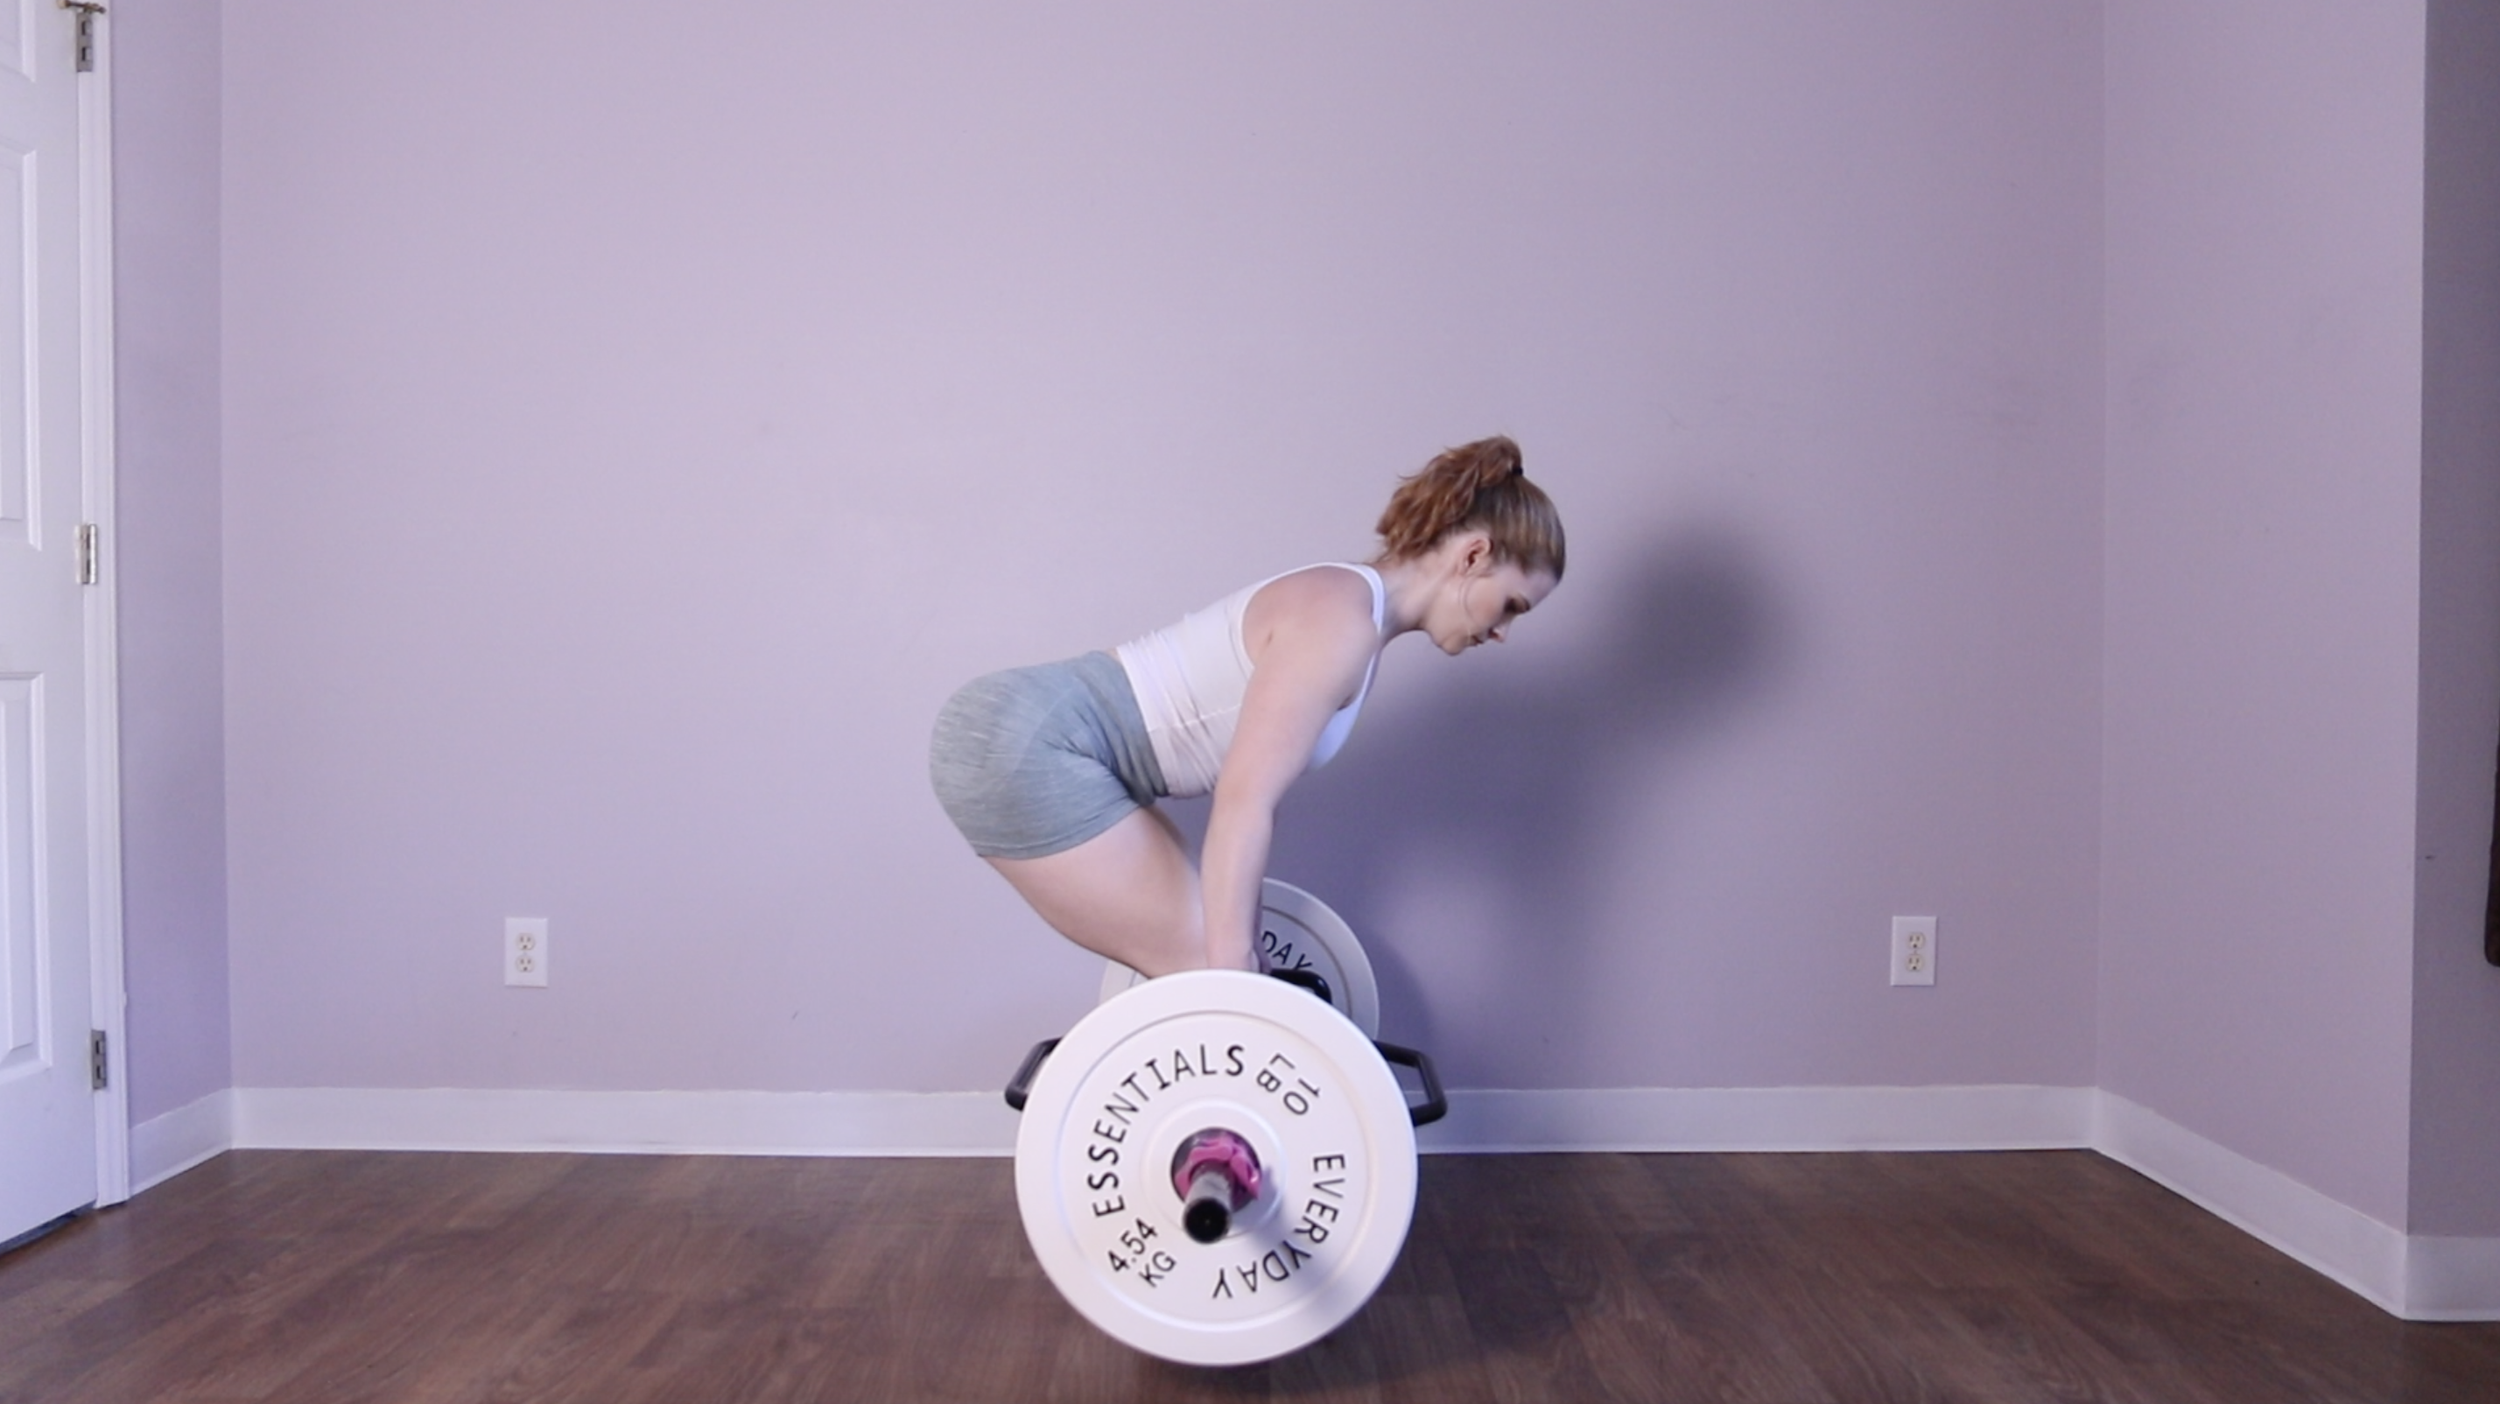
Important cues to keep in mind for performing RDLs:
Maintain a neutral spine throughout the movement to protect your lower back. Avoid rounding or excessively arching your back.
Initiate the movement by pushing your hips back rather than bending forward from your waist.
Keep the weight close to your body throughout the exercise to minimize stress on your lower back.
Focus on engaging your hamstrings and glutes while maintaining tension in these muscles during the eccentric and concentric phases.
Control the movement and avoid using excessive momentum or bouncing the weight off the floor.
How to Assess Your Romanian Deadlift (RDL) Technique
Take Video
The best way to assess your deadlift technique is to take a video of yourself performing the exercise from the side, front, and back. This allows you to focus on performing the exercise and avoid injury from turning your head or craning your neck to look in a mirror.
Set up your smartphone or camera facing the profile (side) of your body. Make sure your whole body is in frame from the beginning to the end of the movement. Your feet, head, hips, and knees should all be within the picture for the entire video. You can need to prop your camera up using another piece of gym equipment, or you can use a tripod. You can also ask a friend or fellow gymgoer to hold your phone/camera and film for you.
Once the camera is set up, perform a set of your deadlifts like you normally do—recording the entire set from picking up the weight until you put the weight down.
Afterward, watch the video of your deadlift and assess it for the technique cues outlined above.
Warning Signs
Another important way to assess your technique is to listen to your body while performing the exercise. Key questions to ask yourself are:
Do I feel any pain or discomfort anywhere at any point of the movement?
Do I keep my balance throughout the entire range of motion?
Are there parts of the movement where I move slower?
Is there any point of the movement where I change my positioning (i.e., rounding the spine and/or shoulders forward, weight shifting to one side, weight shifting forward or back, weight coming forward instead of straight down)?
The answers to these questions can give you a clue to where your RDL technique is breaking down. This, in turn, can help you decide what to do to improve your deadlifts.
Common Mistakes
Mistake 1: Reaching the Weight Towards the Floor
It’s super common for people to view the RDL as an “up and down” movement because the weight moves down and up. But thinking about the exercise this way can lead to the mistake of rounding the spine and shoulders and reaching the weight towards the floor—which puts a lot of pressure on the back and can lead to injury.
Instead, think of the RDL as a “back and forth” movement—this movement is all about the hips going back behind you and then returning forward to the starting position.
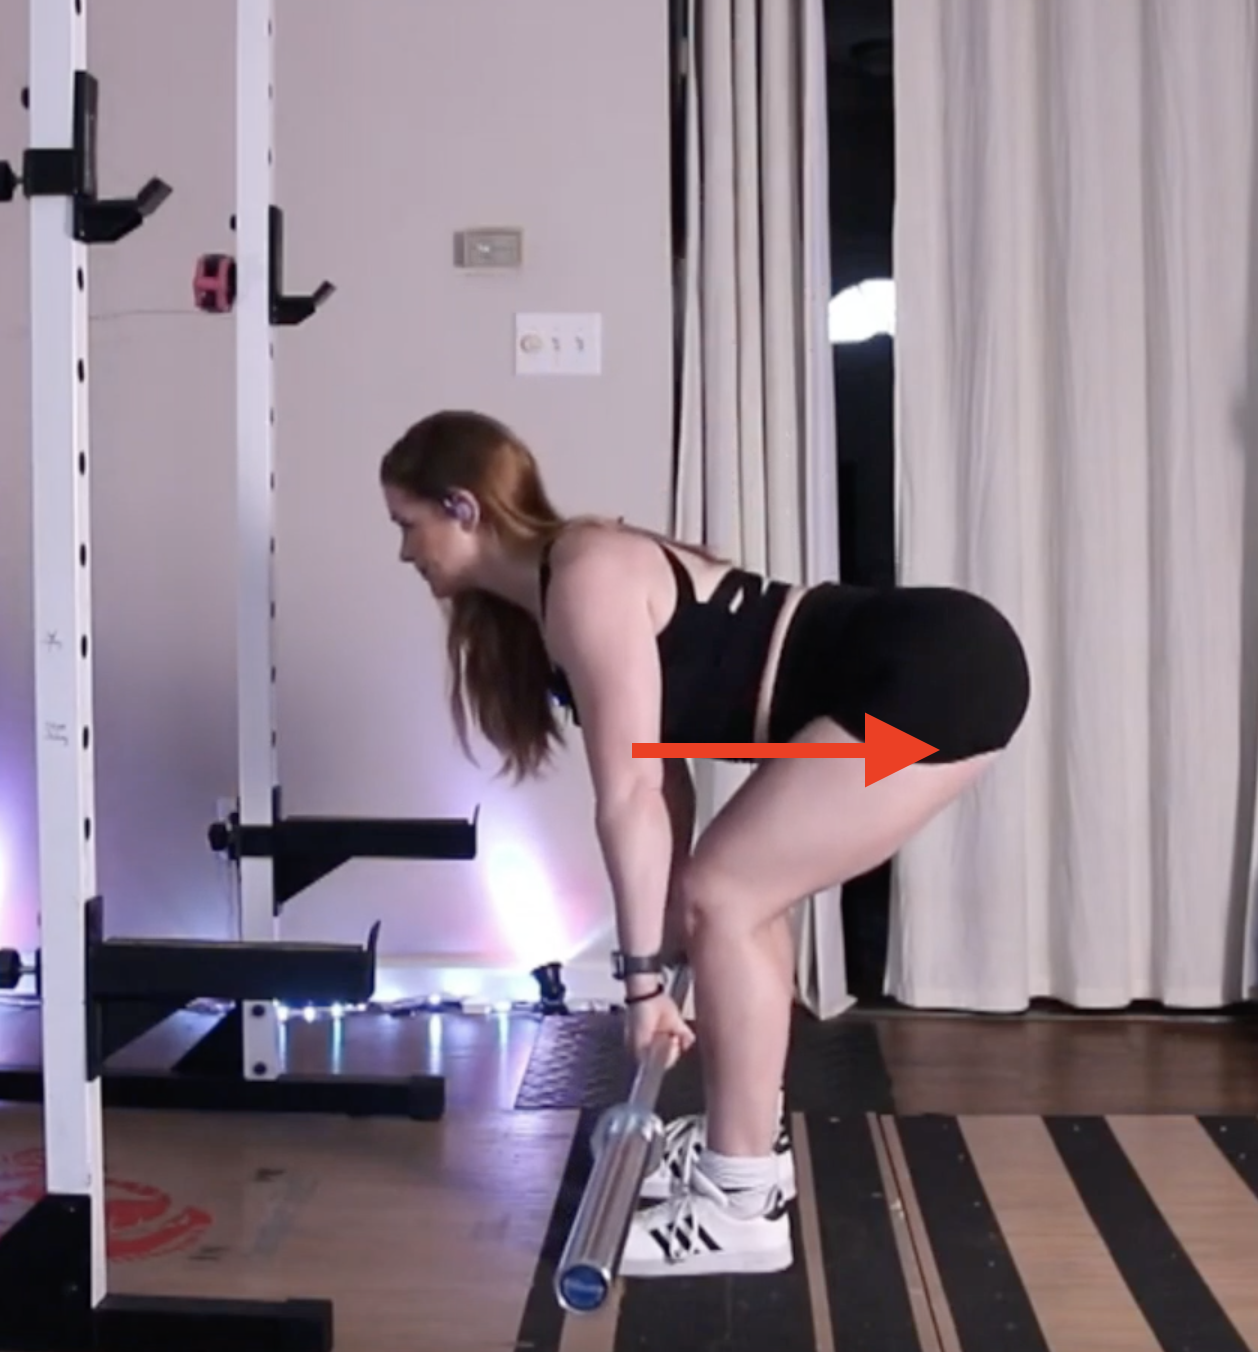
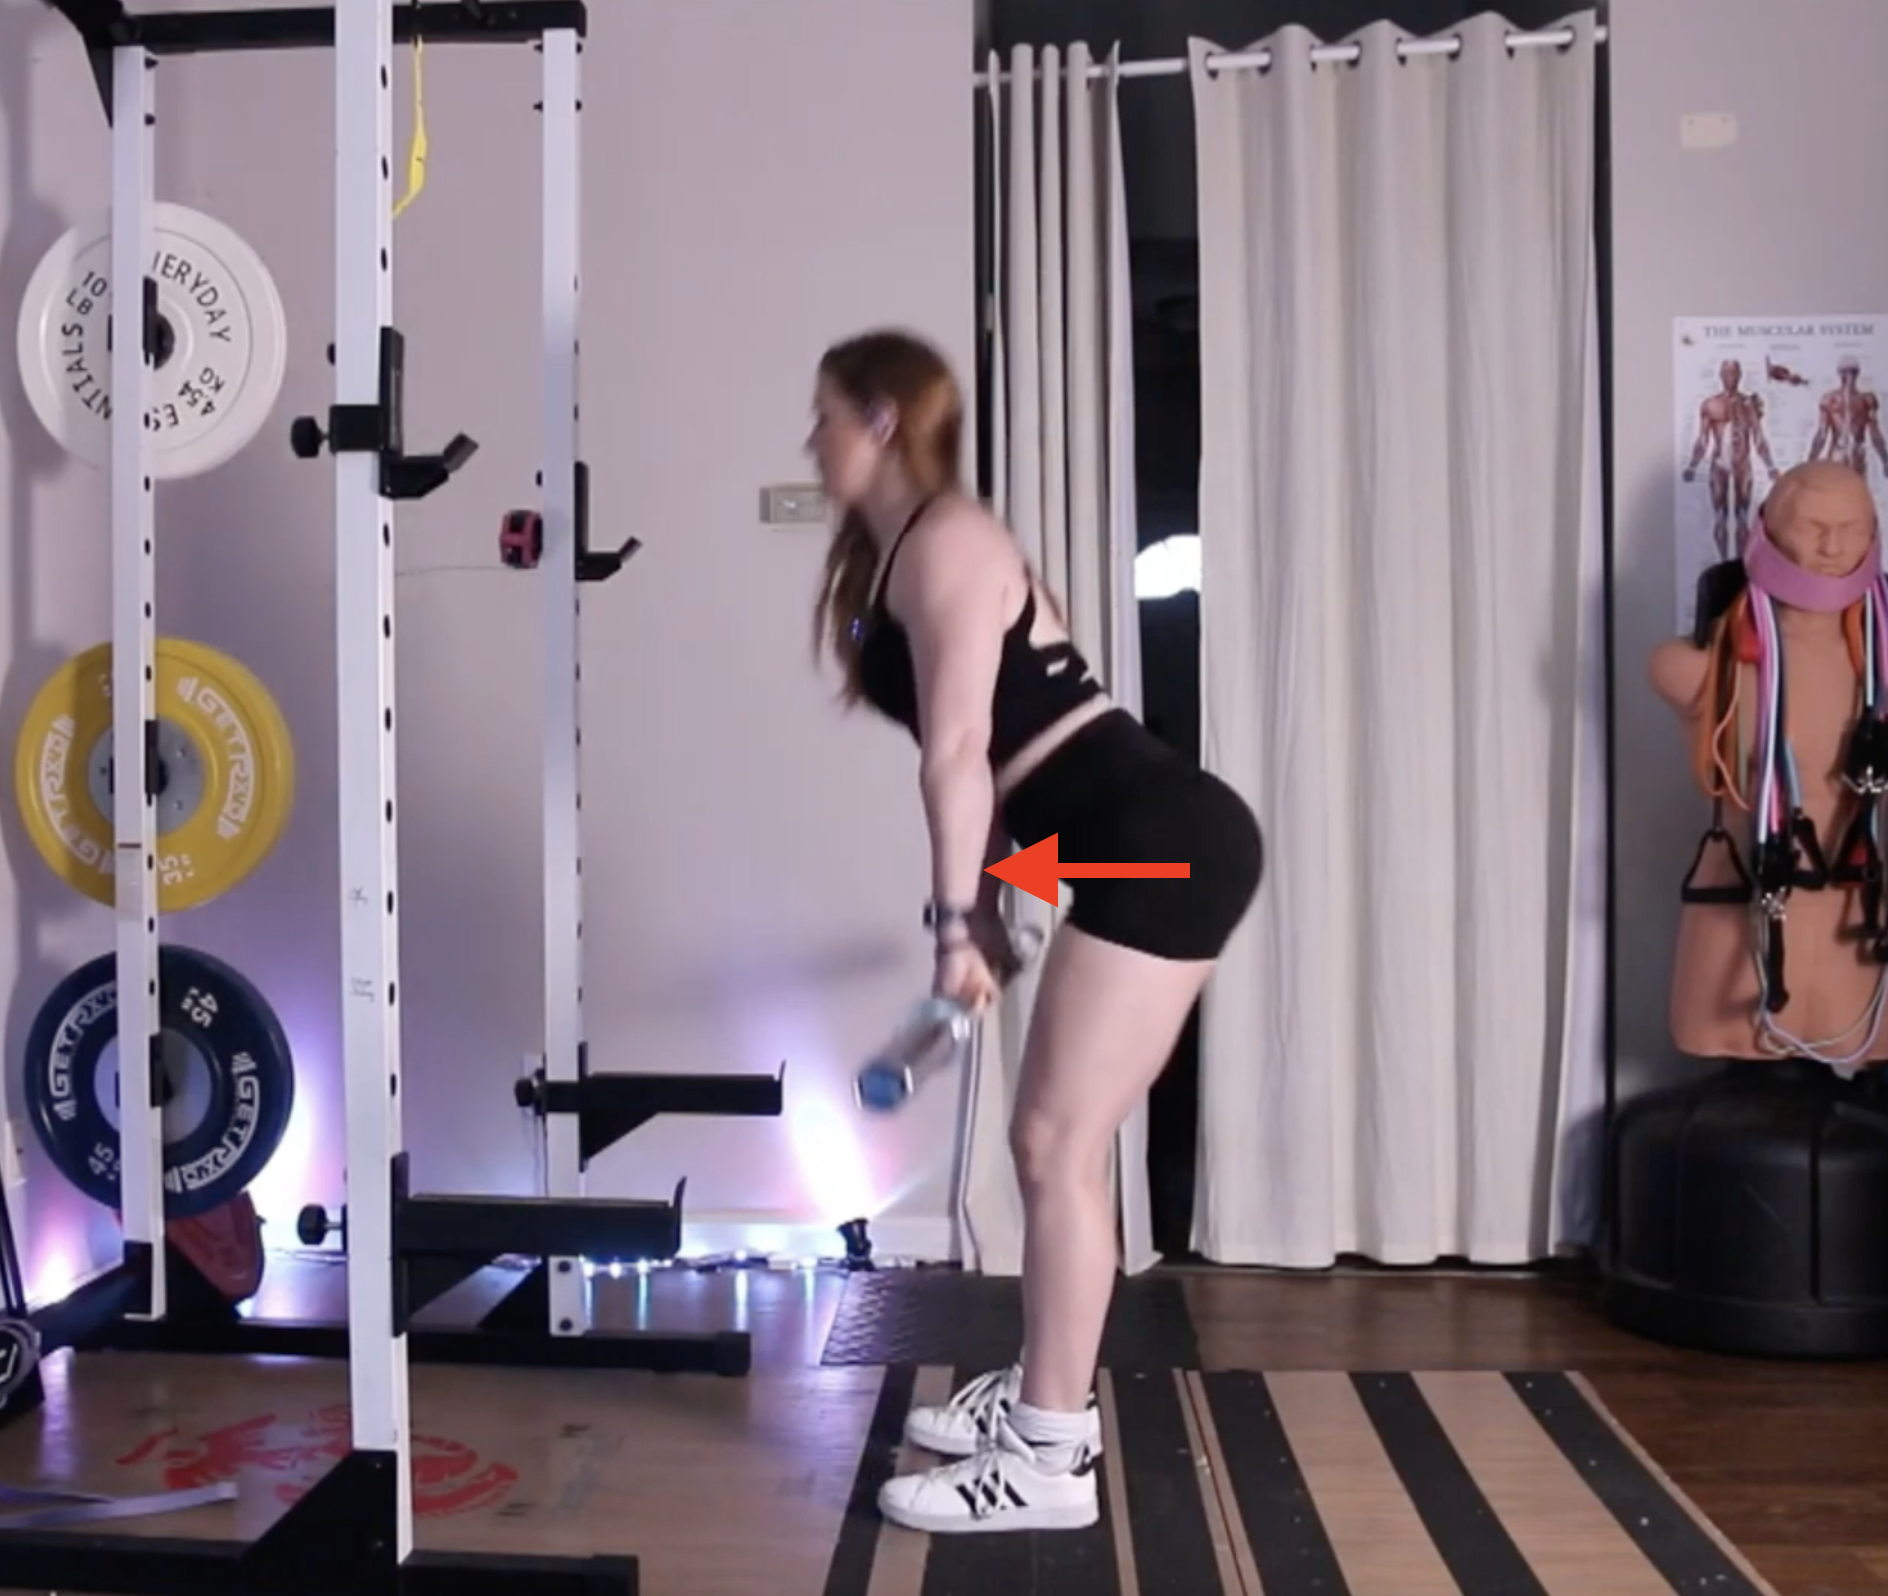
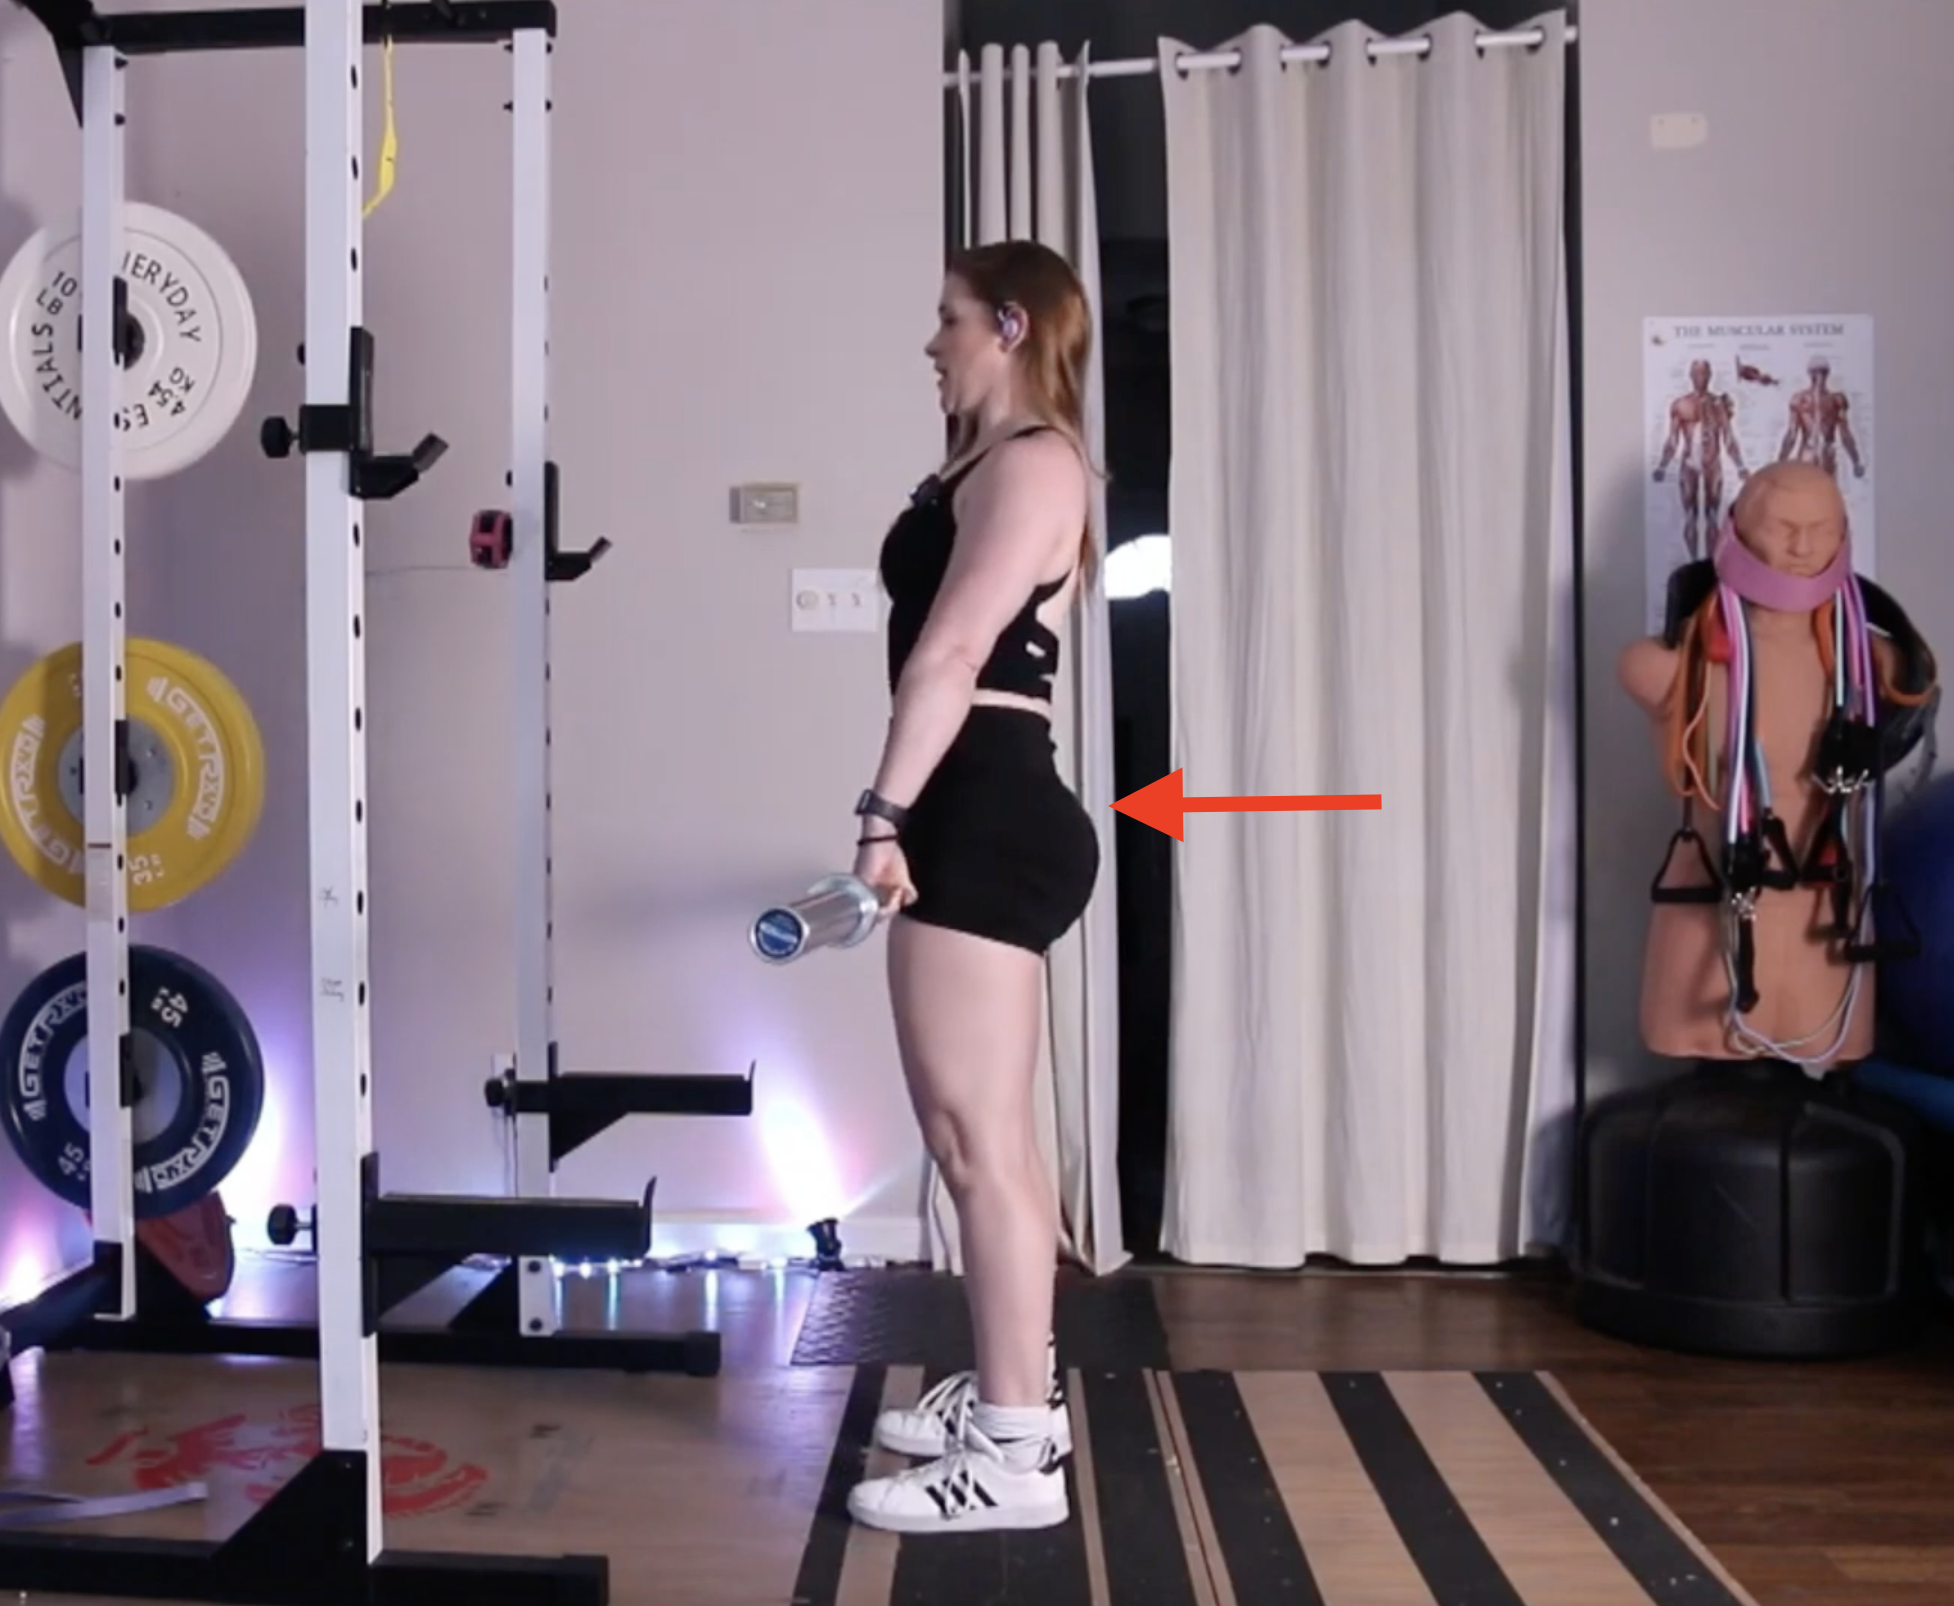
How to fix it:
While performing the exercise, focus on keeping your torso rigid. Squeeze your armpits to engage your lats, and actively push your chest forward—try to keep this engagement throughout the entire movement. As you push your hips back, stop the movement when you feel your hamstrings stretch and stop all movement of the weight and your torso once your hips stop moving. To come back up, engage your glutes, drive your heels down into the floor to bring your hips back forward, and straighten up to standing. Imagine holding a plank while you do the exercise—you should keep your torso rigid and your core muscles engaged in the same way as you perform the exercise.
Mistake 2: Hyperextending the spine
Sometimes people over-correct for a rounded spine by arching the back in the opposite direction. This makes the back look like you’re doing a standing cow pose from yoga. Telltale signs of a hyperextended spine are lower back pain or strain while lifting and a head tilted up with eyes forward. If you take a picture or video from the side, you’ll notice a bend in the back.
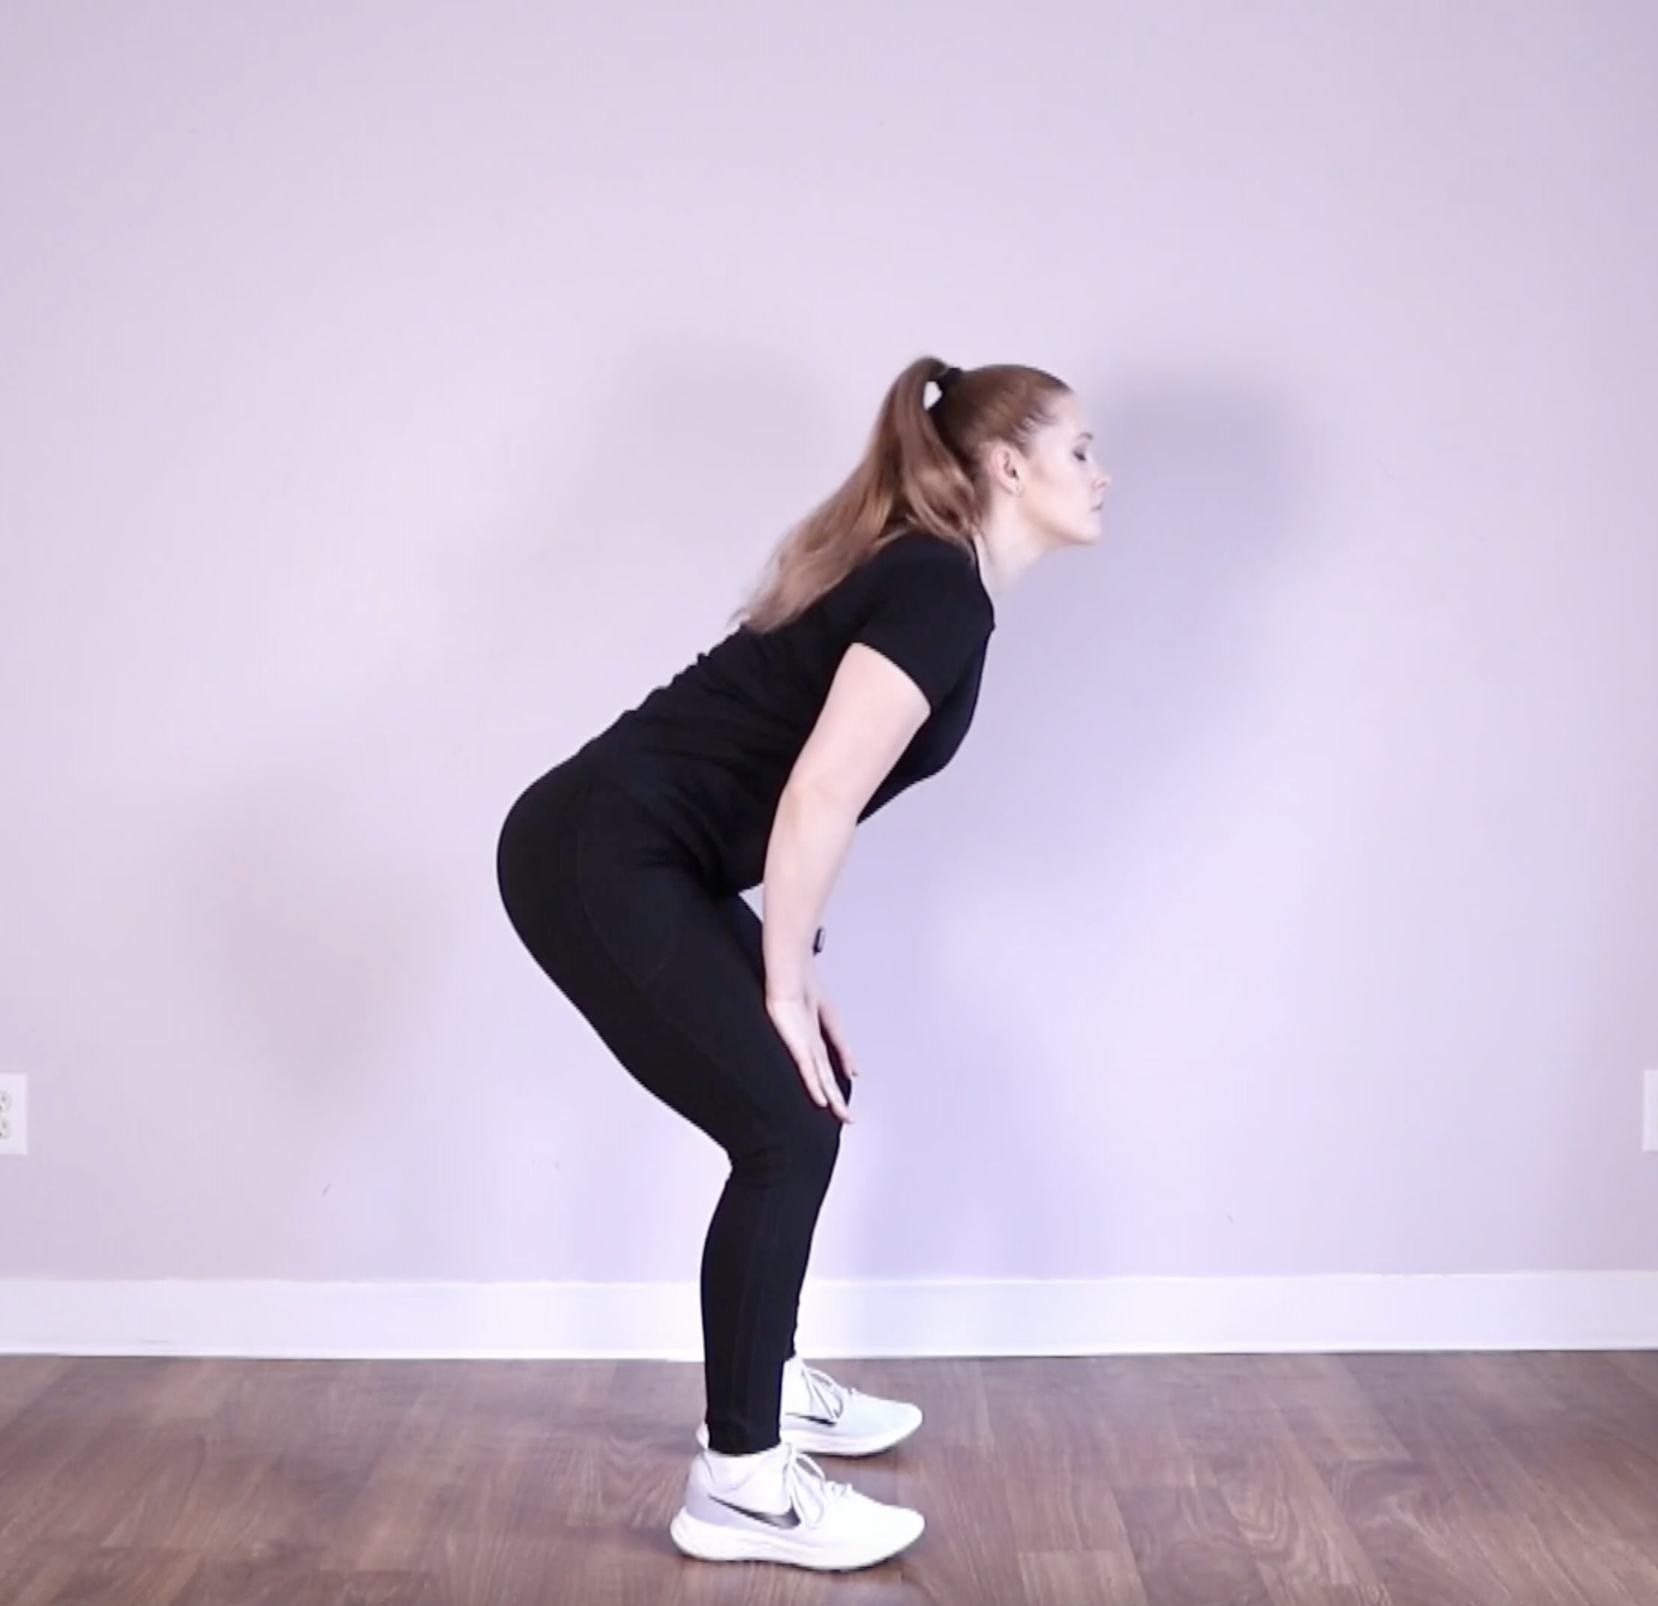
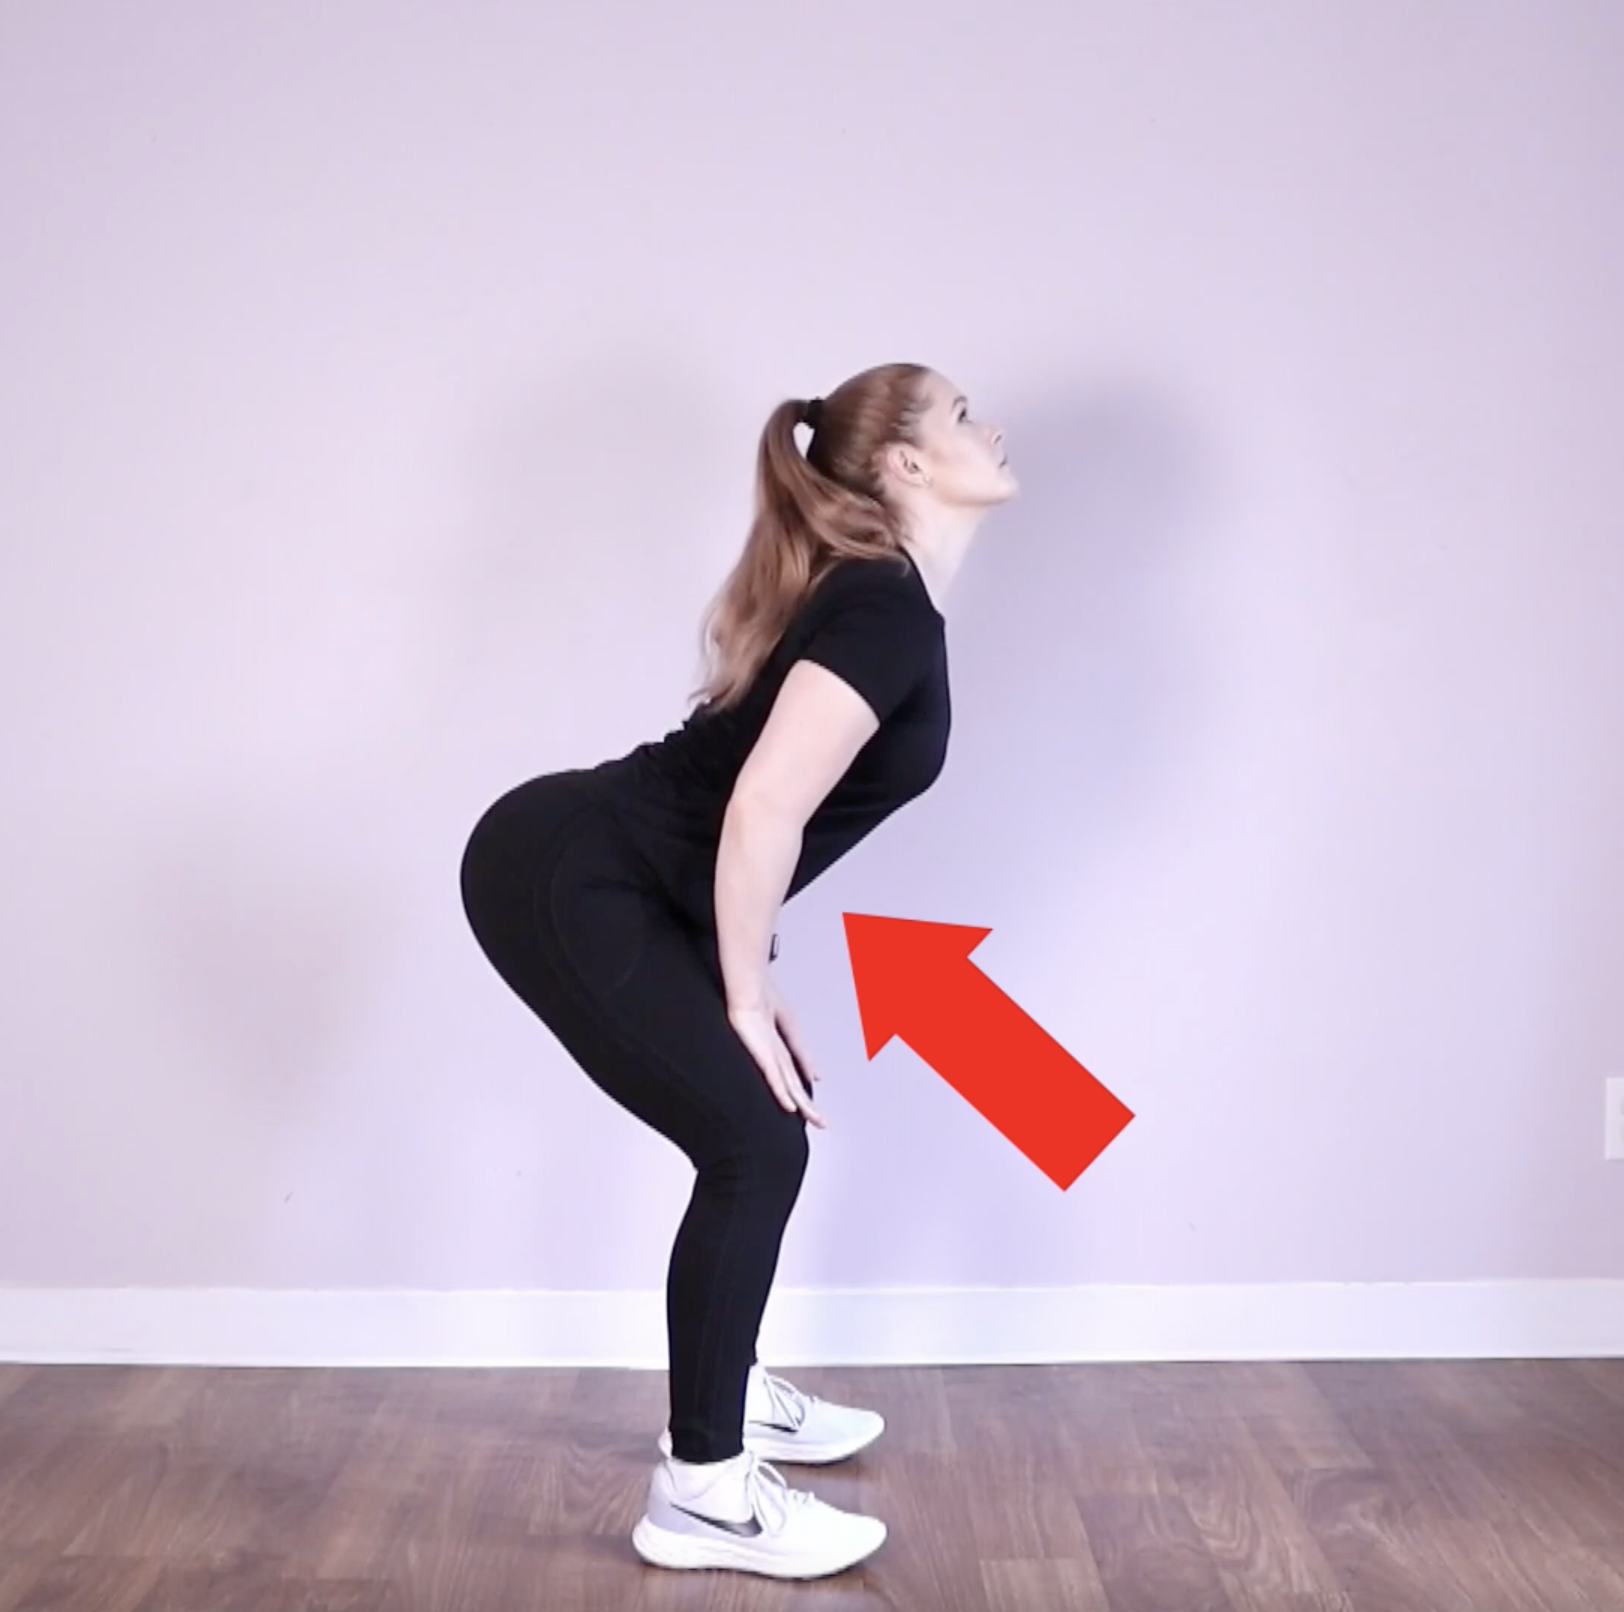
How to fix it:
Before you practice your deadlifts, warm up your core with some hip tilts and core stabilizing exercises like dead bugs and bird dogs. These will help you to become more aware of your spinal alignment so that you can actively correct it as you lift. As you perform the deadlift, actively engage your abdominals to keep your hips in a neutral position.
Mistake 3: Too Much Knee Bend
People often have trouble figuring out the degree of knee bend to hip-hinge needed to perform a RDL correctly. You don’t necessarily have to keep your knees completely straight (unless you’re trying to perform a stiff leg deadlift), but you only want to bend your knees enough to allow your hips to move back. At the bottom of the movement, your knees should not go past your toes, and ideally, they should stay right above your ankles.
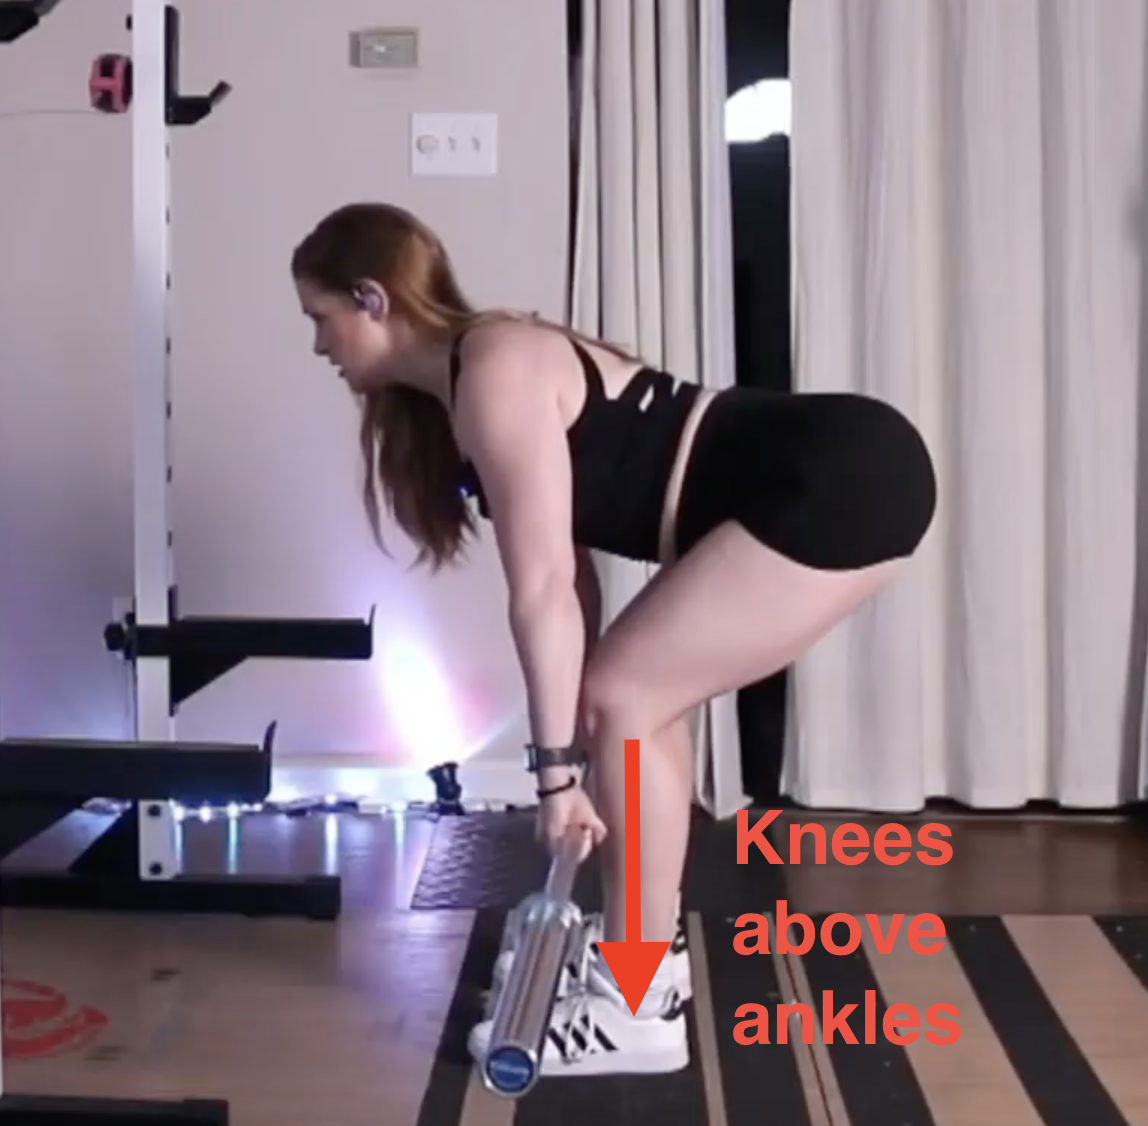
How to fix it:
Take a video of your form from the side as you perform the RDL. At the bottom, if your knees are over your toes or past them, that’s a sign that you’re squatting your deadlift. Continuing to train this way will minimize the gains you get in your glutes and hamstrings (which is, like, the point of this exercise).
To fix this, as you descend into the bottom of the exercise, try to keep your knees more straight—not locked out, just straighter. Keep pushing your hips back until you feel a stretch in your hamstrings (back of the thighs) and allow your weight to shift back into your heels a bit more. Stop all movement once you can’t push your hips back anymore due to the stretch in your hamstrings. Then engage your glutes to come back up.
Mistake 4: Ramping the Weight Up the Legs
Sometimes, you may get “stuck” on the way back up from the bottom of a deadlift and it becomes very difficult to finish standing up. Some lifters will “hitch” the weight up to get to the top of the lift by bending their knees and using their thighs as a “ramp.” They may either slide the weight up the thighs (ramp) or use the legs to “bump” the weight up the thighs (hitch).
Neither of these techniques is good for proper RDL form. Ideally, you should be able to pull the weight up to standing without having to use your thighs as a ramp or hitch. If you keep getting stuck halfway up in the RDL, then you may be using more weight than you should. Only use the amount of weight that you can execute the movement with good technique throughout the entire range of motion.
Also, use the same tips as above regarding “squatting the deadlift” to keep your legs more straight and your body weight back.
More Tips to Improve Your Romanian Deadlift
Warm Up Properly
I’ve said it before, and I’ll probably say it in every technique post: don’t skip your warmup!
Skipping the warmup can lead to injury—since tight muscles and stiff joints can lead to sharp pains in the joints or even a pulled muscle.
Always take 5-10 minutes to do some moderate-intensity cardiovascular exercise (like walking on a treadmill, using a rowing machine, or riding a stationary bike) before you train. Also make sure to do some dynamic stretches to loosen up tight muscles and prep your body for more intensity.
If you have any tight muscles that don’t loosen up during the cardio and dynamic stretches, you can try applying pressure to the muscles using a foam roller or medicine ball on your legs or upper body.
Depending on the intensity of your workout, you may also include what are called “priming” exercises at the end of your warmup. These are exercises that allow you to activate the muscles that you’ll be using during the challenge portion of your workout. These also give you a chance to rehearse the challenge movement using less weight or intensity.
Good priming exercises for the RDL are things like bridges, hip thrusts, and band good mornings.
2 Go Slow
The number one adjustment for improving your deadlift technique is to slow down your reps and add a pause at the bottom. This is why many of my training programs include deadlift variations using the 4:2:1 reps (4 seconds down, 2-second pause, 1 second up).
Practicing this way allows you to correct any slight errors that may occur without noticing during faster reps. It also helps you improve strength by developing control of the entire range of motion. Slow eccentric training is also a super effective way to grow more muscle, especially in the hamstrings and glutes.
I recommend including at least one set of slow eccentric RDLs in each deadlift workout, either as the main exercise or as a priming exercise during your warmup.
3 Reduce the Weight
If you’re having trouble performing the RDL with good technique, try using less weight and see if your form improves.
Only use as much weight as you can control, keeping your body in good alignment throughout the entire range of motion. Using too much resistance can cause pain and also lead to form failure. It’s not worth it to risk injury only to add a few more pounds or kilograms onto the bar.
4 Improve Core Stability
Having poor core strength can lead to back pain or tiredness in the back muscles while deadlifting. It can also lead to difficulty keeping your spine in alignment (i.e., “straight”) throughout the movement, and you might find yourself caving forward.
To strengthen your core stability, first get into the habit of firing up your core at the beginning of your training sessions by practicing imprinting on the floor.
Core stabilizing exercises like planks & plank variations and standing balance exercises like step back to single leg balance, step ups, and lunges can also help you to develop core stability.
5 Improve Grip Strength
Once you master the basic technique of the RDL, you may find that your legs and back need more weight than what your hands can hold for the duration of your sets. This is a sign that your grip strength is weaker than your legs, and it’s one of the most common problems my clients have with their RDLs.
One way to address this is to work on building your grip strength by only using the weight that your hands can handle for your RDLs. This means your glutes, back, and hamstrings won’t get as fatigued during your sets—so you should incorporate other exercises in your training routine that target these muscles (i.e., hip thrusts, step-ups, kickbacks, and bridges).
You can also add other exercises that challenge grip strength to your workout routine, like farmer carries, rows, assisted pullups, and pulldowns.
The Bottom Line
If you are unsure about your RDL technique and would like some guidance, reach out to me when I’m live on Tuesdays on Twitch. I do Technique Tuesdays on the second Tuesday of each month for people who post their exercise videos to the #technique-reviews channel of my Coaching Corner Discord server (click here to access). If you aren’t able to attend live, don’t worry! I’ll save the Technique Reviews as a highlight and repost it to my Youtube channel to watch whenever you get the chance :)

7 Ways to Improve Your Squat Technique
Mastering the squat is super important for staying injury-free in the gym. It’s also one of the basic movements of the human body. Improving your squat technique can help you have better posture and move better in your everyday life.
Before adding any weight or resistance to the squat, make sure that your technique is spot on by checking your form against the tips below.
Mastering the squat is super important for staying injury-free in the gym. It’s also one of the basic movements of the human body. Improving your squat technique can help you have better posture and move better in your everyday life.
Before adding any weight or resistance to the squat, make sure that your technique is spot on by checking your form against the tips below.
How to Squat Correctly
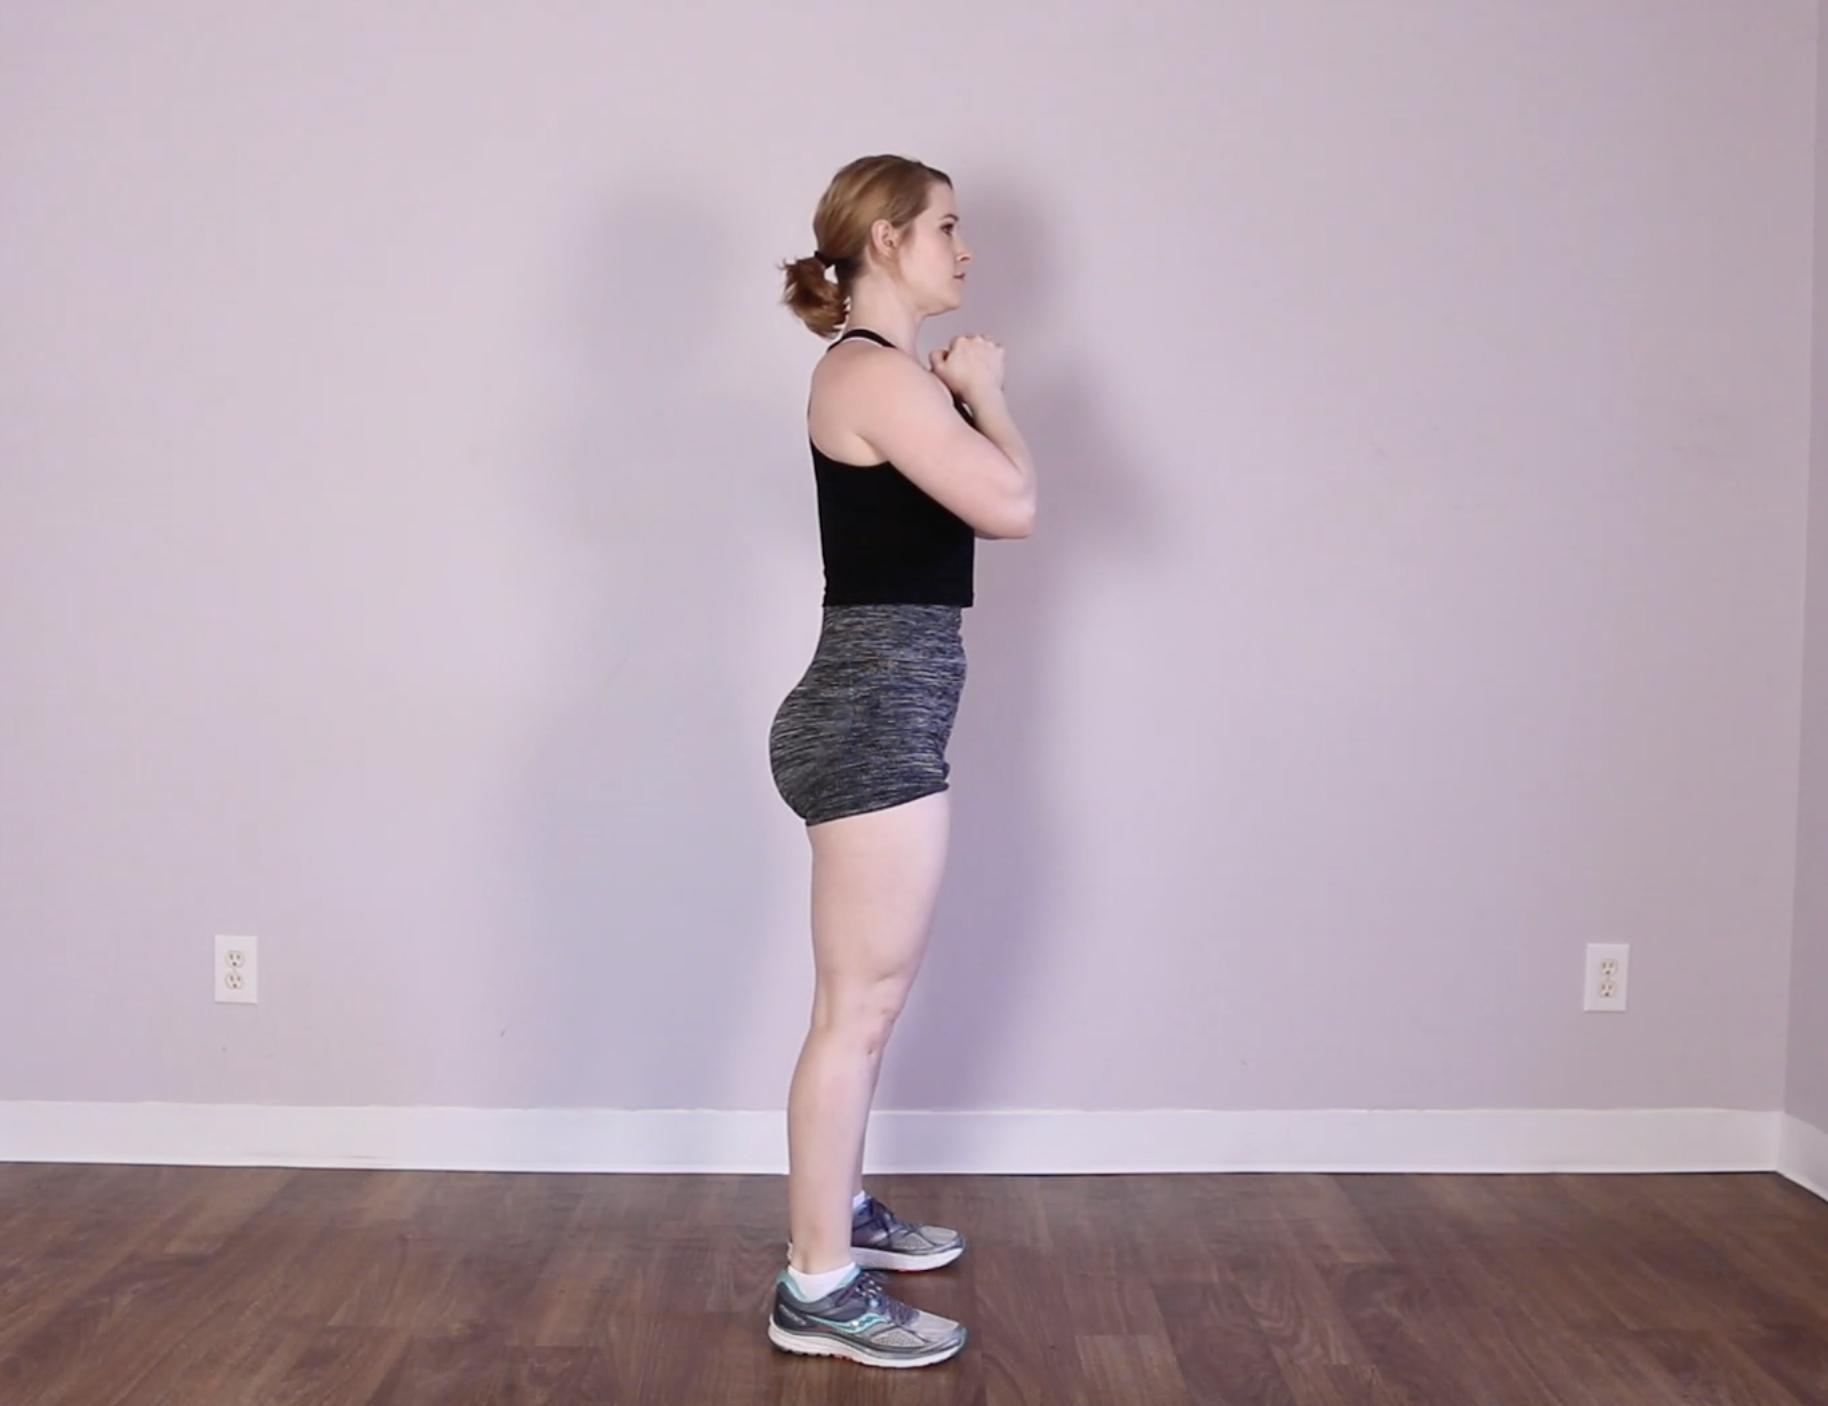
Stand with your feet shoulder-width apart or slightly wider with your toes pointed slightly outward.
Take a deep breath into your belly and engage the muscles in your core (i.e., abdominals, obliques, transverse abdominis, and back muscles). Keep these muscles engaged throughout the movement to keep your spine in alignment.
Initiate the movement by doing the following movements at the same time:
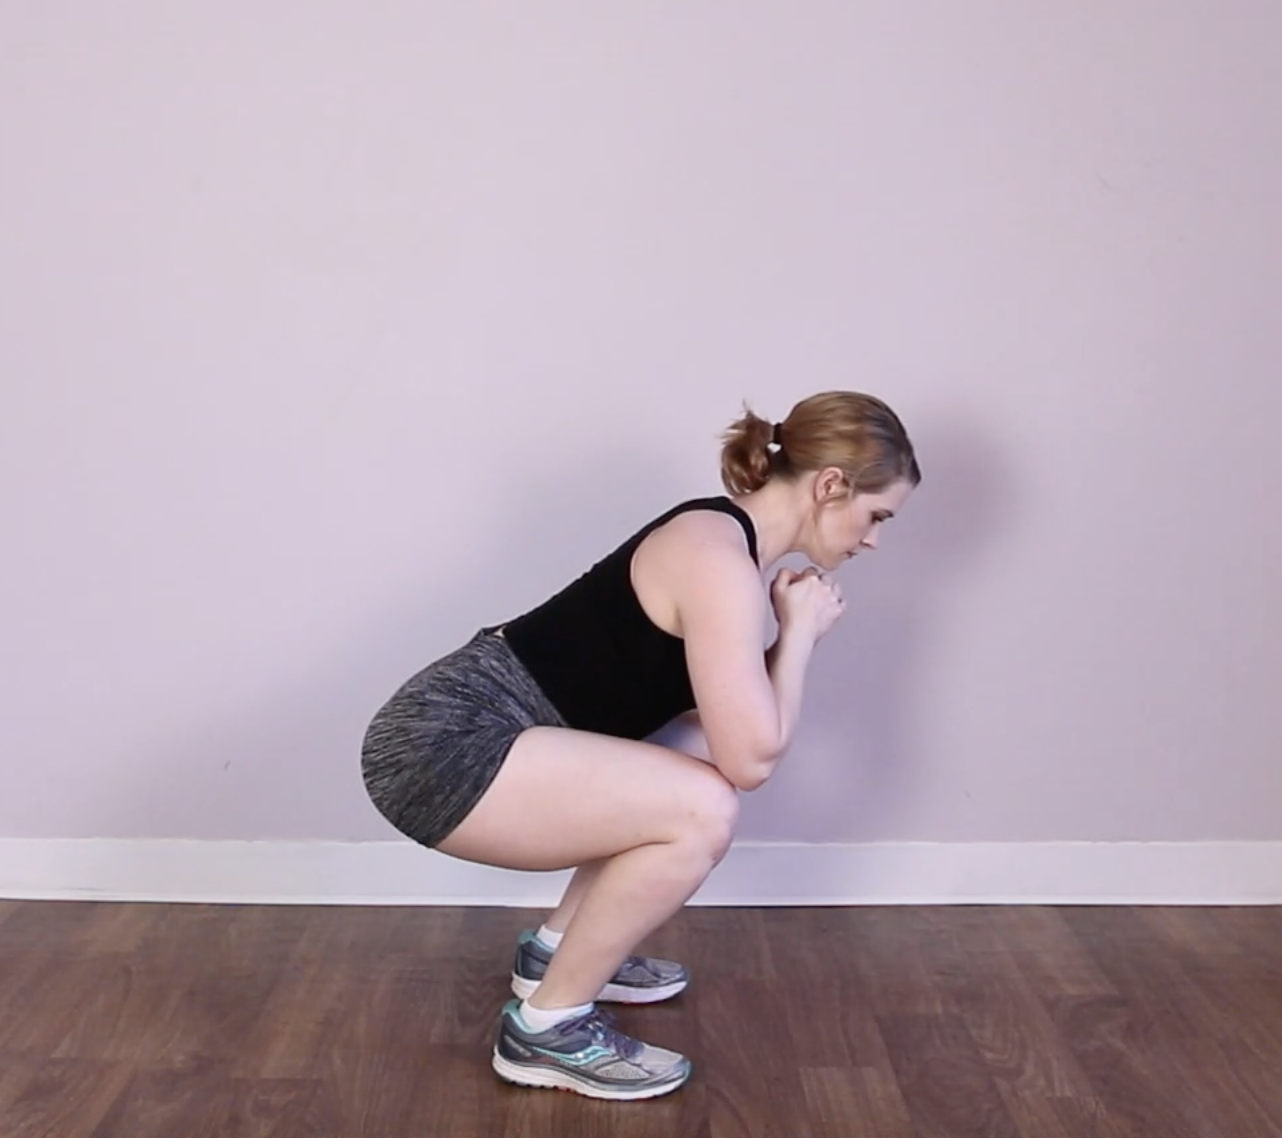
Hip Hinge: Push your hips back, keeping your back straight, and allow your chest and shoulders to tip forward as the hips go back.
Knee Bend: Bend your knees at the same rate as you push your hips back
Ankle Bend: Pull your toes up towards your knees to flex your ankles (dorsiflexion), allowing your knees to come forward.
Continue bending your hips, knees, and ankles to lower yourself into a sitting position. Stop all motion when you reach the limit of mobility for any of the joints.*
Pause briefly at the bottom of the squat while maintaining control and balance.
Engage your quadriceps & glutes to extend your hips and knees to stand back up, pressing your heels and the balls of your feet into the ground. Stop when you have returned fully to standing, with your hips under your shoulders and your knees under your hips.
*For powerlifting, the goal of the squat is to bring the hips to just below the level of the knees so that the thighs “break parallel” with the ground (USAPL Rulebook 2021).
How to Assess Your Squat Technique
Take Video
The best way to assess your squat technique is to take a video of yourself performing the exercise from the side, front, and back. This allows you to focus on performing the exercise and avoid injury from turning your head or craning your neck to look in a mirror.
Set up your smartphone or camera facing the profile (side) of your body. Make sure your whole body is in frame from the beginning to the end of the movement. Your feet, head, hips, and knees should all be within the picture for the entire video. You can need to prop your camera up using another piece of gym equipment, or you can use a tripod. You can also ask a friend or fellow gymgoer to hold your phone/camera and film for you.
Once the camera is set up, perform a set of your squats like you normally do—recording the entire set from picking up the weight until you put the weight down.
Afterward, watch the video of your squat and assess it for the technique cues outlined above.
Warning Signs
Another important way to assess your technique is to listen to your body while performing the exercise. Key questions to ask yourself are:
Do I feel any pain or discomfort anywhere at any point of the movement?
Do I keep my balance throughout the entire range of motion?
Are there parts of the movement where I move slower?
Is there any point of the movement where I change my positioning (i.e., knees collapse/valgus, weight shifting to one side, weight shifting forward or back, is any joint moving faster or slower than the other joints)?
The answers to these questions can give you a clue to where your squat technique is breaking down. This, in turn, can help you decide what to do to improve your squats.
7 Tips to Improve Your Squat
1 Warm Up Properly
This one goes without saying, but I’ll say it anyway 😊 Don’t skip your warmup! The warmup period at the beginning of your workout is an important chance for you to get blood flowing to your muscles, lubricate your joints, and prepare your body for training.
A good warmup should include 5-10 minutes of moderate-intensity cardiovascular exercise (like walking on a treadmill, using a rowing machine, or riding a stationary bike).
Your cardio warmup should be followed by dynamic stretches, which are low- to no-resistance movements that allow you to take your joints through their full range of motion. Pay attention to your muscles as you stretch, and take note of any areas that feel tight and might need more time to stretch. Main muscles to pay attention to are your quadriceps, hamstrings, glutes, and calves. If you will be practicing barbell back squats in your workout, make sure to stretch your shoulders, chest, and back as well.
If you have any tight muscles that don’t loosen up during the cardio and dynamic stretches, you can try applying pressure to the muscles using a foam roller or medicine ball on your legs or upper body.
Depending on the intensity of your workout, you may also include what are called “priming” exercises at the end of your warmup. These are exercises that allow you to activate the muscles that you’ll be using during the challenge portion of your workout. These also give you a chance to rehearse the challenge movement using less weight or intensity.
Skipping the warmup can lead to injury—since tight muscles and stiff joints can lead to sharp pains in the joints or even a pulled muscle.
2 Go Slow
The number one adjustment for improving your squat technique is to slow down your squat reps and add a pause at the bottom. This is why many of my training programs include some variation of the Slow Eccentric Pause Squat during the first and second blocks.
Practicing this way allows you to correct any slight errors that may occur without noticing during faster reps. It also helps you improve strength by developing control of the entire range of motion in the squat. Slow eccentric training is also a super effective way to grow more muscle, especially in the quads and glutes.
I recommend including at least one set of slow eccentric pause squats in each squat workout, either as the main squat exercise or as a priming exercise during your warmup.
3 Reduce the Weight
Sometimes, using too much resistance can cause pain and can also lead to form failure. If you’re having trouble performing the squat with good technique using weight, try using less weight and see if your form improves.
Only use as much weight as you can control, keeping your body in good alignment throughout the entire range of motion. It’s not worth it to risk injury only to add a few more pounds or kilograms onto the bar. No ego lifting!
4 Improve Core Stability
Having poor core strength usually expresses itself as back pain or tiredness in the back muscles while squatting. It can also lead to difficulty keeping your spine in alignment (i.e., “straight”) throughout the movement, and you might fined yourself caving forward.
To strengthen your core stability, first get into the habit of firing up your core at the beginning of your training sessions by practicing Imprinting on the floor.
Core stabilizing exercises like planks & plank variations and standing balance exercises like Step Back to Single Leg Balance, Single Leg Squats, Step Ups, and Lunges can also help you to develop core stability.
5 Improve Hip Hinge
Many people mistakenly think of the squat as simply bending the knees, but it’s just as much about hinging at the hips as bending the knees. If you don’t push your hips back enough during the squat, your knees will shoot forward and your heels will come off the ground—putting a lot of strain on your knees. If you experience knee pain when you squat and your squat looks like the picture below, it’s because you need to hinge your hips more.
Having poor hip hinge technique can also look like rounding the lower back—especially at the bottom of the squat. This can be a sign of poor core strength as well.
If your squat looks like either of the pictures above, make sure to incorporate hip hinging into your workouts. Before your squat workouts, rehearse the hip hinge with exercises like Band Good Mornings. Also make sure to include hip-hinging exercises in your resistance training, like Romanian Deadlifts. This will help build up the mobility and strength of your hamstrings, glutes, and back muscles while also building core strength.
Foam rolling the hamstrings, glutes, and back can also help to loosen tight muscles—which can also impact your mobility.
6 Improve Hip Mobility
If you have difficulty going deep into the squat, or if you feel tightness or pain in the groin area at the bottom of the movement, you may have poor hip mobility.
Poor hip mobility can look like excessively leaning forward in the squat, your knees drifting inwards as you descend, or shifting your weight significantly to one side when squatting down.
To improve your hip mobility, do exercises that strengthen and stretch the hip flexors, gluteus medius, gluteus minimus, and hip adductor muscles.
To strengthen the hip flexor muscles, practice core exercises like Dead Bugs, Single Leg Drop, and Bicycle Crunches. Standing exercises like Standing Knee Ups, Good Mornings, and Romanian Deadlifts can also help strengthen the hip flexors. Stretch the hip flexors with exercises like Floor Hip Flexor Stretch, Seated Quad Stretch, and Runner’s Lunge.
To strengthen the gluteus medius muscles, do exercises that involve hip abduction (that is, taking your leg away from the center line of your body). Hip abduction exercises include Standing Hip Abduction, Monster Walks, and Band Bridges. To stretch the gluteus medius, try variations of glutes stretches and the Figure 4 Stretch.
To strengthen the gluteus minimus, practice hip external rotation and abduction (meaning, the movement of opening up your legs). Good exercises for this involve Dirty Dogs, Standing Hip CARs, and Side-Lying Clams. To stretch this muscle, do variations of glutes stretches and the Figure 4 Stretch.
To strengthen the hip adductor muscles, perform what’s called hip adduction (that is, bringing your leg in towards the center line of your body). Try exercises like Side-Lying Hip Adduction and Standing Hip Adduction with a Band. Sumo stance exercises (like Sumo Kettlebell Deadlifts) and single leg exercises (like Drinking Birds and Split Squats) also engage the adductor muscles. To stretch this muscle, open your hips with stretches like the Butterfly Stretch, Spiderman Lunge, and Side Lunge.
You can also use a foam roller on your legs to apply pressure to loosen tight muscles in your hips.
7 Improve Ankle Flexibility
Poor ankle mobility often causes your heels to lift off the ground as you get deeper into the squat. It can sometimes cause you to feel off-balance like you’re going to fall backward when squatting low. You may also feel significant tightness in the calves or Achilles tendon as you lower down into the squat.
Poor ankle mobility usually comes from tight calves and weakness in the muscles around your ankles (like the tibialis anterior or “tib ant” for short). You can improve your ankle mobility by stretching your calves with exercises like the Wall Calf Stretch, Down Dog Alternating Calf Stretches, and the Seated Hamstring and Calf Stretch. Deficit Calf Raises are a great exercise for both stretching and strengthening the calves.
To strengthen the muscles around your ankles, practice exercises that involve ankle dorsiflexion (that is, pulling your toes up towards your knee). This includes Bench Knee Over Toe with Dorsiflexion, Squat Hold With Dorsiflexion, the Tib Ant Side to Side Squat, and the Tib Ant Forward & Back Squat.
If you’re having trouble loosening your calves from stretching, you should also try using the foam roller to put pressure on the muscles.
The Bottom Line
If you are unsure about your squat technique and would like some guidance, reach out to me when I’m live on Tuesdays on Twitch. I do Technique Tuesdays on the second Tuesday of each month for people who post their exercise videos to the #technique-reviews channel of my Coaching Corner Discord server (click here to access). If you aren’t able to attend live, don’t worry! I’ll save the Technique Reviews as a highlight and repost it to my Youtube channel to watch whenever you get the chance :)

5 Steps to Set a SMART Fitness Goal
January is the perfect time to set your intention for what you want to do with your fitness in the coming year.
By the end of 2025, what do you want to achieve?
It’s important to get clear on your goals because that helps you to stay focused and motivated in your workouts and nutrition throughout the year. It also will allow you to craft a step-by-step plan for what to do every day, every week, and every month to move toward what you want to achieve.
The best way to set yourself up for success is to make your goal(s) SMART. SMART stands for:
Specific
Measurable
Attainable
Relevant
Time-Bound
Setting a SMART goal can help you get clear on what you want and turn your goals from dreams into action.

January is the perfect time to set your intention for what you want to do with your fitness in the coming year.
By the end of 2025, what do you want to achieve?
It’s important to get clear on your goals because that helps you to stay focused and motivated in your workouts and nutrition throughout the year. It also will allow you to craft a step-by-step plan for what to do every day, every week, and every month to move toward what you want to achieve.
The best way to set yourself up for success is to make your goal(s) SMART. SMART stands for:
Specific
Measurable
Attainable
Relevant
Time-Bound
Setting a SMART goal can help you get clear on what you want and turn your goals from dreams into action.
How to Set a SMART Goal for Fitness
1 Get Specific
The first step in setting a SMART fitness goal is to make it specific. Rather than a vague goal like "I want to get in shape," define precisely what you want to achieve.
To get started on setting your specific goal, first as yourself: What does it look like for me to achieve my goal? Describe in as much detail as possible.
Then begin to refine your vision by asking yourself the following questions:
What specific aspect of my fitness or health do I want to improve (heart health, body fat, muscle, strength, energy levels, etc)?
What specific activities or exercises do I want to do?
Is there an activity or exercise that I want to learn how to do?
Refining your goal from vague to specific might look like going from saying “I want to lose weight” to saying "I want to lose 10 pounds of body fat." Instead of “I want to be in better shape” to "I want to run a 5K race."
The more specific your goal, the easier it becomes to create a roadmap for success.
2 How Will You Measure Your Goal?
Making your goal measurable will help you stay motivated and on task as you track your progress and celebrate milestones. Taking measurements will also allow you to adjust your plan if you aren’t moving in the right direction.
One way to measure your progress is to take body measurements (such as weight, inches around the waist and hips, and body fat percentage). I recommend taking these measurements every 4-6 weeks (if you’re using the ABC Trainerize app, you can log this info as Body Stats).
Another way to measure your progress is to track your workouts every time you train. Write down (or record in ABC Trainerize) what exercises you do and other relevant info like distance, speed, incline, how much weight you used, and the number of sets and reps you perform. If you’re doing one of my programs, enter this information into your daily workout plan, or you can write this info in a workout tracking sheet or fitness journal.
Think about your specific goal, and ask yourself: How will I measure achieving my goal?
For fat loss, I recommend setting a specific number for your weight, the number of inches/centimeters you want to lose around your belly, or the body fat percentage.
For muscle-building, set a specific number for the amount of weight in muscle you aim to gain and/or the number of inches/centimeters of different muscle measurements.
For strength-building, set a performance-based goal for how many pounds/kilograms you would like to lift for a specific exercise (squat, bench, deadlift, etc). You can also set a goal of being able to do a certain number of reps for a specific exercise (5 pullups, 100 pushups, etc).
3 Make Your Goal Attainable
Ensure that your fitness goal is realistic and attainable. Consider your current fitness level, time availability, and any potential constraints. Setting a goal that is too ambitious or beyond your capabilities may lead to frustration and demotivation. For instance, if you currently struggle with running, aiming to complete a marathon in two months might not be achievable. Instead, consider a more manageable goal like completing a 5K race. Be honest with yourself and set a target that challenges you but is within reach.
If you’re not sure what a realistic and attainable goal might be, ask me! If you’re one of my clients, let’s have a sit-down to talk about it during your monthly coaching call or during one of your training sessions. You can also just message me and we can go over it via text if you’re more comfortable with that.
4 Reflect on the Relevance
The relevance of your fitness goal is crucial to maintaining motivation. Align your goal with your personal interests, values, and long-term aspirations.
Ask yourself: Why does this goal matter to me? How will it contribute to my overall well-being?
If your goal isn’t relevant or meaningful to you, you will struggle so much in the coming year to show up for your workout and nutrition. But if achieving this goal will make a tangible impact on something important, you’ll have a much easier time sticking to your plan—even on the days you don’t “feel like it.”
5 Set a Deadline
Finally, setting a deadline or timeframe for your fitness goal adds a sense of urgency and helps you stay focused.
Without a specific timeframe, it's easy to procrastinate and lose motivation.
Define a realistic timeline to work towards your goal, whether it's three months, six months, or a year. Break down your goal into smaller milestones, each with its own deadline. Then track your progress and reflect frequently to maintain momentum.
Again, if you’re not sure what a realistic timeframe might be for achieving your goal, let’s talk about it during your monthly coaching call, during one of your training sessions, or in messages.
Let’s Get To It
After reading this post and reflecting on the questions, let me know what your SMART goals are for your fitness this year. Send me a message in ABC Trainerize or post in the comments below. Let me know if you have any questions or need some guidance! Looking forward to seeing what you come up with.

Focus on Core Strength
Developing a strong core is an essential part of building muscle and improving your physique. That’s why it’s important to include exercises like crunches, planks, torso twists, and back exercises in your weekly workout plan. In this post, we’ll go over why doing core training is so important for health and fitness. We’ll also cover some basic techniques you can use to strengthen and stabilize your core.
Developing a strong core is an essential part of building muscle and improving your physique. That’s why it’s important to include exercises like crunches, planks, torso twists, and back exercises in your weekly workout plan. In this post, we’ll go over why doing core training is so important for health and fitness. We’ll also cover some basic techniques you can use to strengthen and stabilize your core.
What is the Core?
The core is made up of the muscles in your torso–namely the abdominals, obliques, transverse abdominis, and erector spinae. All of these muscles work together to keep your torso rigid and your body in a good posture while you exercise.
Abdominals
The abs (rectus abdominis) are the most well-known core muscle, commonly referred to as the "six-pack." It runs vertically along the front of the abdomen and aids in flexing the trunk. You can feel these muscles working the most during exercises like crunches, but they also engage isometrically to stabilize in exercises like planks, pushups, squats, and deadlifts.
Obliques
The internal and external obliques are located on the sides of the abdomen. These muscles help with trunk rotation, lateral flexion, and overall core stability. You can feel these muscles during exercises like the twist & reach, bicycle crunches, and side planks.
Erector Spinae
The erector spinae muscles run alongside the spine in the back and assist in back extension and rotation. These muscles are worked in exercises like bird dogs, swimmers, supermans, and bridges.
Transversus Abdominis
The transversus abdominis (abdominal wall) is a deep muscle lies beneath the obliques and acts as a stabilizer for the spine and pelvis. It provides essential support for the internal organs and aids in proper breathing. This muscle is activated any time you stabilize your core for balance in exercises like planks, squats, and balance work.
Why Core Training Matters
Strengthening the muscles in your core (i.e., abdominals, obliques, erector spinae) will help to improve your posture and keep your spine in alignment while exercising. This, in turn, can help you keep your back safe and avoid injury while training. Improving your posture will also help to alleviate chronic pain in your neck, back, and shoulders in everyday life.
No matter whether you’re an advanced exerciser or beginner, it's important to prioritize core training for several reasons:
Stability and Balance
A strong core serves as the foundation for all movements. By engaging and strengthening your core muscles, you enhance your stability and balance, allowing you to perform exercises with better form and control. This, in turn, reduces the risk of injury and sets you up for long-term success in your fitness journey.
Injury Prevention
Weak core muscles can lead to poor posture, improper movement patterns, and imbalances throughout the body. This increases the risk of injuries, particularly in the lower back and other vulnerable areas. By training your core, you provide crucial support to your spine, maintain proper alignment, and reduce the risk of strains or injuries during resistance exercises.
Improved Performance
The core is involved in almost every movement, from lifting weights to performing athletic activities. A strong core allows for efficient force transfer, enabling you to generate more power and move with greater control and precision. Whether you're performing compound lifts or engaging in sports, a strong core will enhance your overall performance and help you reach your goals more effectively.
Functional Fitness
The core muscles play a vital role in everyday activities and functional movements. Strengthening your core improves your ability to perform tasks such as bending, twisting, lifting, and carrying objects with ease and without discomfort. By training your core, you enhance your functional fitness, making daily activities more manageable and reducing the risk of strain or injury.
How to Build a Better Core
Just as with any other muscle group, in order to build a strong core you’ll need to do resistance training exercises that specifically target these muscles.
Isolation exercises are great for improving your mind-muscle connection to each specific muscle in the core. Here are a few of my favorite foundational exercises for training the core:
Imprinting
This movement engages your deep abdominal muscles and helps you to form mind-muscle connection with the core. Lie on your back with your knees bent and feet flat on the ground, hip-width apart. Place your arms by your sides. Take a deep breath in, and as you exhale, gently press your lower back into the floor, allowing your pelvis to tilt slightly. Hold this position for a few seconds while maintaining a relaxed upper body and natural breathing. Release the imprint and repeat the movement for several repetitions.
Cat-Cow
The Cat-Cow is an excellent exercise for connecting with the abdominals and erector spinae muscles. I use this exercise as a primer in my warmups before lifting and for beginner programs to promote spinal mobility. Begin on all fours with your hands directly beneath your shoulders and your knees aligned with your hips. Take a deep breath, and as you exhale, round your spine towards the ceiling as you engage your abdominals, tucking your hips and chin (cat pose). As you inhale, return to the starting position and continue to push your belly towards the floor as you lift your eyes and hips (cow pose). Continue to slowly move through both the cat and cow pose, matching each phase of the exercise with your breath. Perform 6-10 repetitions (reps).
Bird Dogs
Bird Dogs are a great way to train your erector spinae while also developing stability in all of the other core muscles. To perform the Bird Dog exercise, start on all fours with your hands directly beneath your shoulders and your knees aligned with your hips. Keep your spine in a neutral position. Inhale and lift one leg up and straighten it out while you lift the opposite side arm, forming a straight line from your hand to your foot. Slowly lower back down as you exhale, and switch to the other side with another inhale. Continue switching side to side for 6-10 reps.
Crunches
Crunches are a great isolation exercise for targeting the abdominal muscles. For the basic crunch, lay down on the floor face up with your knees bent. Take your hands to either side of your head, and engage the muscles along the front of your torso by drawing your belly button in towards your spine. Exhale as you lift your shoulders off the ground, pause for a moment at the top and then lower down with control as you inhale.
Torso Twists
Exercises that require you to twist your torso (like the seated torso twists, twist crunches, twist & reach) are all great ways to train the obliques muscles. The key to targeting these muscles is to keep your hips stable while rotating your spine to turn your shoulders.
Planks
Planks are another great exercise for helping you to develop stability in all of the muscles in your core. You can perform this exercise on your knees and work towards being able to hold a full pushup position. Do the plank on the elbows if you find that holding the position on your hands hurts your wrists.
Compound Exercises
Compound exercises like squats, deadlifts, farmer’s carries, and lunges engage the core as well. During these types of movements, your core muscles engage isometrically to stabilize your torso and keep your posture upright.
Stay Consistent!
Consistency is key when it comes to core training, just like any other aspect of fitness. As a beginner or advanced exerciser, it’s a good idea to incorporate a few core exercises in your workout routine each week.
I usually program a few core exercises in each of the workouts I design for my clients and Trainerize subscription programs. You’ll often see them as priming exercises in the warm-up or in dedicated core-focused segments. You can also do the bonus core-focused workouts on your rest days or at the end of a regular workout session.
If you’re programming for yourself, make sure to include a few exercises for the abdominals, obliques, erector spinae every week.

How to Build Muscle
Let’s talk about how to get the most benefit from your resistance training workouts so you can build muscle and get strong 💪
Read time: 5 minutes
Let’s talk about how to get the most benefit from your resistance training workouts so you can build muscle and get strong 💪
In general, muscle gets stronger when it is challenged.
The goal of resistance training is to challenge the muscles by making them perform a movement against some kind of resistance (weights, bands, machines) to the point where they get tired and start to give out. As your muscles get tired, microscopic tears form in the muscle tissue, which the body then repairs and fortifies after your workout while you’re sleeping.
Over a long period of time doing resistance training 2-3 times per week, you will get noticeably stronger. The exercises in your workouts will become easier and you’ll be able to perform more repetitions, use more weight, and do more overall exercises without tiring as easily. You may also notice that your physique and appearance change as certain muscle groups become more defined and visible.
It’s important to keep a few basic principles in mind so that you can get the maximum benefit from your resistance training workouts:
👉 Learn Your Muscles
👉 Use the Right Weight
👉 Practice Progressive Overload
Let’s take a look at what these principles mean in more detail below.
1 Learn Your Muscles
Knowing the names of different muscles and understanding their functions is essential for getting the most out of your workouts.
Taking time to learn your muscles will help you to perform your exercises correctly. Knowing which muscles should be fired up and where you should feel “the work” will allow you to know whether you’re doing an exercise correctly or not.
Knowing your muscles will also help you to maximize muscle engagement during the exercises so that you can fatigue the target muscles more effectively.
You don’t need to learn the names and functions of all 600 muscles in your body, however you should learn the major muscle groups that are in your lower body (legs), upper body (arms/back), and core (torso region).
Check out the charts below to see the major muscle groups in the body:
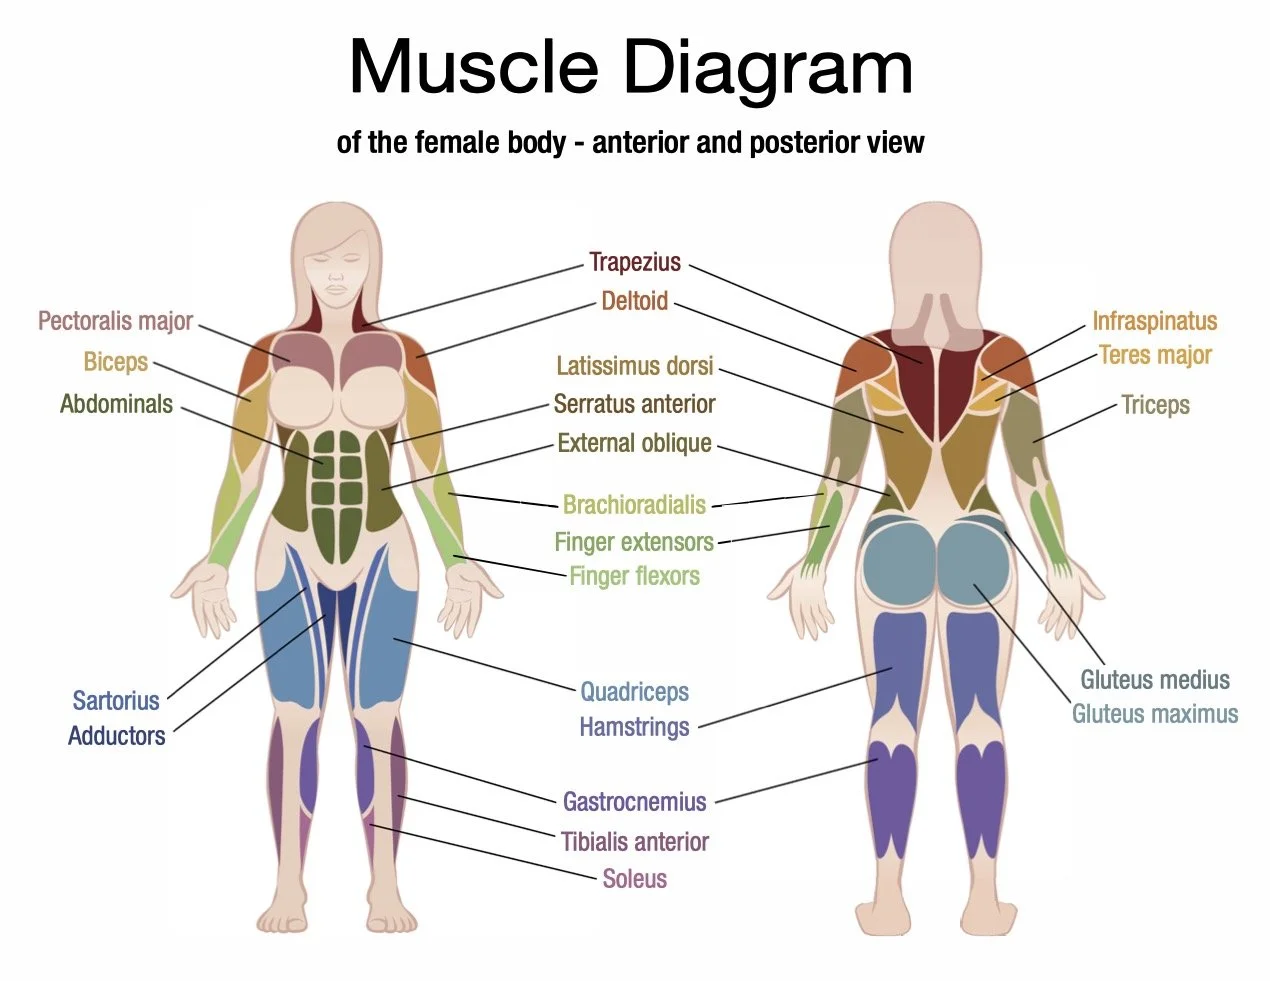
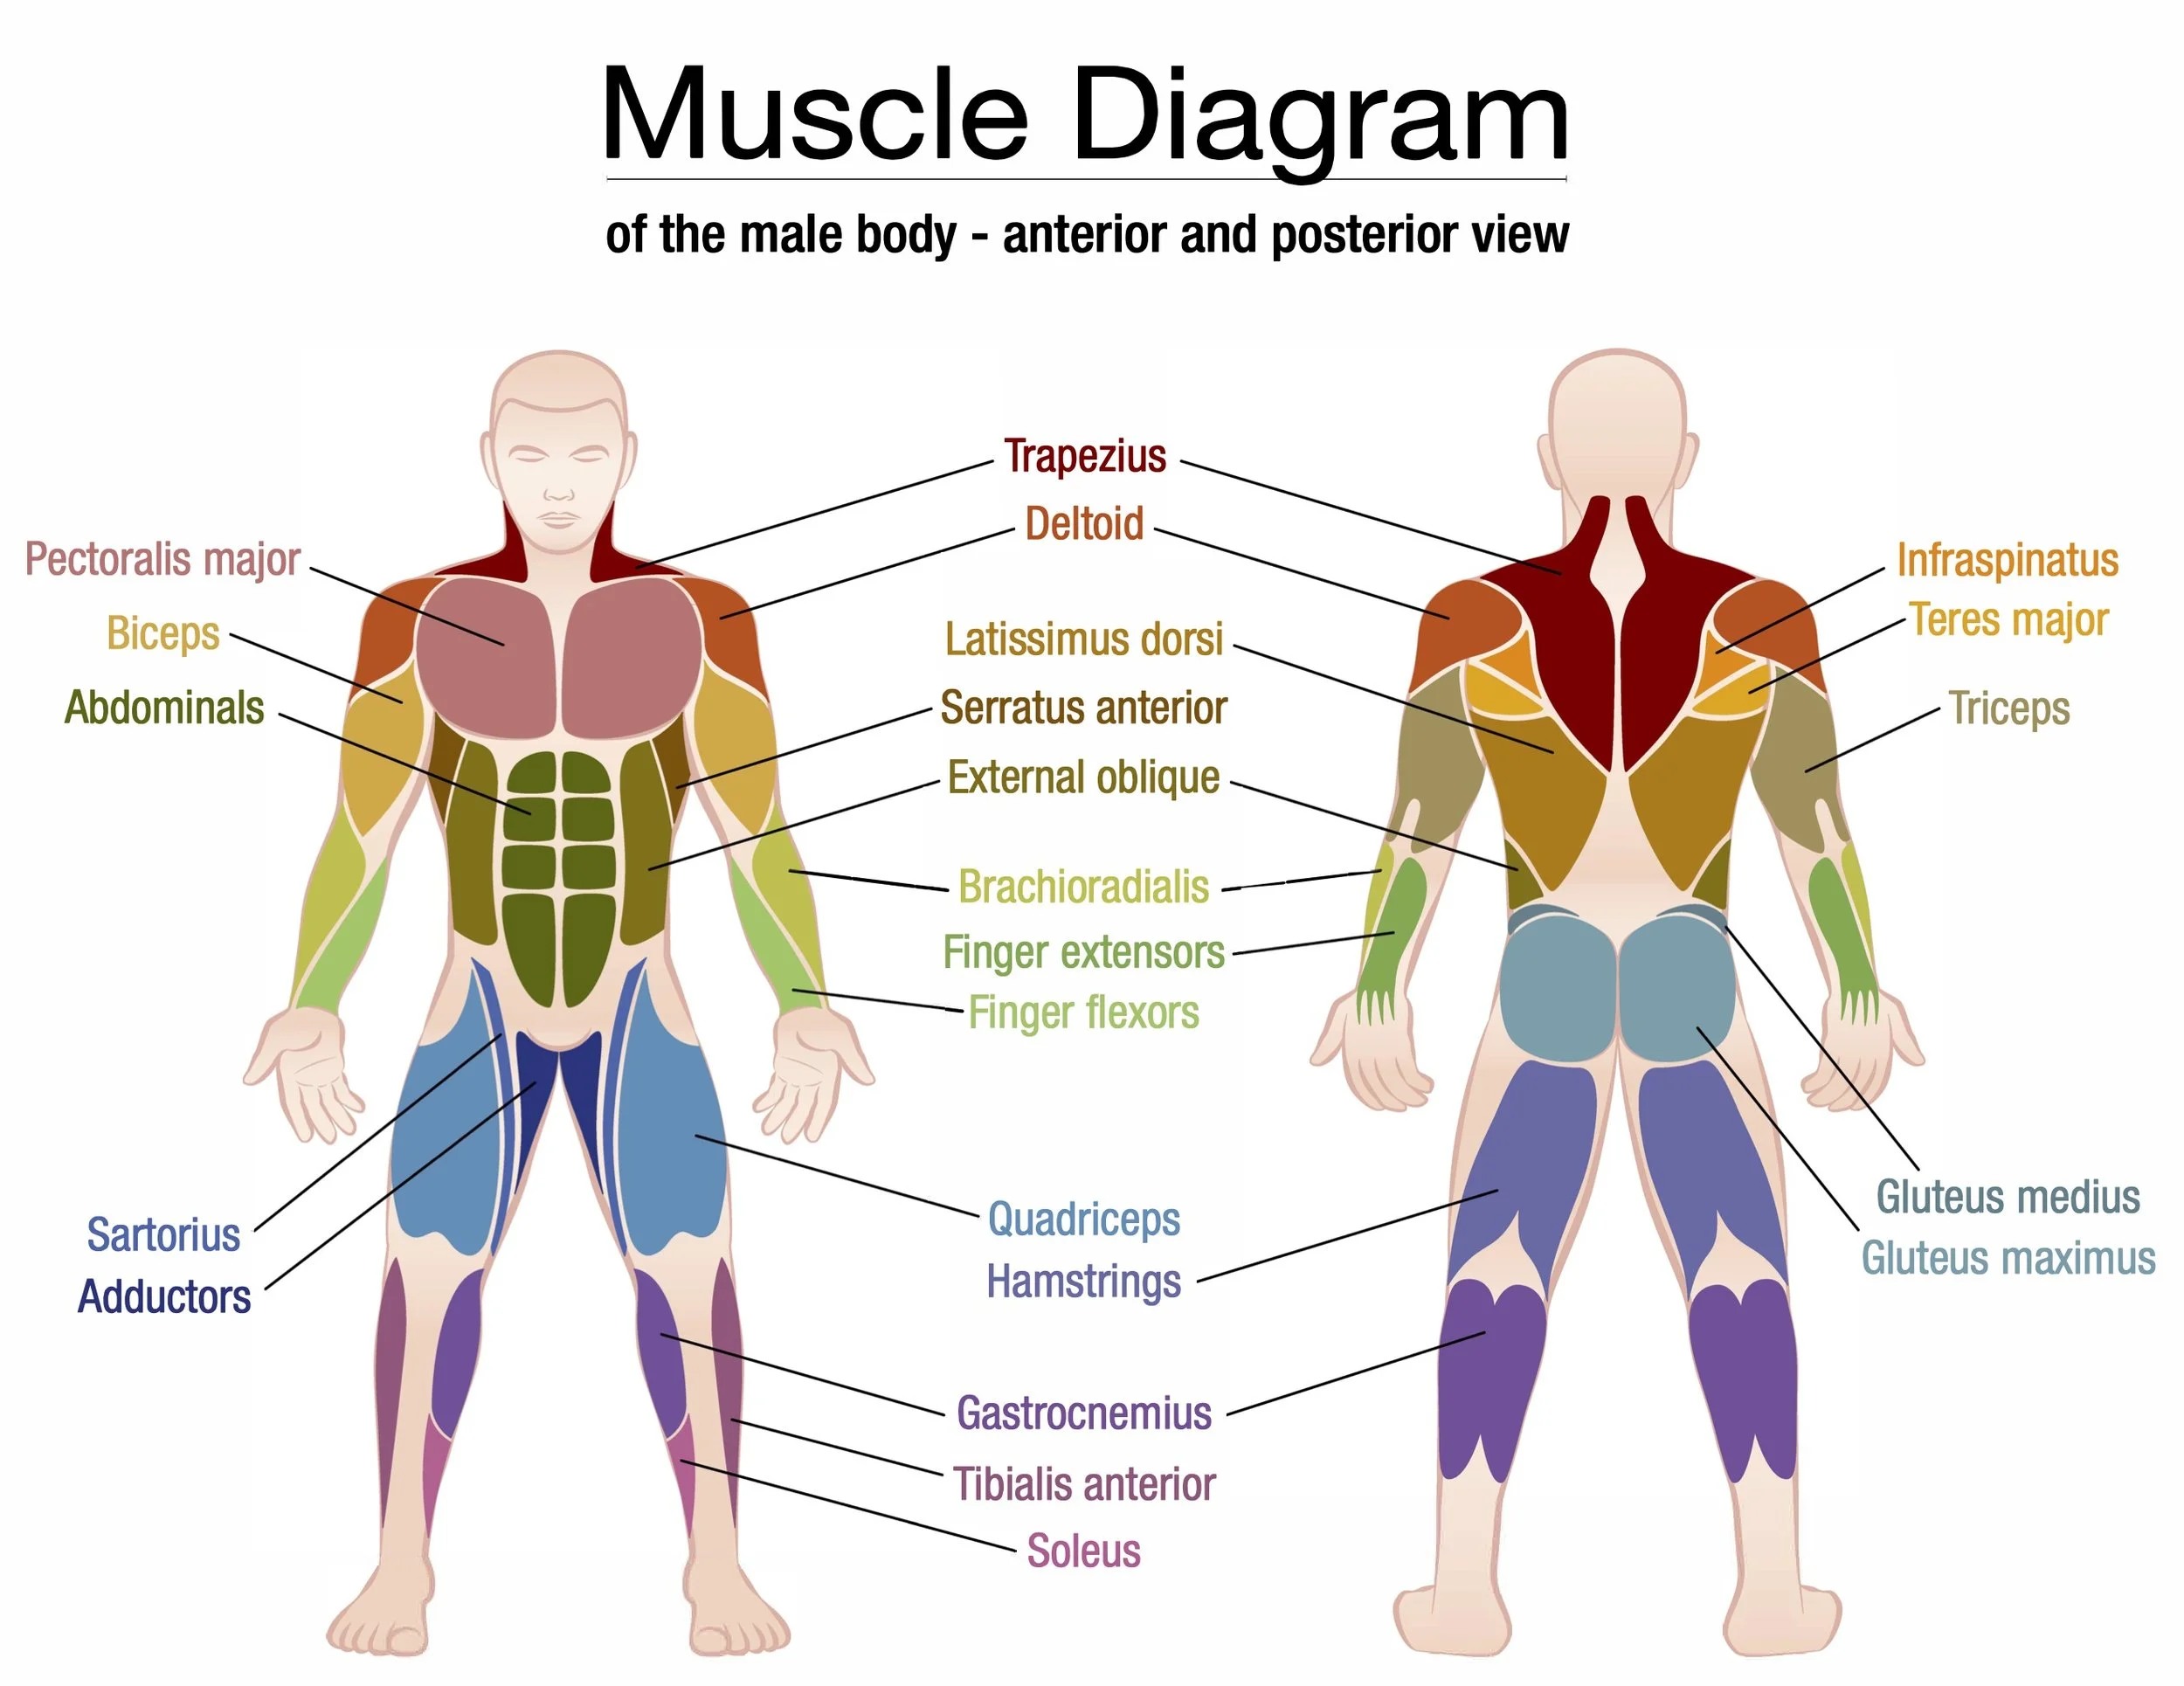
When you watch an exercise tutorial video, pay attention to the muscle group that is named as the target for that exercise. While doing the exercise, try to develop an awareness of what it feels like for that muscle to be firing as it gets tired. Pay attention as well to the sensation of that muscle stretching during the cool-down portion of your workout.
Over time, you’ll be able to connect with your muscles better and fire them up more easily–a skill called proprioception or “mind-muscle connection.” Improving your proprioception will improve your coordination and exercise technique over time. It will also help you in the future when you learn new exercises!
2 Use the Right Weight
Remember: your muscles need to be challenged in order to grow stronger.
It’s not enough to just go through the motions of the exercise. You have to actually fatigue the muscles by using the right amount of resistance (i.e., weight or band level).
How do you know whether or not you’re using the right weight or band? You should feel the target muscles for each exercise burning at the end of each set within the recommended number of reps.
For example, if the recommendation is 8-12 reps per set, then use a weight or resistance level that has you feeling the target muscles starting to burn at around rep 8, 9, or 10. When you feel the muscles burning, keep going until you feel like you could only do 1 or 2 more reps before your muscles give out.
👉 If you’re able to easily get to 12 reps and feel only a little burn, you need to add more resistance (either use a heavier weight or a heavier band).
👉 If you can barely get to 8 before your muscles give out, try a lighter weight or band in your next set.
It might take some time for you to find the right weight to use during each exercise. But once you do find the right weight, use that weight again during the next workout and try to do more repetitions. Once you’re able to do the top number of recommended reps easily, increase the weight again until you feel the muscles burning and fatiguing within the recommended range again. This is how you can practice the principle of progressive overload.
3 Practice Progressive Overload
Every time you train, you should give your muscles more work than what they’re used to. Otherwise, it’s very easy to hit what’s called a training plateau (a point where your body doesn’t change much and you aren’t getting stronger or building muscle).
To prevent a plateau, you’ll need to always train with a form of what’s called novel stimulus–that is, a new challenge for the muscles that triggers the repair and growth process.
One way to get a novel stimulus is to do more repetitions and use more resistance (i.e., weights or bands) over time. For example, in Week 1 of a new training block, you may feel challenged doing sets of 10 repetitions of Biceps Curls with 5lb in each hand. 8 weeks later, you should be doing the same exercise either for more than 10 reps per set and/or using heavier dumbbells.
Another way to challenge the muscles is to try different exercises and new variations of exercises. For example, if you spend one block doing Goblet Squats for your legs, try doing Barbell Back Squats in a new block to give your body a novel stimulus.
Experts recommend changing up one or more aspects of your training every 4 to 12 weeks to keep your muscles challenged with novel stimuli.

3 Ways to Get Your Heart Pumping With Cardio
Cardiovascular exercise (or “cardio” for short) is a style of training focused on getting your heart pumping for at least 10 minutes. This type of exercise improves the health of your heart & lungs, which deliver oxygen and nutrients to your body & brain.
With the weather being cold, it’s hard to get outside for walks, hikes, gardening, and other activities that you do during the spring and summer.
Nevertheless, staying active is important to keeping your body strong and healthy. So, I recommend adding indoor cardiovascular exercise to your weekly training program if you aren’t doing it already.
Benefits of Cardio
Cardiovascular exercise (or “cardio” for short) is a style of training focused on getting your heart pumping for at least 10 minutes. This type of exercise improves the health of your heart & lungs, which deliver oxygen and nutrients to your body & brain.
Doing cardio regularly has many benefits:
reduced risk of illnesses like heart disease, high blood pressure, stroke, type 2 diabetes, and some types of cancer
boosted immune system, reduced risk of getting sick from viral illnesses like the cold and flu
reduced tension and anxiety (improved mental health)
improving your quality of sleep and overall energy levels[1]
Adding cardio to your regular training routine can also improve your gains! It increases your total calorie burn, which makes it a super effective training strategy for fat loss.
If your goal is to build muscle, cardio can also help maximize your muscle gains by improving the efficiency of your cardiovascular system—this allows your body to get more oxygen and nutrients to your muscles while you are training and recovering.
Some types of cardio (like high-intensity training) may also help to maximize your muscle gains by stimulating the release of anabolic hormones like testosterone, growth hormone, and IGF-1.[2, 3, 4]
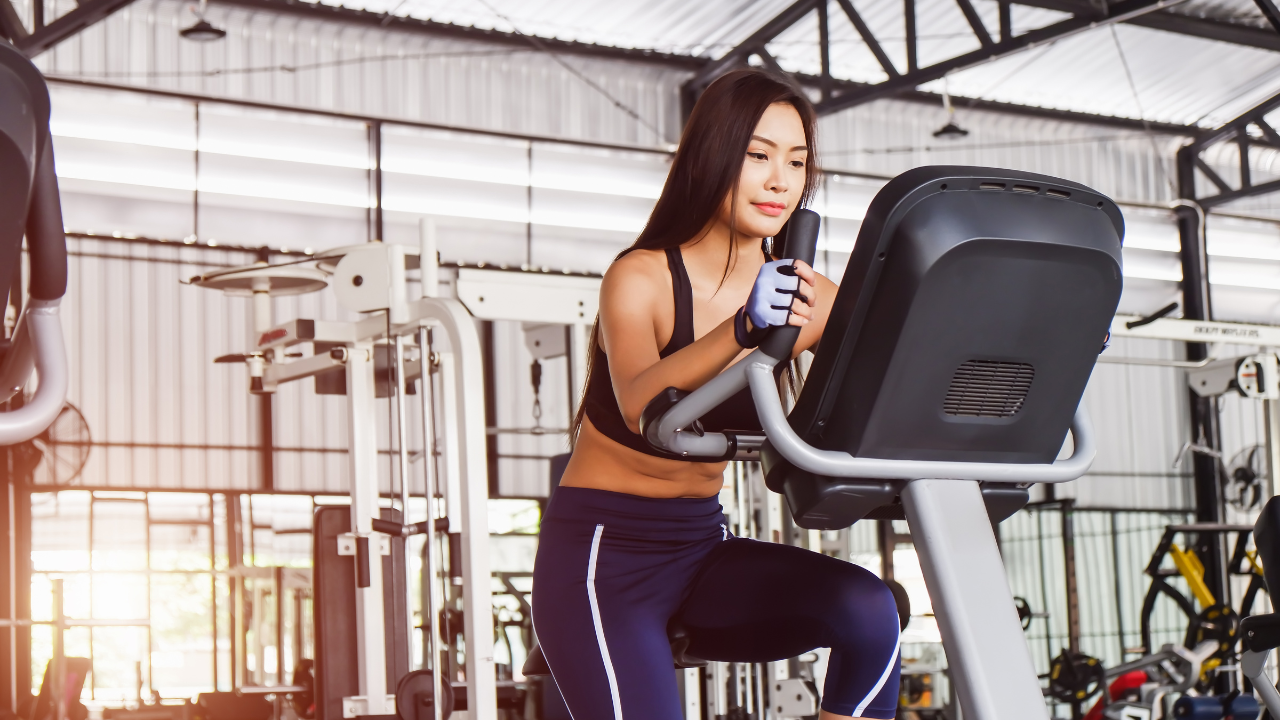
Types of Cardio
Any exercise that gets your heart rate up counts as cardio!
One way to get your heart pumping during the winter months is to hop on a cardio machine like a treadmill, elliptical, rowing machine, stationary bike, etc for 20-30 minutes while watching tv or listening to music. This is called Steady State Cardio.
I myself am a big fan of Cardio Circuits. Circuits involve alternating between a couple of different exercises for a set period of time or number of reps. For example, I might do 30 seconds of jumping jacks, followed by 30 seconds of kettlebell squats, and then hold a plank for 30 seconds. I’ll do this for between 3 and 5 rounds, resting for 10 seconds between each exercise.
Another popular style of cardio is High-Intensity Interval Training (HIIT). For this style of training, you alternate between periods of vigorous activity and rest intervals. For example, you can do a HIIT speed-walk workout by alternating between 30-second periods of speed walking or jogging and 2-minute periods of slower walking for a total of 20 minutes. You can also do what’s called a tabata—alternating between 20 seconds of any exercise (like jumping jacks or squats) and 10 seconds of rest for 8 rounds.
How to Track Your Cardio
Click the button below to calculate your personal target heart rate zones, and make sure to write these down so you can reference them later!
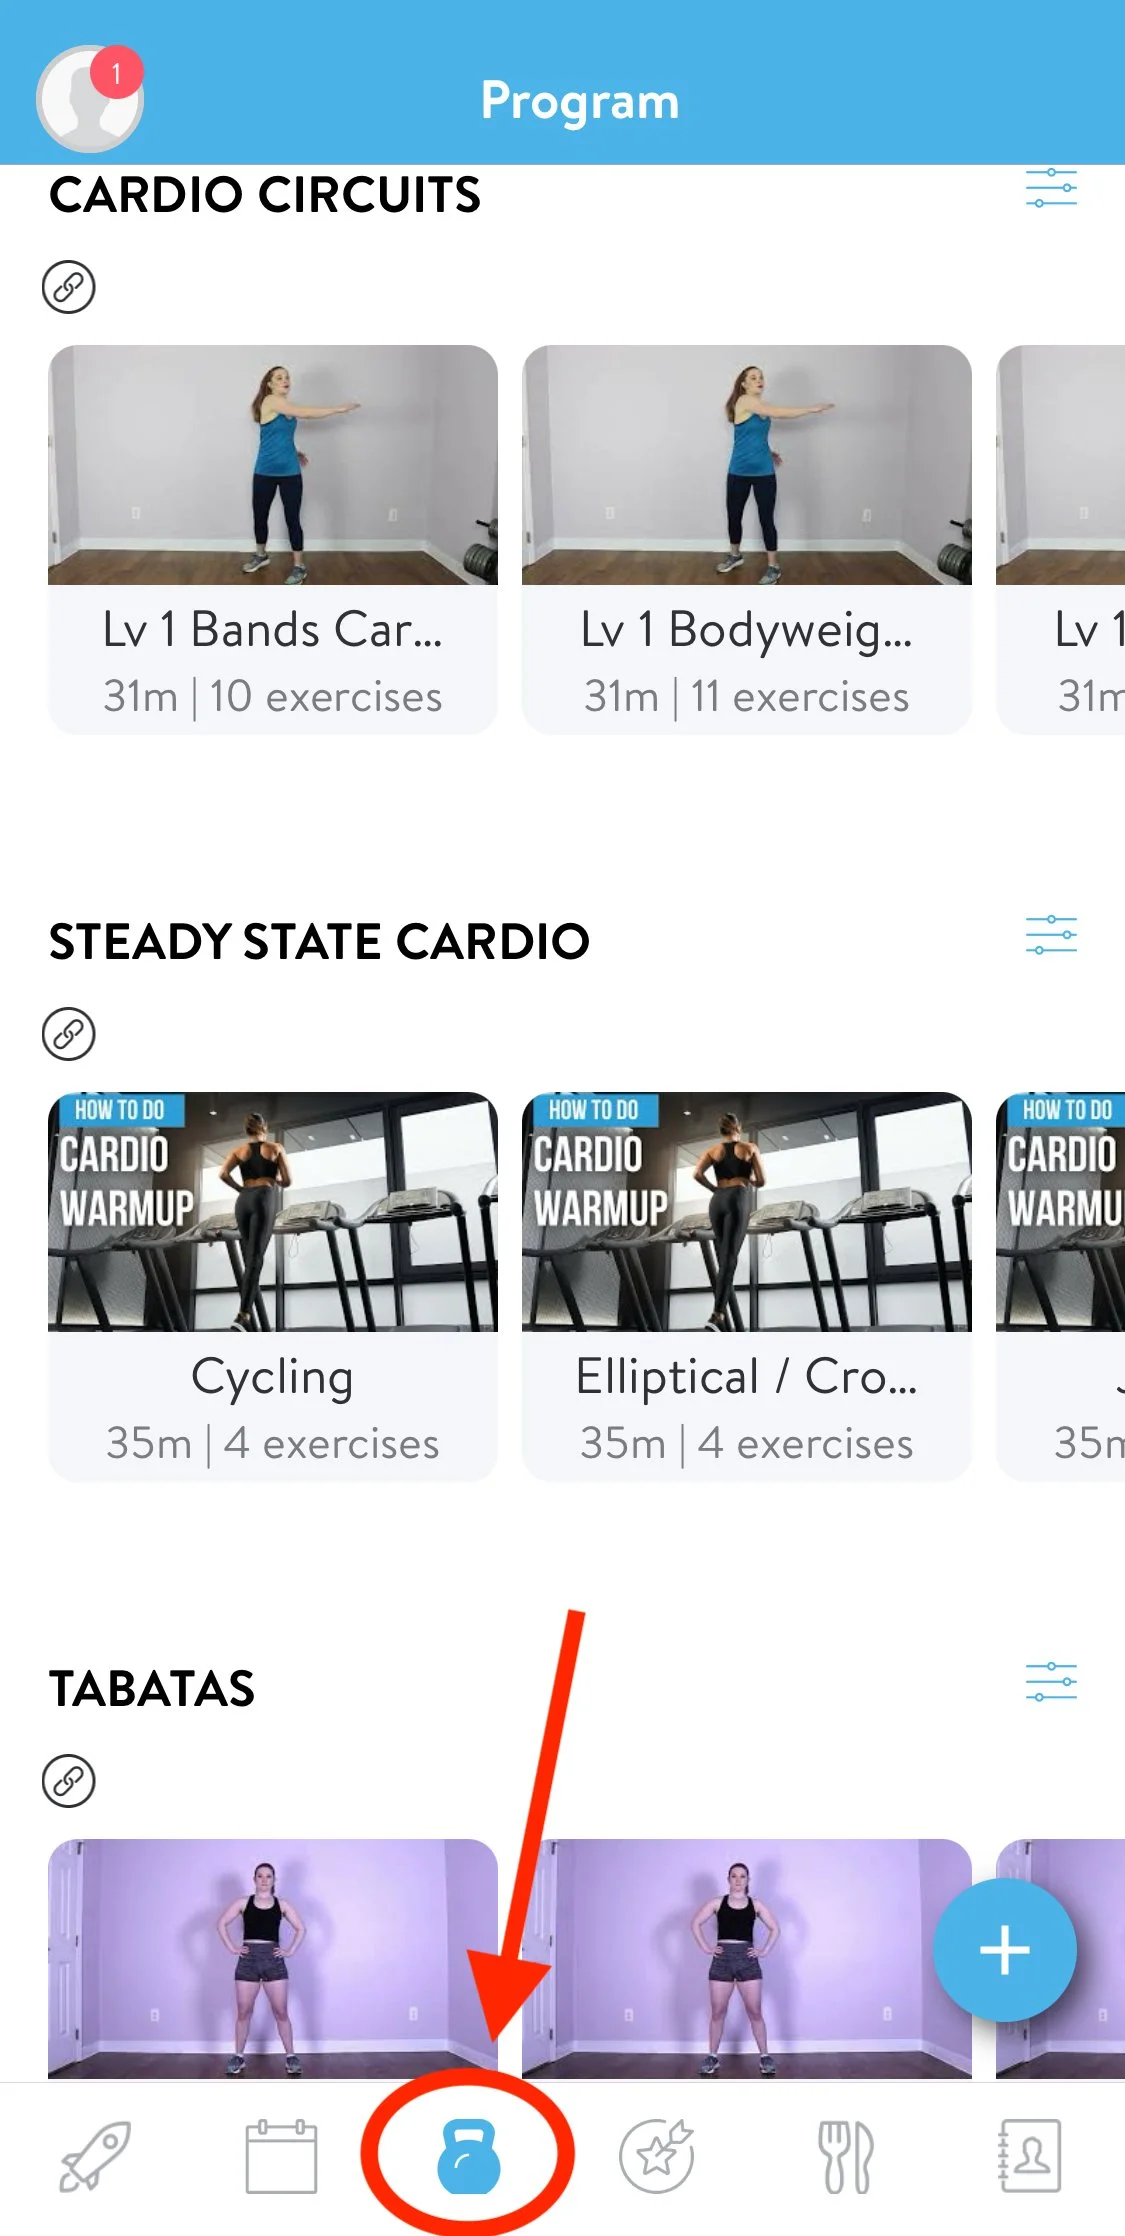
If you’re subscribed to one of my training programs or coaching programs, I’ve added to your ABC Trainerize account a few collections of cardio workouts that you can use whenever you like. Do these before or after your resistance training workouts, or on a separate day on their own.
To access them, go to your Program tab within the ABC Trainerize app and scroll down until you see the headings labeled Cardio Circuits, HIIT Tabatas, and Steady State Cardio. Scroll to the right and left in each section to see the available workouts.
The workouts are organized according to the equipment they use and the level of difficulty. I’ll add more to these collections over time, but at least for now you’ve got a nice collection to start with.
While doing cardio, your goal should be to get your heart rate into one of 3 target heart rate zones:
Low-Intensity Zone: between 55% and 63% of your max heart rate
Moderate-Intensity Zone: between 64% and 75% of your max heart rate
High-Intensity Zone: between 76% and 93% of your max heart rate[5, 6]
Use a heart rate monitor, a fitness tracking device, or track manually while you are exercising to ensure that your heart rate is in the right zone.
Check your heart rate every few minutes while you exercise to make sure it’s staying between 64% and 75% of your max heart rate. For the talking test, at the moderate-intensity level, you should be able to talk in full sentences, but you should not be able to sing.
How Often to Do Cardio
The American Heart Association recommends doing at least 150 minutes of moderate-intensity cardio total each week.[7] You can split this into 3-5 days per week of 30- to 50-minute cardio training sessions.
According to the American Heart Association, you can count each minute of high-intensity (or mixed high- and moderate-intensity exercise) as 2 minutes towards your weekly 150-minute cardio goal.[7]
Keep in mind that doing too much high-intensity exercise can keep your body in an inflammatory state and weaken your immune system—making you more susceptible to illness or injury. Experts recommend no more than approximately 40-50 minutes of intensity above 85 percent per week, and not more than 30-40 minutes cumulative time per week with your heart rate above 90 percent in order to prevent symptoms of overreaching.[8]

Feeling Sore?
Do you sometimes feel sore after your workouts? It’s totally normal! If you push your muscles close to failure in your resistance training (like you should), microscopic tears will form along the muscle fiber walls. These tears trigger an “inflammation cascade” that can lead to tenderness or tightness in the muscles.

Do you sometimes feel sore after your workouts? It’s totally normal!
If you push your muscles close to failure in your resistance training (like you should), microscopic tears will form along the muscle fiber walls.
These tears send a signal to your body that it needs to repair and fortify the tissue to make it stronger. So while you’re resting, your body will flood the muscle with fluid, blood cells, protein, and hormones.
All of this “stuff” puts pressure on your nerves—which causes the muscles to feel tender, stiff, or painful.
This type of soreness is usually worse during the first day or two after a hard workout, so we call it Delayed Onset Muscle Soreness (DOMS).
DOMS tends to affect people most during the first week or two at the beginning of a new program. The more you stick with your training program consistently, the better your body will get at recovering.
You should experience less DOMS over time—at least until you change up your workout routine again.
A certain amount of soreness is to be expected, especially when you first start resistance training or begin a new program.
However you shouldn’t be totally debilitated in the days following your training. You should still be able to walk around and do your everyday activities.
If, however, you feel intense pain even at rest, or if your soreness lasts more than a few days after your workout, it may be a sign that you pushed too hard in your previous workout.
Next time, bring it down a notch by either doing fewer reps or using less resistance/weight. If the soreness persists past a few days or a week, you may need to see a physician to rule out any possible injuries.
Note that muscle soreness is different from the sharp pain that you might experience in your the joints or other tissues as a result of injury. Again, you shouldn’t feel intense, unbearable pain. Never “push through” sharp pain in your workouts. If you experience this, you should see a healthcare provider.
If you’re feeling a normal level of soreness, it’s totally fine to work out again. In fact, exercising might give you some relief by loosening the muscles and increasing blood flow to the area (which flushes out cellular waste).
You can also reduce your soreness by drinking lots of water and eating a high-protein diet.
For immediate relief, you can try alternating hot and cold compresses. Applying heat (e.g., using a heating pad or taking a hot bath) can helps increase blood flow and loosens tight muscles. An ice pack can help reduce pain by decreasing inflammation in the affected area.
Some people also take inflammation-reducing drugs like ibuprofen, but it’s best to check with your doctor first before taking any medication (even if it’s over the counter).

How hard should you push in your workouts?
During resistance training workouts, pay attention to how hard your muscles are working in every set of each exercise. This can also help you to judge whether or not you might need to use more or less resistance (i.e. weight).
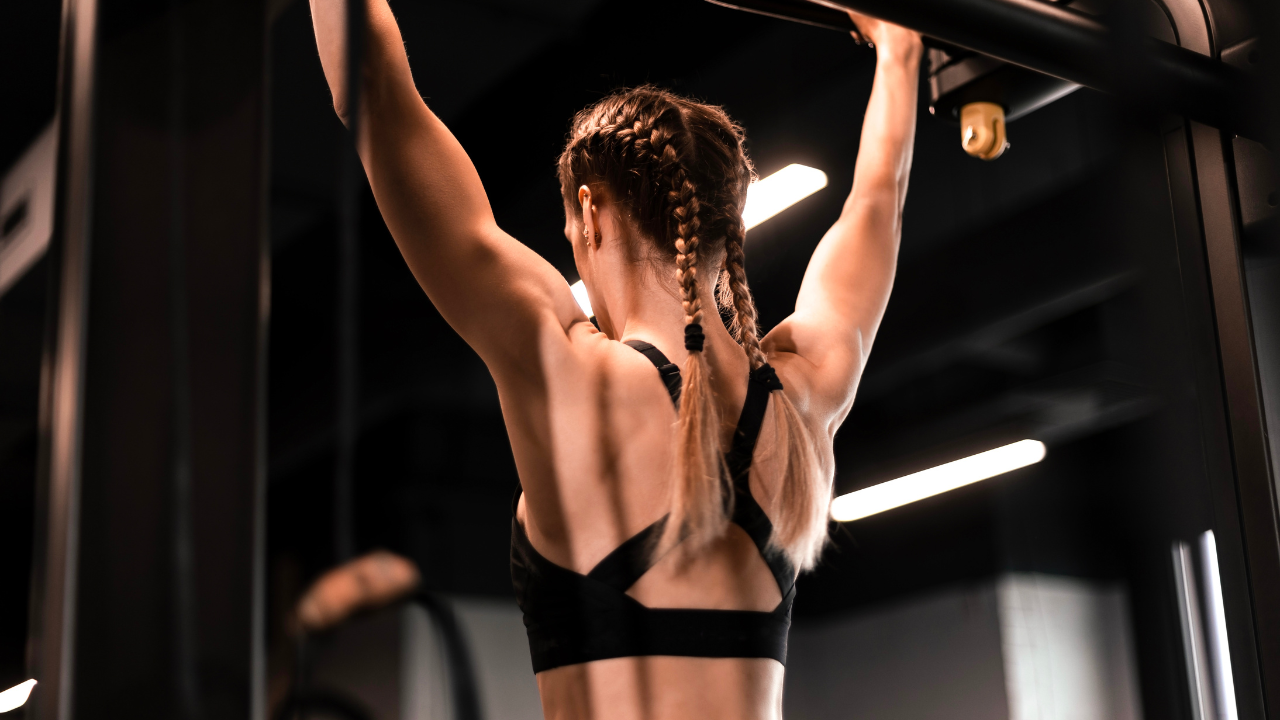
During resistance training workouts, pay attention to how hard your muscles are working in every set of each exercise. This can also help you to judge whether or not you might need to use more or less resistance (i.e. weight).
Your goal should be to approach muscle failure--that's the feeling you get when your muscles are tired and about to give out.
Approaching muscle failure might feel like a "burning" sensation in the muscles, or you might find your reps are slowing down, and it's harder to keep good technique.
As a general rule of thumb, it's a good idea to stop once either:
Your reps are significantly slower, or
You find that you're not able to keep proper technique in the exercise
One way to monitor the intensity of your training is to use the Rate of Perceived Exertion (RPE) scale. At the end of every set of an exercise, ask yourself “How hard am I working on a scale of 1 to 10 (with 1 being “no effort” and 10 being “maximum effort”).
When you’re first learning a new exercise, I recommend practicing the movement for 1 or 2 sets at an RPE level 4 or 5. This means that you’re putting in effort but not tiring yourself out in any way.
Once you get familiar with the movement, then you can begin to gradually challenge yourself by adding more resistance (using more weight or a heavier band). Keep it light initially, starting with a low weight/resistance level and try 1 or 2 sets. Adjust the weight or resistance until you’re working at an RPE level 6 or 7–meaning you’re starting to feel tired in the last few repetitions or you may feel the target muscles beginning to burn.
As you get more comfortable with the technique of the exercise, you can begin to challenge yourself at an RPE level 8 or 9. This means using a weight and doing a number of repetitions that fatigues the muscles and really has them burning by the last repetition, until you feel like you could only do 1 or 2 more reps before your muscles give out.
As you add on more weight to challenge yourself, remember to always prioritize doing your exercises with good technique while keeping your body in alignment. Never sacrifice good form to add more weight or squeeze out another rep. This can lead to injury or muscle strain 😬