7 Ways to Improve Your Squat Technique
Mastering the squat is super important for staying injury-free in the gym. It’s also one of the basic movements of the human body. Improving your squat technique can help you have better posture and move better in your everyday life.
Before adding any weight or resistance to the squat, make sure that your technique is spot on by checking your form against the tips below.

How to Squat Correctly
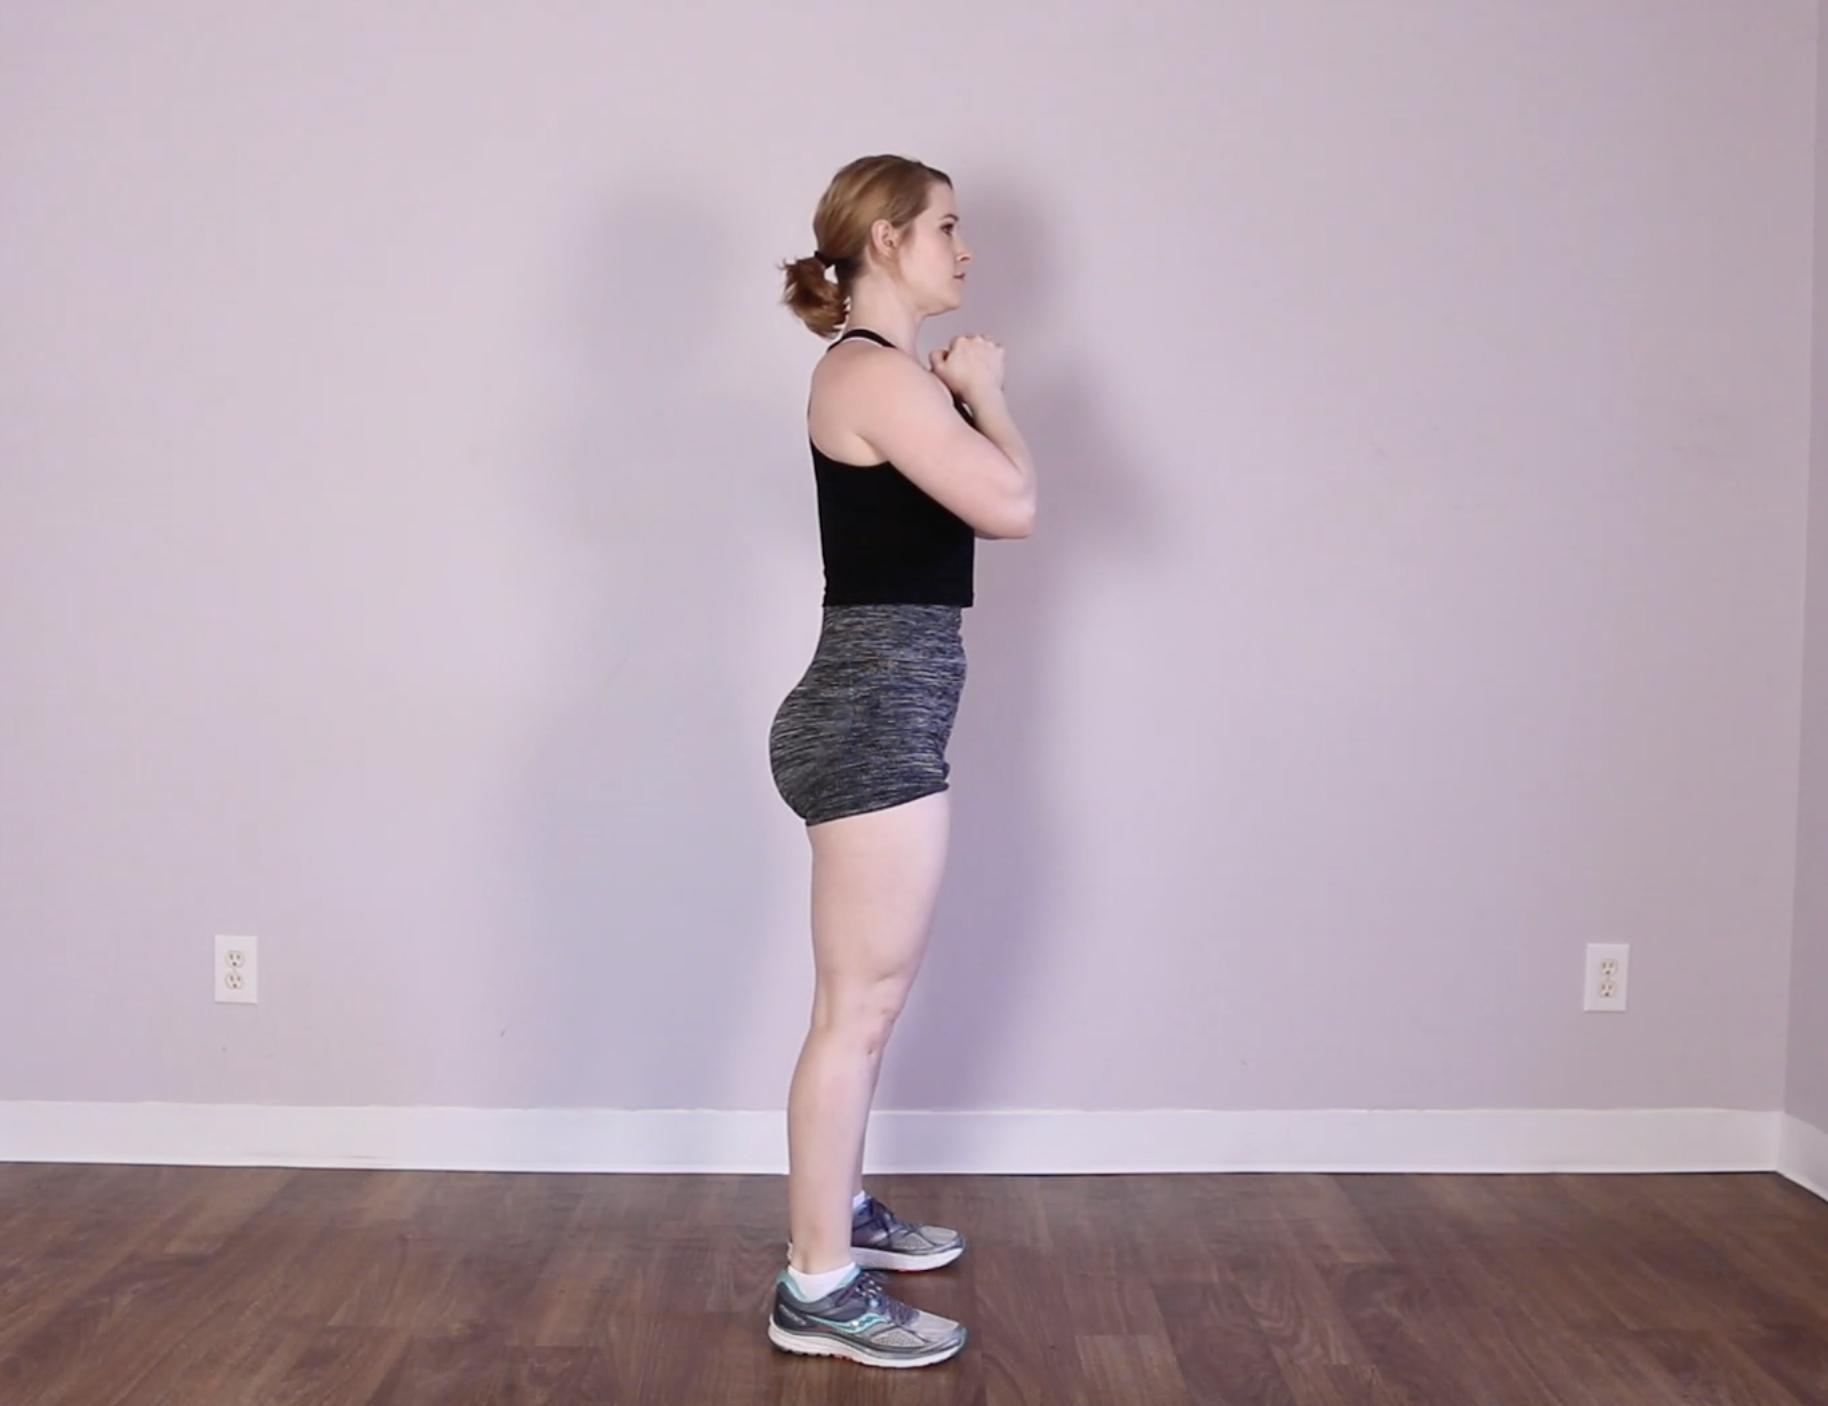
Stand with your feet shoulder-width apart or slightly wider with your toes pointed slightly outward.
Take a deep breath into your belly and engage the muscles in your core (i.e., abdominals, obliques, transverse abdominis, and back muscles). Keep these muscles engaged throughout the movement to keep your spine in alignment.
Initiate the movement by doing the following movements at the same time:
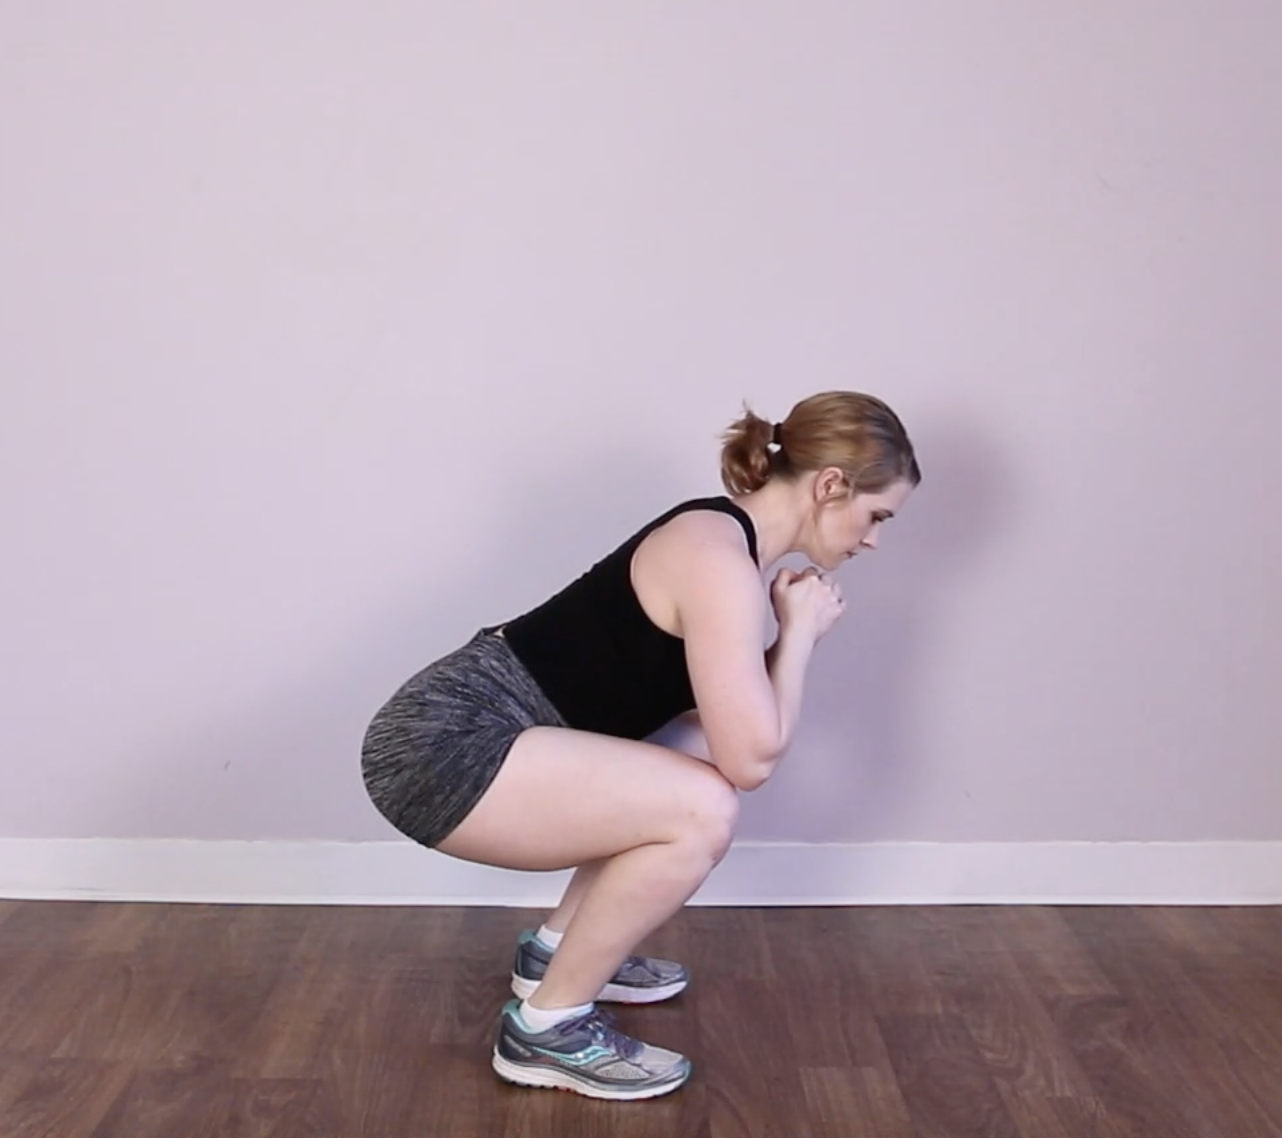
Hip Hinge: Push your hips back, keeping your back straight, and allow your chest and shoulders to tip forward as the hips go back.
Knee Bend: Bend your knees at the same rate as you push your hips back
Ankle Bend: Pull your toes up towards your knees to flex your ankles (dorsiflexion), allowing your knees to come forward.
Continue bending your hips, knees, and ankles to lower yourself into a sitting position. Stop all motion when you reach the limit of mobility for any of the joints.*
Pause briefly at the bottom of the squat while maintaining control and balance.
Engage your quadriceps & glutes to extend your hips and knees to stand back up, pressing your heels and the balls of your feet into the ground. Stop when you have returned fully to standing, with your hips under your shoulders and your knees under your hips.
*For powerlifting, the goal of the squat is to bring the hips to just below the level of the knees so that the thighs “break parallel” with the ground (USAPL Rulebook 2021).
How to Assess Your Squat Technique
Take Video
The best way to assess your squat technique is to take a video of yourself performing the exercise from the side, front, and back. This allows you to focus on performing the exercise and avoid injury from turning your head or craning your neck to look in a mirror.
Set up your smartphone or camera facing the profile (side) of your body. Make sure your whole body is in frame from the beginning to the end of the movement. Your feet, head, hips, and knees should all be within the picture for the entire video. You can need to prop your camera up using another piece of gym equipment, or you can use a tripod. You can also ask a friend or fellow gymgoer to hold your phone/camera and film for you.
Once the camera is set up, perform a set of your squats like you normally do—recording the entire set from picking up the weight until you put the weight down.
Afterward, watch the video of your squat and assess it for the technique cues outlined above.
Warning Signs
Another important way to assess your technique is to listen to your body while performing the exercise. Key questions to ask yourself are:
Do I feel any pain or discomfort anywhere at any point of the movement?
Do I keep my balance throughout the entire range of motion?
Are there parts of the movement where I move slower?
Is there any point of the movement where I change my positioning (i.e., knees collapse/valgus, weight shifting to one side, weight shifting forward or back, is any joint moving faster or slower than the other joints)?
The answers to these questions can give you a clue to where your squat technique is breaking down. This, in turn, can help you decide what to do to improve your squats.
7 Tips to Improve Your Squat
1 Warm Up Properly
This one goes without saying, but I’ll say it anyway 😊 Don’t skip your warmup! The warmup period at the beginning of your workout is an important chance for you to get blood flowing to your muscles, lubricate your joints, and prepare your body for training.
A good warmup should include 5-10 minutes of moderate-intensity cardiovascular exercise (like walking on a treadmill, using a rowing machine, or riding a stationary bike).
Your cardio warmup should be followed by dynamic stretches, which are low- to no-resistance movements that allow you to take your joints through their full range of motion. Pay attention to your muscles as you stretch, and take note of any areas that feel tight and might need more time to stretch. Main muscles to pay attention to are your quadriceps, hamstrings, glutes, and calves. If you will be practicing barbell back squats in your workout, make sure to stretch your shoulders, chest, and back as well.
If you have any tight muscles that don’t loosen up during the cardio and dynamic stretches, you can try applying pressure to the muscles using a foam roller or medicine ball on your legs or upper body.
Depending on the intensity of your workout, you may also include what are called “priming” exercises at the end of your warmup. These are exercises that allow you to activate the muscles that you’ll be using during the challenge portion of your workout. These also give you a chance to rehearse the challenge movement using less weight or intensity.
Skipping the warmup can lead to injury—since tight muscles and stiff joints can lead to sharp pains in the joints or even a pulled muscle.
2 Go Slow
The number one adjustment for improving your squat technique is to slow down your squat reps and add a pause at the bottom. This is why many of my training programs include some variation of the Slow Eccentric Pause Squat during the first and second blocks.
Practicing this way allows you to correct any slight errors that may occur without noticing during faster reps. It also helps you improve strength by developing control of the entire range of motion in the squat. Slow eccentric training is also a super effective way to grow more muscle, especially in the quads and glutes.
I recommend including at least one set of slow eccentric pause squats in each squat workout, either as the main squat exercise or as a priming exercise during your warmup.
3 Reduce the Weight
Sometimes, using too much resistance can cause pain and can also lead to form failure. If you’re having trouble performing the squat with good technique using weight, try using less weight and see if your form improves.
Only use as much weight as you can control, keeping your body in good alignment throughout the entire range of motion. It’s not worth it to risk injury only to add a few more pounds or kilograms onto the bar. No ego lifting!
4 Improve Core Stability
Having poor core strength usually expresses itself as back pain or tiredness in the back muscles while squatting. It can also lead to difficulty keeping your spine in alignment (i.e., “straight”) throughout the movement, and you might fined yourself caving forward.
To strengthen your core stability, first get into the habit of firing up your core at the beginning of your training sessions by practicing Imprinting on the floor.
Core stabilizing exercises like planks & plank variations and standing balance exercises like Step Back to Single Leg Balance, Single Leg Squats, Step Ups, and Lunges can also help you to develop core stability.
5 Improve Hip Hinge
Many people mistakenly think of the squat as simply bending the knees, but it’s just as much about hinging at the hips as bending the knees. If you don’t push your hips back enough during the squat, your knees will shoot forward and your heels will come off the ground—putting a lot of strain on your knees. If you experience knee pain when you squat and your squat looks like the picture below, it’s because you need to hinge your hips more.
Having poor hip hinge technique can also look like rounding the lower back—especially at the bottom of the squat. This can be a sign of poor core strength as well.
If your squat looks like either of the pictures above, make sure to incorporate hip hinging into your workouts. Before your squat workouts, rehearse the hip hinge with exercises like Band Good Mornings. Also make sure to include hip-hinging exercises in your resistance training, like Romanian Deadlifts. This will help build up the mobility and strength of your hamstrings, glutes, and back muscles while also building core strength.
Foam rolling the hamstrings, glutes, and back can also help to loosen tight muscles—which can also impact your mobility.
6 Improve Hip Mobility
If you have difficulty going deep into the squat, or if you feel tightness or pain in the groin area at the bottom of the movement, you may have poor hip mobility.
Poor hip mobility can look like excessively leaning forward in the squat, your knees drifting inwards as you descend, or shifting your weight significantly to one side when squatting down.
To improve your hip mobility, do exercises that strengthen and stretch the hip flexors, gluteus medius, gluteus minimus, and hip adductor muscles.
To strengthen the hip flexor muscles, practice core exercises like Dead Bugs, Single Leg Drop, and Bicycle Crunches. Standing exercises like Standing Knee Ups, Good Mornings, and Romanian Deadlifts can also help strengthen the hip flexors. Stretch the hip flexors with exercises like Floor Hip Flexor Stretch, Seated Quad Stretch, and Runner’s Lunge.
To strengthen the gluteus medius muscles, do exercises that involve hip abduction (that is, taking your leg away from the center line of your body). Hip abduction exercises include Standing Hip Abduction, Monster Walks, and Band Bridges. To stretch the gluteus medius, try variations of glutes stretches and the Figure 4 Stretch.
To strengthen the gluteus minimus, practice hip external rotation and abduction (meaning, the movement of opening up your legs). Good exercises for this involve Dirty Dogs, Standing Hip CARs, and Side-Lying Clams. To stretch this muscle, do variations of glutes stretches and the Figure 4 Stretch.
To strengthen the hip adductor muscles, perform what’s called hip adduction (that is, bringing your leg in towards the center line of your body). Try exercises like Side-Lying Hip Adduction and Standing Hip Adduction with a Band. Sumo stance exercises (like Sumo Kettlebell Deadlifts) and single leg exercises (like Drinking Birds and Split Squats) also engage the adductor muscles. To stretch this muscle, open your hips with stretches like the Butterfly Stretch, Spiderman Lunge, and Side Lunge.
You can also use a foam roller on your legs to apply pressure to loosen tight muscles in your hips.
7 Improve Ankle Flexibility
Poor ankle mobility often causes your heels to lift off the ground as you get deeper into the squat. It can sometimes cause you to feel off-balance like you’re going to fall backward when squatting low. You may also feel significant tightness in the calves or Achilles tendon as you lower down into the squat.
Poor ankle mobility usually comes from tight calves and weakness in the muscles around your ankles (like the tibialis anterior or “tib ant” for short). You can improve your ankle mobility by stretching your calves with exercises like the Wall Calf Stretch, Down Dog Alternating Calf Stretches, and the Seated Hamstring and Calf Stretch. Deficit Calf Raises are a great exercise for both stretching and strengthening the calves.
To strengthen the muscles around your ankles, practice exercises that involve ankle dorsiflexion (that is, pulling your toes up towards your knee). This includes Bench Knee Over Toe with Dorsiflexion, Squat Hold With Dorsiflexion, the Tib Ant Side to Side Squat, and the Tib Ant Forward & Back Squat.
If you’re having trouble loosening your calves from stretching, you should also try using the foam roller to put pressure on the muscles.
The Bottom Line
If you are unsure about your squat technique and would like some guidance, reach out to me when I’m live on Tuesdays on Twitch. I do Technique Tuesdays on the second Tuesday of each month for people who post their exercise videos to the #technique-reviews channel of my Coaching Corner Discord server (click here to access). If you aren’t able to attend live, don’t worry! I’ll save the Technique Reviews as a highlight and repost it to my Youtube channel to watch whenever you get the chance :)