Tracking Your Nutrition in Trainerize
Say goodbye to that yearly MyFitnessPal subscription, and say hello to Trainerize nutrition tracking 👋
I’m super excited to announce that Trainerize has recently added a feature that will allow you to track your nutrition within the app.
In the past, I’ve had my clients mainly use MyFitnessPal for tracking their calories and macronutrients. However recent changes in how MyFitnessPal operates (namely, requiring a yearly subscription for use of the barcode scanner 👎) have made me reluctant to continue suggesting it. Thankfully we now have this in-app solution that will simplify things!
How to Enable In-App Meal Tracking
There are now four options available for meal tracking, which you can change at any time (or you can ask me to change it for you). The options are:
In-App - Meal Photos
In-App - Full meal tracking
Integration - Fitbit
Integration - MyFitnessPal
To change over to Trainerize tracking yourself, go to the More section of your Trainerize account on the mobile app and double-check that the Full Meal Tracking has been selected.
How to Track Your Meals Using In-App Meal Tracking
Adding a meal or snack
1. To track a meal on mobile, select “+” on the bottom right to pull up the menu and select Meal.
2. Right away, after selecting to track a “Meal,” snap a photo of your meal, upload a photo from your gallery, or skip the photo and go straight to logging the meal.
Searching for a Food & Barcode Scanning
3. Next you can add in all of the foods that make up your meal. This can be done by searching for the food in the search bar.
Additionally, you can also easily add the item by scanning the barcode (available for the US, Canada, Australia, and the UK).
Any recently selected foods will be stored in the RECENT tab. And by tapping on the name of the food, you will be able to view all of the details of the food. This includes the serving information, calories, macros, and micronutrients.
Tip: If you want the food to appear under your FAVORITES tab for ease of access to your favorite foods, simply tap the heart icon on the top right corner.
Adding Custom Foods
If a food does not exist when you search for the food, you can go to the CUSTOM tab and add a custom food manually.
You will be able to input the name of the food, serving size, calories (all required), including optional info like macros and micronutrient details, and include a photo.
Adding the Meal
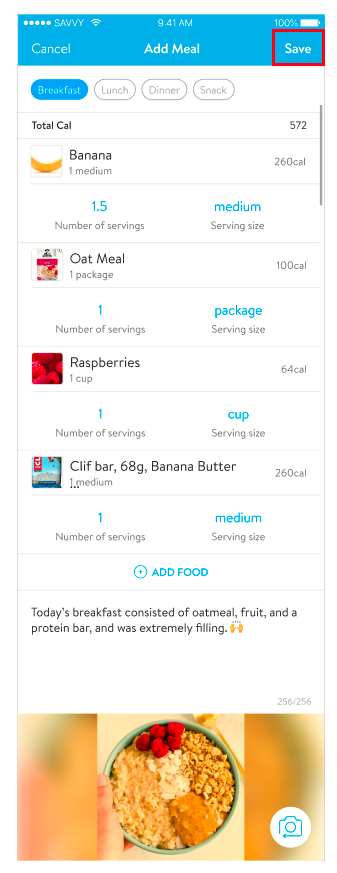
4. After adding in the foods, you will see an overview of what’s been added to the meal. You can adjust the serving size, add in more foods, add a description, and update the photo if you wish then hit SAVE to save the meal. And ta-da! A new meal has been tracked! 🙌
The meal will also be automatically tagged as Breakfast, Lunch, Dinner, or Snack depending on your phone’s time (based on the moment you hit save).
MEAL TIMEFRAMES
breakfast - 06:00am-10:00am (4 hours)
snack 1 - 10:00am-11:30 am (1.5 hours)
lunch - 11:30am- 15:00pm (3.5 hours)
snack 2 - 15:00pm-18:00pm (3 hours)
dinner - 18:00pm-21:00pm (3 hours) after dinner snacks until breakfast
Adding a Past Meal
You can track a past meal by selecting the meal from your meal history.
Click the lower right-hand clock icon to bring up any previously tracked meals.
Select the meal and click Add
There can only be one meal per Breakfast, Lunch, Dinner. If the meal already exists, you will be prompted to replace it with the newer meal or keep the new meal as a snack.
How to add a meal to multiple days
To add a meal to multiple days, follow these steps.
1. In your mobile app, click on the "+" icon at the bottom-right of the screen.
2. Click on the "Date" option at the top.
3. Select the desired dates in the present or past that you wish to add the meal to.
4. Once done, select "Meal".
5. Enter the details of what's in the meal and then click "Next". Once the details of the meal have been entered, click on "Save" at the top-right. Your meal has been saved to multiple dates successfully.
Important note: Meals can only be added to multiple days in the present and/or past. They cannot be added to a date in the future.


